
| Version 55 (modified by jazz, 15 years ago) (diff) |
|---|
hadoop4win 開發筆記
0.1.4 版
- 降低 HADOOP_HEAPSIZE - 因為記憶體不足的電腦會跑不動。(2010-11-19 ITRI)
- [BUG] /var/hadoop 與 /tmp/hbase-${user.name} 會產生在 C: 下,而非 hadoop4win 安裝目錄下。(2011-03-03 Hinet)
- 判斷 java process 的 PID script - 因為 jps 看到的 PID 跟 ps -ef 看到的 PID 不一樣。(2011-03-03 Hinet)
- 加入 ant 與 build.xml 好簡化程式設計步驟 - 參考步驟
0.1.5 版
- 0.1.5 新版想加入的功能
- 整合 Eclipse 開發工具
- 更新 Hadoop、HBase 版本 - 考慮置放一個檔案於網站,以免網路安裝版本一段時間後便無法正常運作。
- NSIS 安裝檔
- [文件] NSIS 繁體中文版說明文件
- 在 Debian / Ubuntu 系列有 nsis 的套件,只是需要學習怎麼使用。
~$ sudo apt-get install nsis
- 加入切換 standalone mode 與 psudo-distributed mode 的 script (2011-03-03 Hinet)
- 預設 standalone mode 的對應 script 與設定檔修改
2010-10-30
- [參考] 從 Re: Cygwin setup.exe via the cygwin shell 的討論可以看到一些參考的語法 (2010-02-03)
setup.exe -d -q -R 'c:\cygwin' -s 'http://mirrors.xmission.com/cygwin/' -l 'c:\cygwin\home\thrall' -P vim,bc
- [參考] Hadoop + HBase + Cygwin + Windows 7 x64 (2010-10-26)
- 測試讓 cygwin setup.exe 從 http://ftp.ntu.edu.tw/pub/cygwin/ 下載到 cygwin_mirror 目錄
REM 純下載 Cygwin Base 分類下的檔案
setup.exe -q -D -O -s http://mirror.mcs.anl.gov/cygwin -C base
REM 把 http 開頭的目錄搬到 cygwin_mirror
move http* cygwin_mirror
REM  用本地目錄 cygwin_mirror 安裝到 c:/hadoop4win
setup.exe -q -d -L -l %cd%/cygwin_mirror -R c:/hadoop4win
pause
2010-12-21
- 學習使用 EclipseNSIS
- [限制] 目前 EclipseNSIS 並不支援 Linux - 開發者覺得工程浩大,暫時不會改。
- [結論] 光安裝就有點麻煩,得先裝 Eclipse 3.5 sr1 版本,然後還有 NSIS 、EclipseNSIS Plugin 要裝。若只是要產生安裝檔,似乎有點工程太大。加上仔細看了一下介紹,似乎都要寫 NSIS Script 腳本,EclipseNSIS 只是多了 InstallOption 的介面設計工具罷了。所以還是改用指令好了~
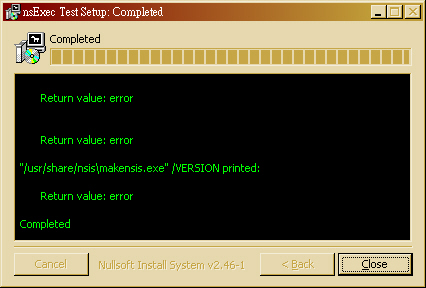
- 在 Ubuntu 10.04 底下測試 NSIS 指令 - 其實只要找對範例程式,也不難寫啦~drbl-winroll 應該是用 nsExec 寫的。
~$ sudo apt-get install nsis
~$ cp /usr/share/doc/nsis/Examples/nsExec/test.nsi .
~$ makensis test.nsi

... 略 ...
Processed 1 file, writing output:
Adding plug-ins initializing function... Done!
Processing pages... Done!
Removing unused resources... Done!
Generating language tables... Done!

Output: "nsExec Test.exe"
Install: 2 pages (128 bytes), 3 sections (3144 bytes), 46 instructions (1288 bytes), 47 strings (946 bytes), 1 language table (198 bytes).
Datablock optimizer saved 8092 bytes (~13.4%).

Using zlib compression.

EXE header size:               48128 / 50688 bytes
Install code:                    987 / 6032 bytes
Install data:                   4046 / 27660 bytes
CRC (0x93CB145C):                  4 / 4 bytes

Total size:                    53165 / 84384 bytes (63.0%)
- 如果要設計網路安裝版,倒也可以用 NSISdl 這個 plugin 來開發。簡單寫一個測試範例,還算蠻簡單的。(注意:底下用 \$ 是為了配合 cat 語法,若直接貼程式碼請拿掉!)
~$ cat > NSISdl.nsi << EOF
Name "NSISdl Plugin Test"
OutFile "NSISdl.exe"

ShowInstDetails show

Section "Download Hadoop"
	NSISdl::download /TIMEOUT=30000 http://ftp.twaren.net/Unix/Web/apache//hadoop/core/hadoop-0.20.2/hadoop-0.20.2.tar.gz hadoop-0.20.2.tar.gz
	Pop \$0
	StrCmp \$0 "success" +3
		MessageBox MB_OK "Download failed: \$0"
		Quit
SectionEnd
EOF
~$ makensis NSISdl.nsi
- 產生出來的 NSISdl.exe 在 Windows 7 上執行的結果如下圖:


- [文件] 多重使用者身份問題:README.MultiUser.gz 這個文件說明了 NSIS 幫忙判斷使用者是否具備 Admin 或 PowerUser 權限的寫法。而 README.StartMenu 則說明了怎麼產生在開始選單的目錄。
~$ zcat /usr/share/doc/nsis/README.MultiUser.gz | less
~$ less /usr/share/doc/nsis/README.StartMenu
- 學習讀取 ini 設定檔 - [參考] /usr/share/doc/nsis/Examples/{FileFunc.nsi.gz, FileFunc.ini}
- 使用 ReadINIStr 這個語法,以 FileFunc.nsi 為例。
- 首先,第一步是找到 INI 檔案的路徑。第 17 行宣告 INI 這個變數。第 723~727 行,設定 INI 這個變數,並且讓它的內容等於編譯時提供的 FileFunc.ini。
- 流程上,透過 .onInit 這個函數宣告初始化流程要做的事情就是把 FileFunc.ini 拷貝到 $PLUGINSDIR 目錄中的暫存檔 $INI。
- 用 InitPluginsDir 這個語法設定 $PLUGINSDIR 目錄變數
- 用 GetTempFileName 這個語法會在 $PLUGINSDIR 目錄產生一個暫存檔,並回傳檔名存放於 $INI 中。
- 用 File 把 FileFunc.ini 拷貝存放到 $INI 的路徑去。
GetTempFileName 使用者變數(輸出) [暫存檔路徑]
File [/nonfatal] [/a] ([/r] [/x 檔案|通配符 [...]] (檔案|通配符) [...] | /oname=輸出路徑\檔案名稱 輸入路徑\檔案名稱)
 17 Var INI

723 Function .onInit
724         InitPluginsDir
725         GetTempFileName $INI $PLUGINSDIR
726         File /oname=$INI "FileFunc.ini"
727 FunctionEnd
- 接著,第 19 行宣告 STATE 變數,並於第 96 行使用 ReadINIStr 從 $INI 的 "[Field 1]" 這個區段(section)的某一項(entry)
ReadINIStr 用戶變量(輸出) INI檔案 區段 項
ReadINIStr user_var(output) ini_filename section_name entry_name
- 在 FileFunc.ini 中就定義了 "[Field 1]" 這一個區段(section),並定義了 State 這一項(entry)。
  5 [Field 1]
  8 State="  1. Locate"
 19 Var STATE
 96         ReadINIStr $STATE $INI "Field 1" "State"
- 4.8.1.45 XPStyle 預設為 off,可用的設定值為 on 或 off。設定安裝程式與反安裝程式是否使用 XP 外觀樣式。
2010-12-28
- Cygwin setup.exe 的參數列表:用 wine 跑 "setup.exe /?" 的結果
2010/12/28 12:30:20 Starting cygwin install, version 2.738
2010/12/28 12:30:20 io_stream_cygfile: fopen(/etc/setup/setup.rc) failed 2 No such file or directory
2010/12/28 12:30:20 io_stream_cygfile: fopen(/etc/setup/last-cache) failed 2 No such file or directory
2010/12/28 12:30:20 io_stream_cygfile: fopen(/etc/setup/last-action) failed 2 No such file or directory
2010/12/28 12:30:20 io_stream_cygfile: fopen(/etc/setup/net-method) failed 2 No such file or directory
2010/12/28 12:30:20 io_stream_cygfile: fopen(/etc/setup/net-proxy-host) failed 2 No such file or directory
2010/12/28 12:30:20 io_stream_cygfile: fopen(/etc/setup/net-proxy-port) failed 2 No such file or directory
2010/12/28 12:30:20 io_stream_cygfile: fopen(/etc/setup/last-mirror) failed 2 No such file or directory
2010/12/28 12:30:20 io_stream_cygfile: fopen(/etc/setup/extrakeys) failed 2 No such file or directory
2010/12/28 12:30:20 io_stream_cygfile: fopen(/etc/setup/chooser_window_settings) failed 2 No such file or directory
2010/12/28 12:30:20 Current Directory: Z:\home\jazz\work
2010/12/28 12:30:20
Command Line Options:
 -D --download                          Download from internet
 -L --local-install                     Install from local directory
 -s --site                              Download site
 -O --only-site                         Ignore all sites except for -s
 -R --root                              Root installation directory
 -P --packages                          Specify packages to install
 -C --categories                        Specify entire categories to install
 -p --proxy                             HTTP/FTP proxy (host:port)
 -q --quiet-mode                        Unattended setup mode
 -M --package-manager                   Semi-attended chooser-only mode
 -h --help                              print help
 -l --local-package-dir                 Local package directory
 -r --no-replaceonreboot                Disable replacing in-use files on next
                                        reboot.
 -X --no-verify                         Don't verify setup.ini signatures
 -n --no-shortcuts                      Disable creation of desktop and start
                                        menu shortcuts
 -N --no-startmenu                      Disable creation of start menu shortcut
 -d --no-desktop                        Disable creation of desktop shortcut
 -K --pubkey                            Path to extra public key file (gpg
                                        format)
 -S --sexpr-pubkey                      Extra public key in s-expr format
 -u --untrusted-keys                    Use untrusted keys from last-extrakeys
 -U --keep-untrusted-keys               Use untrusted keys and retain all
 -A --disable-buggy-antivirus           Disable known or suspected buggy anti
                                        virus software packages during
                                        execution.
Ending cygwin install
2010/12/28 12:30:20 AddAccessAllowedAce(, owner) failed: 1337
2010/12/28 12:30:20 AddAccessAllowedAce(, group) failed: 1337
2010/12/28 12:30:20 AddAccessAllowedAce(, everyone) failed: 1337
2010/12/28 12:30:20 AddAccessAllowedAce(, owner) failed: 1337
2010/12/28 12:30:20 AddAccessAllowedAce(, group) failed: 1337
2010/12/28 12:30:20 AddAccessAllowedAce(, everyone) failed: 1337
2011-04-11
- 嘗試排解 Windows 7 安裝 hadoop4win 的權限問題,但還是會發生 conhost 的錯誤.
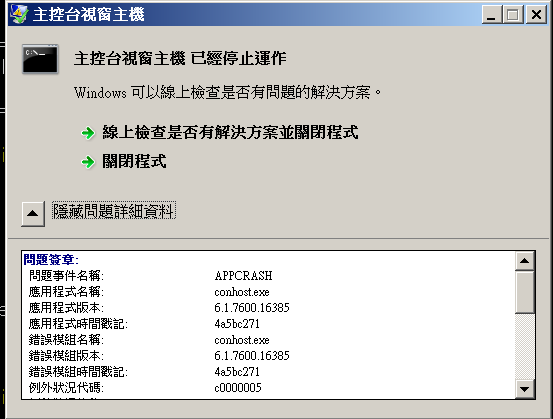
- Win 7的新特性:控制臺主機(ConHost.exe)

2011-04-15
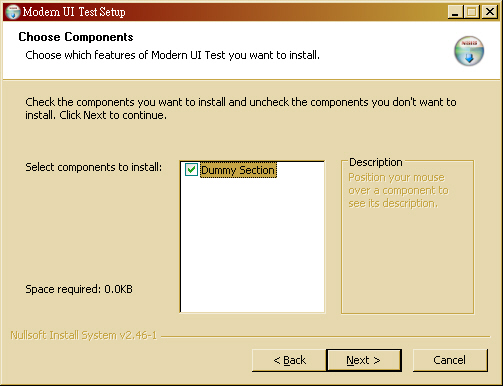
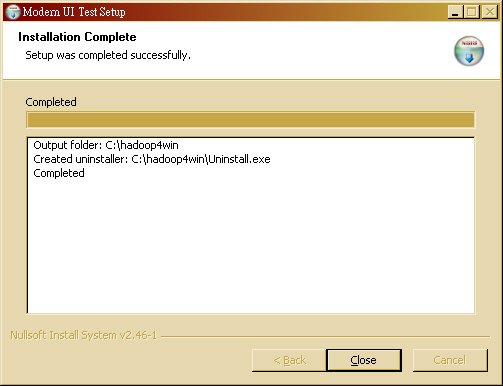
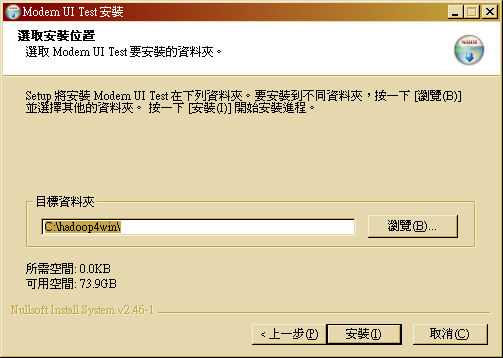
- 直接從 Modern UI 範例開始學 NSIS ~
firefox file:///usr/share/doc/nsis/Docs/Modern%20UI/Readme.html#examples
- 首先,嘗試編譯範例 Basic.nsi
~$ cp /usr/share/doc/nsis/Examples/Modern\ UI/Basic.nsi .
~$ makensis Basic.nsi
- 這個範例蠻單純的,就是在指定安裝的目錄中放 Uninstall.exe


- 接著看 WelcomeFinish.nsi,跟 Basic.nsi 差別就只有四行:
!insertmacro MUI_PAGE_WELCOME
!insertmacro MUI_PAGE_FINISH
!insertmacro MUI_UNPAGE_WELCOME
!insertmacro MUI_UNPAGE_FINISH
~$ cp /usr/share/doc/nsis/Examples/Modern\ UI/WelcomeFinish.nsi .
~$ makensis WelcomeFinish.nsi


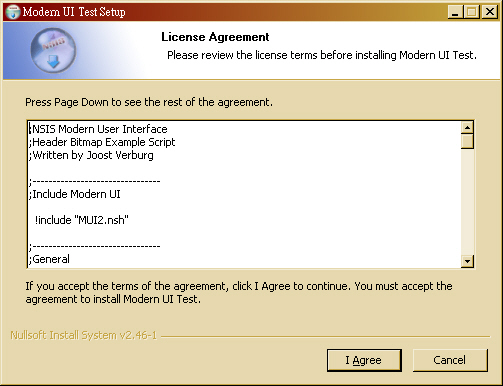
- 至於 HeaderBitmap.nsi 主要則增加兩行:
  !define MUI_HEADERIMAGE
  !define MUI_HEADERIMAGE_BITMAP "圖檔路徑"
~$ cp /usr/share/doc/nsis/Examples/Modern\ UI/HeaderBitmap.nsi .
~$ makensis HeaderBitmap.nsi
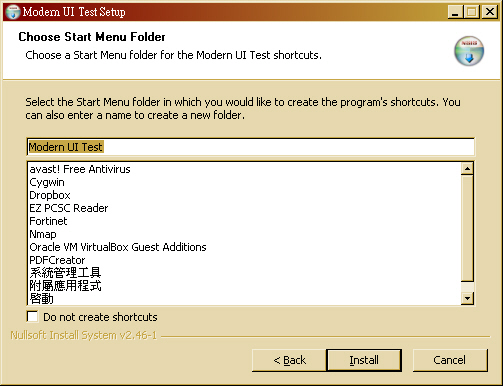
- 若要在開始選單產生目錄,StartMenu.nsi 加了幾個語法
  Var StartMenuFolder

  # 用 Registry 紀錄使用者設定的「開始」選單「目錄名稱」
  !define MUI_STARTMENUPAGE_REGISTRY_ROOT "HKCU"
  !define MUI_STARTMENUPAGE_REGISTRY_KEY "Software\Modern UI Test"
  !define MUI_STARTMENUPAGE_REGISTRY_VALUENAME "Start Menu Folder"

  # 顯示要使用 STARTMENU 的頁面
  !insertmacro MUI_PAGE_STARTMENU Application $StartMenuFolder

 # 把要在「開始」選單中處理的動作,寫在 MUI_STARTMENU_WRITE_BEGIN 跟 MUI_STARTMENU_WRITE_END 頁面中間
 !insertmacro MUI_STARTMENU_WRITE_BEGIN Application

    ;Create shortcuts
    CreateDirectory "$SMPROGRAMS\$StartMenuFolder"
    CreateShortCut "$SMPROGRAMS\$StartMenuFolder\Uninstall.lnk" "$INSTDIR\Uninstall.exe"

  !insertmacro MUI_STARTMENU_WRITE_END

 # 把要從「開始」選端中反安裝的動作,寫在 MUI_STARTMENU_GETFOLDER 之後。
  !insertmacro MUI_STARTMENU_GETFOLDER Application $StartMenuFolder

  Delete "$SMPROGRAMS\$StartMenuFolder\Uninstall.lnk"
  RMDir "$SMPROGRAMS\$StartMenuFolder"
~$ cp /usr/share/doc/nsis/Examples/Modern\ UI/StartMenu.nsi . ~$ makensis StartMenu.nsi
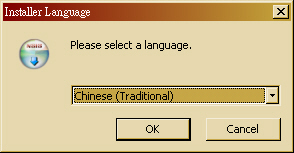
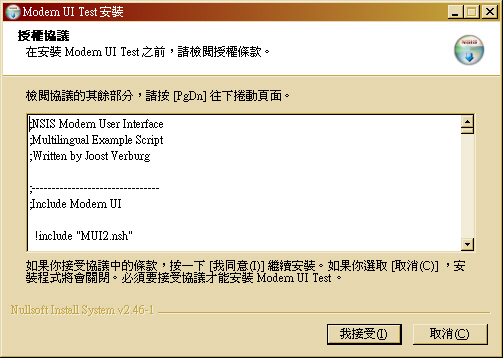
- 比較複雜的是 MultiLanguage.nsi,當然語法主要是加入
  # 用 Registry 紀錄使用者選擇的「語系」
  !define MUI_LANGDLL_REGISTRY_ROOT "HKCU"
  !define MUI_LANGDLL_REGISTRY_KEY "Software\hadoop4win"
  !define MUI_LANGDLL_REGISTRY_VALUENAME "Installer Language"

  # 加入不同語系的巨集,第一個是預設語系
  !insertmacro MUI_LANGUAGE "TradChinese"
  !insertmacro MUI_LANGUAGE "SimpChinese"
  !insertmacro MUI_LANGUAGE "English"

# 在 .onInit 安裝程式初始化的地方,加入多國語系顯示的巨集
Function .onInit
  !insertmacro MUI_LANGDLL_DISPLAY
FunctionEnd
# 在 un.onInit 反安裝程式初始化的地方,加入多國語系顯示的巨集
Function un.onInit
  !insertmacro MUI_UNGETLANGUAGE
FunctionEnd


2011-04-16
- 在 sunny 的 DRBLLiveHelper 原始碼看到 HM NIS EDIT: A Free NSIS Editor/IDE 這個專案。
2011-04-20
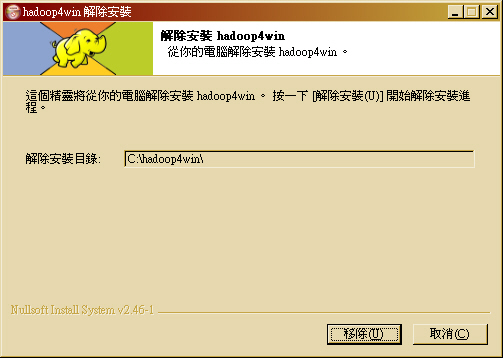
- 把上面看過的幾個範例程式:MultiLanguage.nsi、HeaderBitmap.nsi 跟 StartMenu.nsi 整合在一起。加入 nsExec 跟 NSISdl,撰寫網路安裝版雛型。
- hadoop4win Logo 製作:
- 語法:4.9.1.5 File - 說明要打包進安裝檔的檔案
- 語法:4.6.1.1 AddSize - 告知該 Section 需要多少硬碟空間


2011-04-21
- 實作 hadoop4win-setup-net 網路安裝版,並將程式碼放到 sourceforge 作 SVN 控管。
- http://hadoop4win.svn.sourceforge.net/viewvc/hadoop4win/
2011-04-26
- 由於 Cygwin 1.7.9-1 無法正常運行 wordcount 範例,因此把 hadoop4win-setup-net 網路安裝版的 Cygwin 降級為 1.5.25
- 透過 setup-legacy.exe --help 取得 Cygwin 1.5.25 的安裝參數
Starting cygwin install, version 2.738 Current Directory: E:\ Command Line Options: -D --download Download from internet -L --local-install Install from local directory -s --site Download site -O --only-site Ignore all sites except for -s -R --root Root installation directory -P --packages Specify packages to install -C --categories Specify entire categories to install -p --proxy HTTP/FTP proxy (host:port) -q --quiet-mode Unattended setup mode -M --package-manager Semi-attended chooser-only mode -h --help print help -l --local-package-dir Local package directory -r --no-replaceonreboot Disable replacing in-use files on next reboot. -X --no-verify Don't verify setup.ini signatures -n --no-shortcuts Disable creation of desktop and start menu shortcuts -N --no-startmenu Disable creation of start menu shortcut -d --no-desktop Disable creation of desktop shortcut -K --pubkey Path to extra public key file (gpg format) -S --sexpr-pubkey Extra public key in s-expr format -u --untrusted-keys Use untrusted keys from last-extrakeys -U --keep-untrusted-keys Use untrusted keys and retain all -A --disable-buggy-antivirus Disable known or suspected buggy anti virus software packages during execution. Ending cygwin install - 語法:4.9.14.3 DetailPrint - 顯示訊息到「安裝訊息列表框」
- 語法:4.9.14.14 SetDetailsPrint - 選擇只顯示到狀態列還是列表框
- 語法:nsExec::ExecToLog - 將 Exec 的執行結果顯示到安裝訊息列表框。
- 如何讓 CMD 執行的視窗最小化或在背景執行 - [參考] cmd.exe: how to starts a background process, run some things, stops background process
SET TASK=%RANDOM%-SELENIUM-SERVER-%RANDOM%
start "%TASK%" cmd /k start java -jar "path\selenium-server.jar"
ping -n 5 127.0.0.1 >NUL"
path\Gallio.Echo.exe" "path\MyAssembly.dll"
taskkill /T /FI "WINDOWTITLE eq %TASK%"
2011-05-02
- 應測試發現 Cygwin 1.5.28 版雖然可以正常執行大部分程式,可是無法正常運作 MapReduce( wordcount 範例),必須將舊版 Cygwin 的 mirror 改回 hadoop4win 0.1.4 版的 cygwin-mirror。
- 在 Linux 底下製作的完整版會出現解壓縮錯誤的問題,初步懷疑跟 Unix 與 DOS 的格式差異有關。

- 初步懷疑是 Unix 與 DOS 格式差異造成,但為了編譯方便性,改以 7zip 壓縮整個 cygwin-mirror 目錄,並增加 7z.exe 供安裝過程解壓縮用。
- <失敗> 使用 7zip 的方式雖可避開 cygwin-mirror 的問題,但仍會出現類似的解壓縮問題在解壓縮 jdk1.6.18.zip 時。

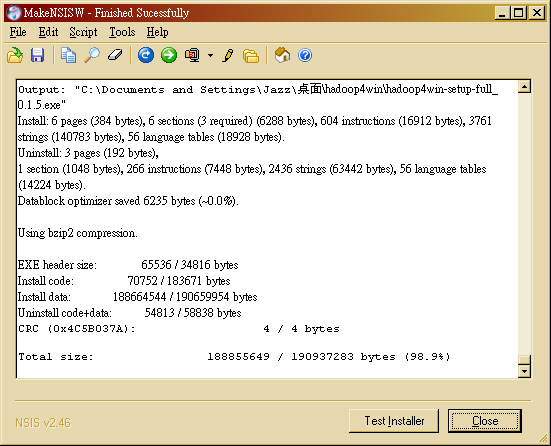
2011-05-03
- 改於 Windows 上安裝 NSIS 進行編譯,初步確認問題是 Unix 與 DOS 格式造成的錯誤。下圖是使用 MakeNSISW 編譯成功的畫面:
- 進行 Windows XP 功能完整性測試 - 成功!!
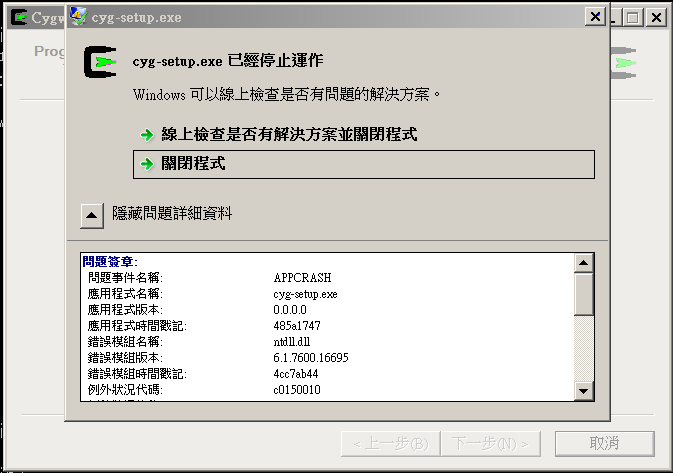
- 進行 Windows 7 功能完整性測試 - 失敗!!


2011-05-15
- <備忘> NSIS 如何新增 Windows 環境變數
- 若是要安裝 Eclipse 的話,就必須把 JDK 的路徑加到環境變數 PATH 中。
2011-06-23
- <備忘> Running Hadoop on Windows
- 本文提到設定 /etc/hosts 的方法是放在 c:\windows\system32\drivers\etc\hosts
Attachments (28)
- 10-12-21_NSISdl_complete.png (14.5 KB) - added by jazz 15 years ago.
- 10-12-21_NSISdl_result.png (13.3 KB) - added by jazz 15 years ago.
- 11-04-15_nsExec_Test.jpg (71.5 KB) - added by jazz 15 years ago.
- 11-04-15_MUI_Basic_1.jpg (96.8 KB) - added by jazz 15 years ago.
- 11-04-15_MUI_Basic_2.jpg (96.6 KB) - added by jazz 15 years ago.
- 11-04-15_MUI_Basic_3.jpg (95.5 KB) - added by jazz 15 years ago.
- 11-04-15_MUI_Basic_4.jpg (75.2 KB) - added by jazz 15 years ago.
- 11-04-15_MUI_Welcome.jpg (114.0 KB) - added by jazz 15 years ago.
- 11-04-15_MUI_Finish.jpg (101.2 KB) - added by jazz 15 years ago.
- 11-04-15_MUI_HeaderBitmap.jpg (99.7 KB) - added by jazz 15 years ago.
- 11-04-15_MUI_StartMenu.jpg (104.3 KB) - added by jazz 15 years ago.
- 11-04-15_MUI_MultiLang_1.jpg (31.6 KB) - added by jazz 15 years ago.
- 11-04-15_MUI_MultiLang_2.jpg (101.8 KB) - added by jazz 15 years ago.
- 11-04-15_MUI_MultiLang_3.jpg (91.9 KB) - added by jazz 15 years ago.
- 11-04-15_MUI_MultiLang_4.jpg (95.4 KB) - added by jazz 15 years ago.
- 11-04-15_MUI_MultiLang_5.jpg (57.6 KB) - added by jazz 15 years ago.
- 11-04-15_MUI_Uninstall.jpg (69.7 KB) - added by jazz 15 years ago.
- 11-04-20_hadoop4win.png (84.4 KB) - added by jazz 15 years ago.
- 11-04-20_hadoop4win-nsis.png (6.1 KB) - added by jazz 15 years ago.
- 11-04-20_hadoop4win-setup-net.jpg (76.0 KB) - added by jazz 15 years ago.
- 11-04-20_hadoop4win-unsetup.jpg (77.4 KB) - added by jazz 15 years ago.
- cygwin-1.5.25.log (2.7 KB) - added by jazz 15 years ago.
- 11-04-26_hadoop4win_size.png (421.1 KB) - added by jazz 15 years ago.
- 11-04-11_win7_conhost_error.png (22.6 KB) - added by jazz 15 years ago.
- 11-05-02_decompress_error.jpg (87.9 KB) - added by jazz 15 years ago.
- 11-05-03_MakeNSIS_Win32.jpg (134.9 KB) - added by jazz 15 years ago.
- 11-05-03_win7_cyg-setup_error.png (25.6 KB) - added by jazz 15 years ago.
- 13-07-01_hive_cygwin.png (19.8 KB) - added by jazz 13 years ago.