
hadoop4win 開發筆記
0.1.4 版
- 降低 HADOOP_HEAPSIZE - 因為記憶體不足的電腦會跑不動。(2010-11-19 ITRI)
- [BUG] /var/hadoop 與 /tmp/hbase-${user.name} 會產生在 C: 下,而非 hadoop4win 安裝目錄下。(2011-03-03 Hinet)
- 判斷 java process 的 PID script - 因為 jps 看到的 PID 跟 ps -ef 看到的 PID 不一樣。(2011-03-03 Hinet)
- 加入 ant 與 build.xml 好簡化程式設計步驟 - 參考步驟
0.1.5 版
- 0.1.5 alpha - 2011/05/03 :
- 改用 NSIS 撰寫 Windows 安裝程式。
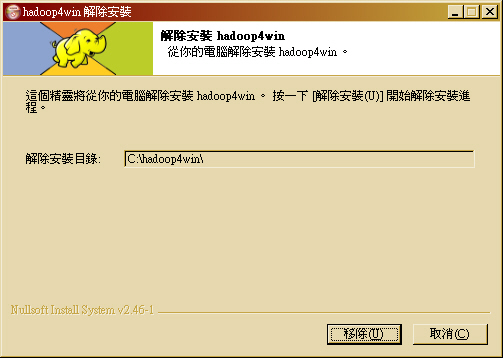
- 新增「開始選單」與「反安裝程式」。
- 修改 hadoop4win-init 安裝流程:
- 自動產生 conf-pseudo 目錄內容,並將原本預設設定目錄移到 conf-local 中。
- 這個做法可以解決 Win7 先前遇到的權限問題。
- 0.1.5 新版想加入的功能
- NSIS 安裝檔
- [文件] NSIS 繁體中文版說明文件
- 在 Debian / Ubuntu 系列有 nsis 的套件,只是需要學習怎麼使用。
~$ sudo apt-get install nsis
- NSIS 安裝檔
2010-10-30
- [參考] 從 Re: Cygwin setup.exe via the cygwin shell 的討論可以看到一些參考的語法 (2010-02-03)
setup.exe -d -q -R 'c:\cygwin' -s 'http://mirrors.xmission.com/cygwin/' -l 'c:\cygwin\home\thrall' -P vim,bc
- [參考] Hadoop + HBase + Cygwin + Windows 7 x64 (2010-10-26)
- 測試讓 cygwin setup.exe 從 http://ftp.ntu.edu.tw/pub/cygwin/ 下載到 cygwin_mirror 目錄
REM 純下載 Cygwin Base 分類下的檔案
setup.exe -q -D -O -s http://mirror.mcs.anl.gov/cygwin -C base
REM 把 http 開頭的目錄搬到 cygwin_mirror
move http* cygwin_mirror
REM  用本地目錄 cygwin_mirror 安裝到 c:/hadoop4win
setup.exe -q -d -L -l %cd%/cygwin_mirror -R c:/hadoop4win
pause
2010-12-21
- 學習使用 EclipseNSIS
- [限制] 目前 EclipseNSIS 並不支援 Linux - 開發者覺得工程浩大,暫時不會改。
- [結論] 光安裝就有點麻煩,得先裝 Eclipse 3.5 sr1 版本,然後還有 NSIS 、EclipseNSIS Plugin 要裝。若只是要產生安裝檔,似乎有點工程太大。加上仔細看了一下介紹,似乎都要寫 NSIS Script 腳本,EclipseNSIS 只是多了 InstallOption 的介面設計工具罷了。所以還是改用指令好了~
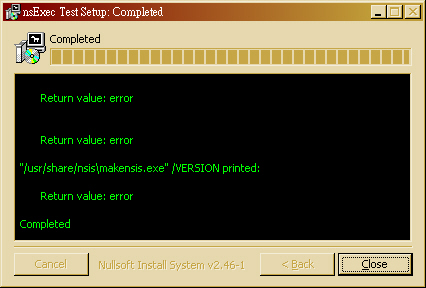
- 在 Ubuntu 10.04 底下測試 NSIS 指令 - 其實只要找對範例程式,也不難寫啦~drbl-winroll 應該是用 nsExec 寫的。
~$ sudo apt-get install nsis
~$ cp /usr/share/doc/nsis/Examples/nsExec/test.nsi .
~$ makensis test.nsi

... 略 ...
Processed 1 file, writing output:
Adding plug-ins initializing function... Done!
Processing pages... Done!
Removing unused resources... Done!
Generating language tables... Done!

Output: "nsExec Test.exe"
Install: 2 pages (128 bytes), 3 sections (3144 bytes), 46 instructions (1288 bytes), 47 strings (946 bytes), 1 language table (198 bytes).
Datablock optimizer saved 8092 bytes (~13.4%).

Using zlib compression.

EXE header size:               48128 / 50688 bytes
Install code:                    987 / 6032 bytes
Install data:                   4046 / 27660 bytes
CRC (0x93CB145C):                  4 / 4 bytes

Total size:                    53165 / 84384 bytes (63.0%)
- 如果要設計網路安裝版,倒也可以用 NSISdl 這個 plugin 來開發。簡單寫一個測試範例,還算蠻簡單的。(注意:底下用 \$ 是為了配合 cat 語法,若直接貼程式碼請拿掉!)
~$ cat > NSISdl.nsi << EOF
Name "NSISdl Plugin Test"
OutFile "NSISdl.exe"

ShowInstDetails show

Section "Download Hadoop"
	NSISdl::download /TIMEOUT=30000 http://ftp.twaren.net/Unix/Web/apache//hadoop/core/hadoop-0.20.2/hadoop-0.20.2.tar.gz hadoop-0.20.2.tar.gz
	Pop \$0
	StrCmp \$0 "success" +3
		MessageBox MB_OK "Download failed: \$0"
		Quit
SectionEnd
EOF
~$ makensis NSISdl.nsi
- 產生出來的 NSISdl.exe 在 Windows 7 上執行的結果如下圖:


- [文件] 多重使用者身份問題:README.MultiUser.gz 這個文件說明了 NSIS 幫忙判斷使用者是否具備 Admin 或 PowerUser 權限的寫法。而 README.StartMenu 則說明了怎麼產生在開始選單的目錄。
~$ zcat /usr/share/doc/nsis/README.MultiUser.gz | less
~$ less /usr/share/doc/nsis/README.StartMenu
- 學習讀取 ini 設定檔 - [參考] /usr/share/doc/nsis/Examples/{FileFunc.nsi.gz, FileFunc.ini}
- 使用 ReadINIStr 這個語法,以 FileFunc.nsi 為例。
- 首先,第一步是找到 INI 檔案的路徑。第 17 行宣告 INI 這個變數。第 723~727 行,設定 INI 這個變數,並且讓它的內容等於編譯時提供的 FileFunc.ini。
- 流程上,透過 .onInit 這個函數宣告初始化流程要做的事情就是把 FileFunc.ini 拷貝到 $PLUGINSDIR 目錄中的暫存檔 $INI。
- 用 InitPluginsDir 這個語法設定 $PLUGINSDIR 目錄變數
- 用 GetTempFileName 這個語法會在 $PLUGINSDIR 目錄產生一個暫存檔,並回傳檔名存放於 $INI 中。
- 用 File 把 FileFunc.ini 拷貝存放到 $INI 的路徑去。
GetTempFileName 使用者變數(輸出) [暫存檔路徑]
File [/nonfatal] [/a] ([/r] [/x 檔案|通配符 [...]] (檔案|通配符) [...] | /oname=輸出路徑\檔案名稱 輸入路徑\檔案名稱)
 17 Var INI

723 Function .onInit
724         InitPluginsDir
725         GetTempFileName $INI $PLUGINSDIR
726         File /oname=$INI "FileFunc.ini"
727 FunctionEnd
- 接著,第 19 行宣告 STATE 變數,並於第 96 行使用 ReadINIStr 從 $INI 的 "[Field 1]" 這個區段(section)的某一項(entry)
ReadINIStr 用戶變量(輸出) INI檔案 區段 項
ReadINIStr user_var(output) ini_filename section_name entry_name
- 在 FileFunc.ini 中就定義了 "[Field 1]" 這一個區段(section),並定義了 State 這一項(entry)。
  5 [Field 1]
  8 State="  1. Locate"
 19 Var STATE
 96         ReadINIStr $STATE $INI "Field 1" "State"
- 4.8.1.45 XPStyle 預設為 off,可用的設定值為 on 或 off。設定安裝程式與反安裝程式是否使用 XP 外觀樣式。
2010-12-28
- Cygwin setup.exe 的參數列表:用 wine 跑 "setup.exe /?" 的結果
2010/12/28 12:30:20 Starting cygwin install, version 2.738
2010/12/28 12:30:20 io_stream_cygfile: fopen(/etc/setup/setup.rc) failed 2 No such file or directory
2010/12/28 12:30:20 io_stream_cygfile: fopen(/etc/setup/last-cache) failed 2 No such file or directory
2010/12/28 12:30:20 io_stream_cygfile: fopen(/etc/setup/last-action) failed 2 No such file or directory
2010/12/28 12:30:20 io_stream_cygfile: fopen(/etc/setup/net-method) failed 2 No such file or directory
2010/12/28 12:30:20 io_stream_cygfile: fopen(/etc/setup/net-proxy-host) failed 2 No such file or directory
2010/12/28 12:30:20 io_stream_cygfile: fopen(/etc/setup/net-proxy-port) failed 2 No such file or directory
2010/12/28 12:30:20 io_stream_cygfile: fopen(/etc/setup/last-mirror) failed 2 No such file or directory
2010/12/28 12:30:20 io_stream_cygfile: fopen(/etc/setup/extrakeys) failed 2 No such file or directory
2010/12/28 12:30:20 io_stream_cygfile: fopen(/etc/setup/chooser_window_settings) failed 2 No such file or directory
2010/12/28 12:30:20 Current Directory: Z:\home\jazz\work
2010/12/28 12:30:20
Command Line Options:
 -D --download                          Download from internet
 -L --local-install                     Install from local directory
 -s --site                              Download site
 -O --only-site                         Ignore all sites except for -s
 -R --root                              Root installation directory
 -P --packages                          Specify packages to install
 -C --categories                        Specify entire categories to install
 -p --proxy                             HTTP/FTP proxy (host:port)
 -q --quiet-mode                        Unattended setup mode
 -M --package-manager                   Semi-attended chooser-only mode
 -h --help                              print help
 -l --local-package-dir                 Local package directory
 -r --no-replaceonreboot                Disable replacing in-use files on next
                                        reboot.
 -X --no-verify                         Don't verify setup.ini signatures
 -n --no-shortcuts                      Disable creation of desktop and start
                                        menu shortcuts
 -N --no-startmenu                      Disable creation of start menu shortcut
 -d --no-desktop                        Disable creation of desktop shortcut
 -K --pubkey                            Path to extra public key file (gpg
                                        format)
 -S --sexpr-pubkey                      Extra public key in s-expr format
 -u --untrusted-keys                    Use untrusted keys from last-extrakeys
 -U --keep-untrusted-keys               Use untrusted keys and retain all
 -A --disable-buggy-antivirus           Disable known or suspected buggy anti
                                        virus software packages during
                                        execution.
Ending cygwin install
2010/12/28 12:30:20 AddAccessAllowedAce(, owner) failed: 1337
2010/12/28 12:30:20 AddAccessAllowedAce(, group) failed: 1337
2010/12/28 12:30:20 AddAccessAllowedAce(, everyone) failed: 1337
2010/12/28 12:30:20 AddAccessAllowedAce(, owner) failed: 1337
2010/12/28 12:30:20 AddAccessAllowedAce(, group) failed: 1337
2010/12/28 12:30:20 AddAccessAllowedAce(, everyone) failed: 1337
2011-04-11
- 嘗試排解 Windows 7 安裝 hadoop4win 的權限問題,但還是會發生 conhost 的錯誤.
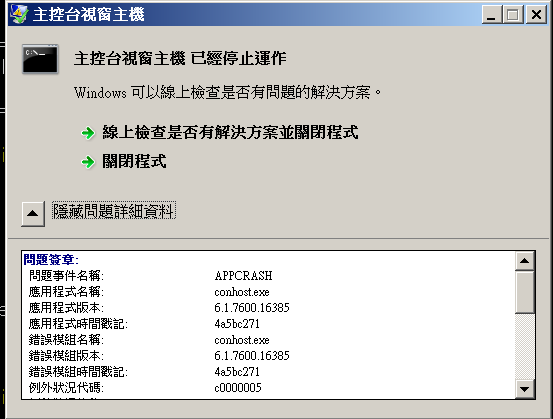
- Win 7的新特性:控制臺主機(ConHost.exe)

2011-04-15
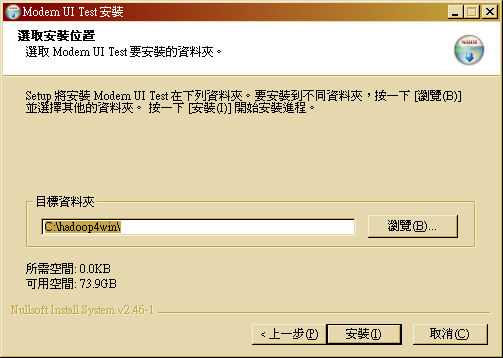
- 直接從 Modern UI 範例開始學 NSIS ~
firefox file:///usr/share/doc/nsis/Docs/Modern%20UI/Readme.html#examples
- 首先,嘗試編譯範例 Basic.nsi
~$ cp /usr/share/doc/nsis/Examples/Modern\ UI/Basic.nsi .
~$ makensis Basic.nsi
- 這個範例蠻單純的,就是在指定安裝的目錄中放 Uninstall.exe


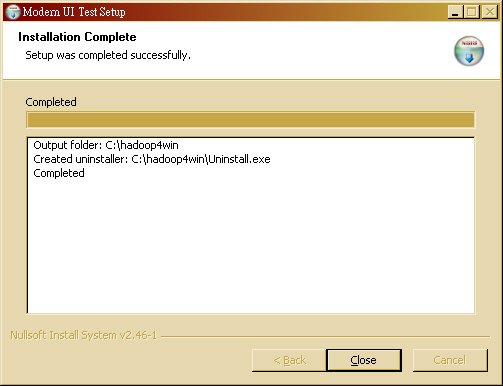
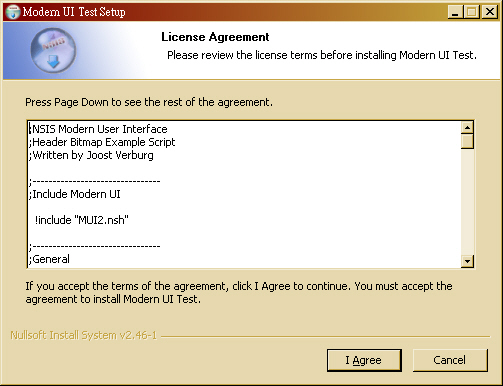
- 接著看 WelcomeFinish.nsi,跟 Basic.nsi 差別就只有四行:
!insertmacro MUI_PAGE_WELCOME
!insertmacro MUI_PAGE_FINISH
!insertmacro MUI_UNPAGE_WELCOME
!insertmacro MUI_UNPAGE_FINISH
~$ cp /usr/share/doc/nsis/Examples/Modern\ UI/WelcomeFinish.nsi .
~$ makensis WelcomeFinish.nsi


- 至於 HeaderBitmap.nsi 主要則增加兩行:
  !define MUI_HEADERIMAGE
  !define MUI_HEADERIMAGE_BITMAP "圖檔路徑"
~$ cp /usr/share/doc/nsis/Examples/Modern\ UI/HeaderBitmap.nsi .
~$ makensis HeaderBitmap.nsi
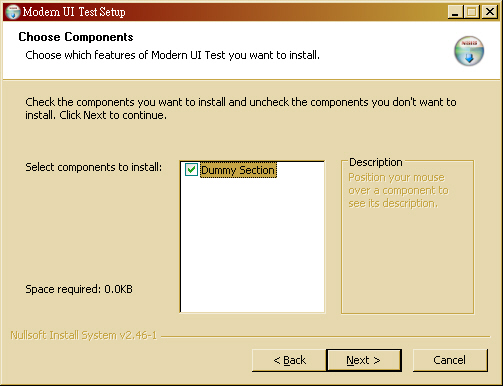
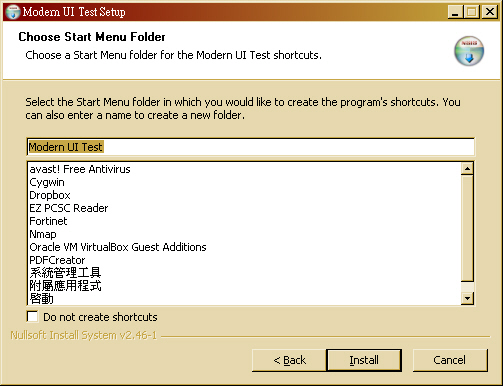
- 若要在開始選單產生目錄,StartMenu.nsi 加了幾個語法
  Var StartMenuFolder

  # 用 Registry 紀錄使用者設定的「開始」選單「目錄名稱」
  !define MUI_STARTMENUPAGE_REGISTRY_ROOT "HKCU"
  !define MUI_STARTMENUPAGE_REGISTRY_KEY "Software\Modern UI Test"
  !define MUI_STARTMENUPAGE_REGISTRY_VALUENAME "Start Menu Folder"

  # 顯示要使用 STARTMENU 的頁面
  !insertmacro MUI_PAGE_STARTMENU Application $StartMenuFolder

 # 把要在「開始」選單中處理的動作,寫在 MUI_STARTMENU_WRITE_BEGIN 跟 MUI_STARTMENU_WRITE_END 頁面中間
 !insertmacro MUI_STARTMENU_WRITE_BEGIN Application

    ;Create shortcuts
    CreateDirectory "$SMPROGRAMS\$StartMenuFolder"
    CreateShortCut "$SMPROGRAMS\$StartMenuFolder\Uninstall.lnk" "$INSTDIR\Uninstall.exe"

  !insertmacro MUI_STARTMENU_WRITE_END

 # 把要從「開始」選端中反安裝的動作,寫在 MUI_STARTMENU_GETFOLDER 之後。
  !insertmacro MUI_STARTMENU_GETFOLDER Application $StartMenuFolder

  Delete "$SMPROGRAMS\$StartMenuFolder\Uninstall.lnk"
  RMDir "$SMPROGRAMS\$StartMenuFolder"
~$ cp /usr/share/doc/nsis/Examples/Modern\ UI/StartMenu.nsi . ~$ makensis StartMenu.nsi
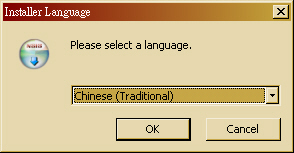
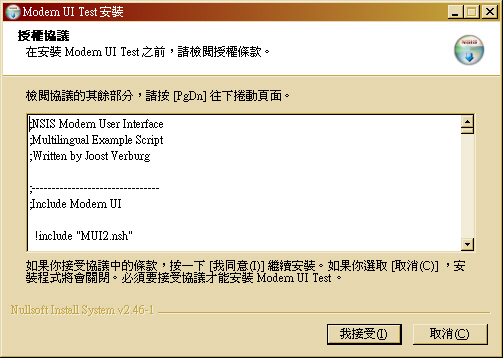
- 比較複雜的是 MultiLanguage.nsi,當然語法主要是加入
  # 用 Registry 紀錄使用者選擇的「語系」
  !define MUI_LANGDLL_REGISTRY_ROOT "HKCU"
  !define MUI_LANGDLL_REGISTRY_KEY "Software\hadoop4win"
  !define MUI_LANGDLL_REGISTRY_VALUENAME "Installer Language"

  # 加入不同語系的巨集,第一個是預設語系
  !insertmacro MUI_LANGUAGE "TradChinese"
  !insertmacro MUI_LANGUAGE "SimpChinese"
  !insertmacro MUI_LANGUAGE "English"

# 在 .onInit 安裝程式初始化的地方,加入多國語系顯示的巨集
Function .onInit
  !insertmacro MUI_LANGDLL_DISPLAY
FunctionEnd
# 在 un.onInit 反安裝程式初始化的地方,加入多國語系顯示的巨集
Function un.onInit
  !insertmacro MUI_UNGETLANGUAGE
FunctionEnd


2011-04-16
- 在 sunny 的 DRBLLiveHelper 原始碼看到 HM NIS EDIT: A Free NSIS Editor/IDE 這個專案。
2011-04-20
- 把上面看過的幾個範例程式:MultiLanguage.nsi、HeaderBitmap.nsi 跟 StartMenu.nsi 整合在一起。加入 nsExec 跟 NSISdl,撰寫網路安裝版雛型。
- hadoop4win Logo 製作:
- 語法:4.9.1.5 File - 說明要打包進安裝檔的檔案
- 語法:4.6.1.1 AddSize - 告知該 Section 需要多少硬碟空間


2011-04-21
- 實作 hadoop4win-setup-net 網路安裝版,並將程式碼放到 sourceforge 作 SVN 控管。
- http://hadoop4win.svn.sourceforge.net/viewvc/hadoop4win/
2011-04-26
- 由於 Cygwin 1.7.9-1 無法正常運行 wordcount 範例,因此把 hadoop4win-setup-net 網路安裝版的 Cygwin 降級為 1.5.25
- 透過 setup-legacy.exe --help 取得 Cygwin 1.5.25 的安裝參數
Starting cygwin install, version 2.738 Current Directory: E:\ Command Line Options: -D --download Download from internet -L --local-install Install from local directory -s --site Download site -O --only-site Ignore all sites except for -s -R --root Root installation directory -P --packages Specify packages to install -C --categories Specify entire categories to install -p --proxy HTTP/FTP proxy (host:port) -q --quiet-mode Unattended setup mode -M --package-manager Semi-attended chooser-only mode -h --help print help -l --local-package-dir Local package directory -r --no-replaceonreboot Disable replacing in-use files on next reboot. -X --no-verify Don't verify setup.ini signatures -n --no-shortcuts Disable creation of desktop and start menu shortcuts -N --no-startmenu Disable creation of start menu shortcut -d --no-desktop Disable creation of desktop shortcut -K --pubkey Path to extra public key file (gpg format) -S --sexpr-pubkey Extra public key in s-expr format -u --untrusted-keys Use untrusted keys from last-extrakeys -U --keep-untrusted-keys Use untrusted keys and retain all -A --disable-buggy-antivirus Disable known or suspected buggy anti virus software packages during execution. Ending cygwin install - 語法:4.9.14.3 DetailPrint - 顯示訊息到「安裝訊息列表框」
- 語法:4.9.14.14 SetDetailsPrint - 選擇只顯示到狀態列還是列表框
- 語法:nsExec::ExecToLog - 將 Exec 的執行結果顯示到安裝訊息列表框。
- 如何讓 CMD 執行的視窗最小化或在背景執行 - [參考] cmd.exe: how to starts a background process, run some things, stops background process
SET TASK=%RANDOM%-SELENIUM-SERVER-%RANDOM%
start "%TASK%" cmd /k start java -jar "path\selenium-server.jar"
ping -n 5 127.0.0.1 >NUL"
path\Gallio.Echo.exe" "path\MyAssembly.dll"
taskkill /T /FI "WINDOWTITLE eq %TASK%"
2011-05-02
- 應測試發現 Cygwin 1.5.28 版雖然可以正常執行大部分程式,可是無法正常運作 MapReduce( wordcount 範例),必須將舊版 Cygwin 的 mirror 改回 hadoop4win 0.1.4 版的 cygwin-mirror。
- 在 Linux 底下製作的完整版會出現解壓縮錯誤的問題,初步懷疑跟 Unix 與 DOS 的格式差異有關。

- 初步懷疑是 Unix 與 DOS 格式差異造成,但為了編譯方便性,改以 7zip 壓縮整個 cygwin-mirror 目錄,並增加 7z.exe 供安裝過程解壓縮用。
- <失敗> 使用 7zip 的方式雖可避開 cygwin-mirror 的問題,但仍會出現類似的解壓縮問題在解壓縮 jdk1.6.18.zip 時。

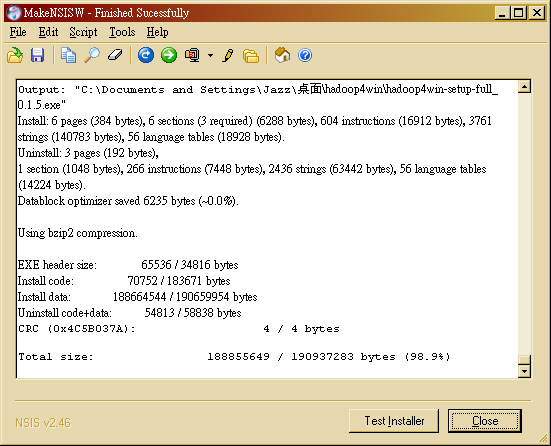
2011-05-03
- 改於 Windows 上安裝 NSIS 進行編譯,初步確認問題是 Unix 與 DOS 格式造成的錯誤。下圖是使用 MakeNSISW 編譯成功的畫面:
- 進行 Windows XP 功能完整性測試 - 成功!!
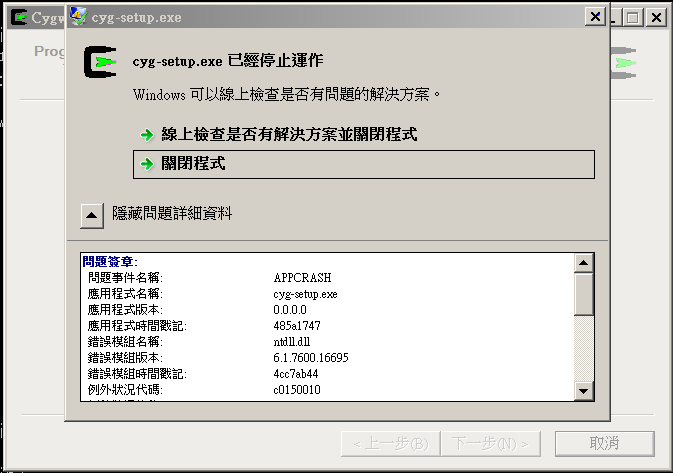
- 進行 Windows 7 功能完整性測試 - 失敗!!


2011-05-15
- <備忘> NSIS 如何新增 Windows 環境變數
- 若是要安裝 Eclipse 的話,就必須把 JDK 的路徑加到環境變數 PATH 中。
2011-05-24
- (2011-05-24)
- Hadoop in Azure - 介紹如何在 Windows Azure 平台上佈署 Hadoop 叢集。看起來跟 HADOOP-6767 "Patch for running Hadoop on Windows without Cygwin" 這個 patch 的作法類似,都是透過 Java Service Wrapper 有關。只是 HADOOP-6767 用的是 GPL / Commercial 混合授權的 JSW (Java Service Wrapper),而這篇文章的作者用的是YAJSW(Yet Another Java Service Wrapper)。但是基本精神很清楚,就是盡可能地用 Windows 的 CMD 或 BAT 來取代原本 hadoop 這隻 bash shell script。如此就可以不依賴 Cygwin 環境,並且把 Hadoop Service 以 Windows Service 方式跑在背景。
2011-06-23
- <備忘> Running Hadoop on Windows
- 本文提到設定 /etc/hosts 的方法是放在 c:\windows\system32\drivers\etc\hosts
- <參考> 維基百科有說明不同作業系統版本的擺放位置 - http://en.wikipedia.org/wiki/Hosts_%28file%29
2011-07-07
- <備忘> 使用 favicon.ico Generator 來產生不同專案的 icon 檔 (參考:2009-02-01)
- 近期覺得 Pig 跟 Hive 也挺好用的,而且又是單機版程式,所以可以放入 hadoop4win 的範疇。
2011-10-04
- <備忘> Windows PowerShell 的新功能
- 由於 Windows 7 的支援不佳,或許該考慮使用 PowerShell 來取代 Cygwin 的功能
2011-12-07
- <備忘> Getting Started with Apache Hadoop 0.23.0 (2011-12-04)
2012-01-02
- <備忘> Apache Hadoop On Windows - 微軟官方 Technet 的技術文件,說明如何在不同的 Windows 平台上架設 Hadoop
- Apache Hadoop on Windows Azure - MSDN 部落格說明在 Windows Azure 上執行 Hadoop 的 Step-by-Step
2012-01-05
- <備忘> Starting the HBase Server from Eclipse
- 這篇文章裡面提到用 Eclipse 搭配一些類別,就可以在 Windows 底下搭配 Cygwin 啟動 HBase 的方式,還會有 Windows 背景運行的圖示在系統列,挺有趣的。


2012-01-23
- <備忘> Latest step by Step Installation guide for dummies: Nutch 0.9 - 在 Cygwin 環境中搭建 Nutch 0.9 版本的步驟
0.1.6 版
- 0.1.6 新版想加入的功能
- 整合 Eclipse 開發工具
- 更新 Hadoop、HBase 版本 - 考慮置放一個檔案於網站,以免網路安裝版本一段時間後便無法正常運作。
- 加入切換 standalone mode 與 psudo-distributed mode 的 script (2011-03-03 Hinet)
- 預設 standalone mode 的對應 script 與設定檔修改
2012-03-09
- 由於 trac 的 svn 裡有 hadoop4win-setup 目錄,而 sourceforge 的 svn 紀錄是新的,所以想試試看能否合併。
- [參考] SourceForge 的 SVN 匯入文件有提到 Filtering the dump file (optional)
- [參考] SVNBOOK 也有提到 Filtering Repository History
- 採用 SVNBOOK 的步驟,首先把 hadoop4win 的部份獨立成一個 Repository
jazz@Wdebian:~/trac_pool/trac_pool/grid$ svnadmin dump svnroot/ > grid_svn_dumpfile
.......
* Dumped revision 248.
jazz@Wdebian:~/trac_pool/trac_pool/grid$ svndumpfilter include --drop-empty-revs --renumber-revs hadoop4win-setup <  grid_svn_dumpfile > hadoop4win_dumpfile
jazz@Wdebian:~/trac_pool/trac_pool/grid$ svnadmin create hadoop4win
jazz@Wdebian:~/trac_pool/trac_pool/grid$ svnadmin load --ignore-uuid hadoop4win < hadoop4win_dumpfile
........
------- Committed revision 30 >>>
jazz@Wdebian:~/trac_pool/trac_pool/grid$ rm grid_svn_dumpfile hadoop4win_dumpfile
jazz@Wdebian:~/trac_pool/trac_pool/grid$ mv hadoop4win ~/hadoop4win_trac
- 做到這一步,我們可以拿到一個只有 hadoop4win-setup 這個目錄的 svnroot。(這裡我多用了 --drop-empty-revs 跟 --renumber-revs 兩個參數,如此可以讓原本 248 個 changeset 的 grid repository 過濾成只有 30 個 changeset 的 hadoop4win repository.
- 根據 sourceforge 的說明,可以用 rsync 方式取回
jazz@Wdebian:~$ mkdir -p hadoop4win_sf
jazz@Wdebian:~$ cd hadoop4win_sf/
jazz@Wdebian:~/hadoop4win_sf$ rsync -av hadoop4win.svn.sf.net::svn/hadoop4win/* .
jazz@Wdebian:~/hadoop4win_sf$ cd
jazz@Wdebian:~$ svnadmin dump hadoop4win_sf/ > hadoop4win_sf_dumpfile
..........
* Dumped revision 15.
jazz@Wdebian:~$ svnadmin load --ignore-uuid hadoop4win_trac/ < hadoop4win_sf_dumpfile
..........
------- Committed new rev 45 (loaded from original rev 15) >>>
- 做到這一步,算是完整地將整個專案 SVN 合併成一個。好在時間點兩個是相互錯開的,不然還真不知道怎麼根據時間點順序做合併呢!
- 接著把這個 SVN repository 用 svnadmin dump 指令先產生一個 hadoop4win_dumpfile 的檔案。然後 scp 到 shell.sf.net
jazz@Wdebian:~$ svnadmin dump hadoop4win_trac/ > hadoop4win_dumpfile
....
* Dumped revision 45.
jazz@Wdebian:~$ scp hadoop4win_dumpfile jazzwang,hadoop4win@shell.sf.net:.
- 登入 shell.sf.net
jazz@Wdebian:~$ ssh -t jazzwang,hadoop4win@shell.sf.net create
[jazzwang@shell-24009 ~]$ adminrepo --checkout svn
[jazzwang@shell-24009 ~]$ rm -rf /svnroot/hadoop4win/*
[jazzwang@shell-24009 ~]$ svnadmin create /svnroot/hadoop4win
[jazzwang@shell-24009 ~]$ svnadmin load --ignore-uuid /svnroot/hadoop4win/ < hadoop4win_dumpfile
[jazzwang@shell-24009 ~]$ adminrepo --save svn

**** Ignoring the contents of the hooks directory (hooks are managed via the web) ****

Save and unlock the svn repository for hadoop4win? [ny] y
- 這樣就算是完整把整個開發過程移植到 sourceforge 去啦!!!!大功告成!!!
- 同步上去以後,ViewCV 的結果是正確的,不過 trac 不正確。出現底下的錯誤訊息,只好請 sourceforge 管理員幫忙了~開單
Warning: Can't synchronize with the repository (The 'repository_dir' has changed,
a 'trac-admin resync' operation is needed.). Look in the Trac log for more information.
2012-03-12
- 有讀寫權限取出 sf.net SVN repository 的指令:
~$ svn co https://hadoop4win.svn.sf.net/svnroot/hadoop4win hadoop4win
- 線上查 Hadoop4Win Trac SVN 歷史紀錄
2012-06-06
- Changes
- updated for hadoop, hbase, ant, pig and hive
- upgrade to hadoop 1.0.3
- upgrade to hbase 0.92.1
- upgrade to pig 0.10.0
- upgrade to hive 0.8.1
- add make-release.sh
- for core-developers on Linux to build source package for Windows
- add VERSION
- an notation of package version
- add configure.bat
- for anyone who would like to build their own setup files on Windows
2012-06-07
- Changes
- add files/apt-cyg
- for upgrade in future
- modified my_packages/hadoop/bin/hadoop4win-init
- change JDK from Sun JDK 6 to Open JDK 7
- modified hadoop4win-full.nsi
- BUGFIX: change pig version
- add -P option for cygwin setup.exe to add needed packages
- fix JDK path to openjdk-7-b146-windows-i586-20_jun_2011.zip
- modified configure.bat
- add wget package
2012-06-11
- Changes
- modified my_packages/hbase/bin/start-hbase
- modified my_packages/hadoop/bin/start-hadoop
- fix issue: jps of JDK 1.0.6 update 21 could not list java process start with cygstart
- modified my_packages/hadoop/bin/hadoop4win-init
- HADOOP_HOME is depricated since 1.0.3
- set hadoop.tmp.dir with cygpath
- add apt-cyg
- do not create folder for datanode for building windows hadoop cluster
- add conf-full and its related configuration files
- link /cygdrive/${DRIVE}/var/hadoop to /var/hadoop
- modified hadoop4win-full.nsi
- add apt-cyg
- openjdk 7 could not list java process with jps (maybe it's the same issue of listed above)
- modified configure.bat
- fixed path of cyg-setup.exe
2012-07-19
- modified hadoop4win-full.nsi
- change from hadoop 1.0.3 back to hadoop 0.20.2 since 1.0.3 could not chmod ${hadoop.tmp.dir}/mapred/ttprivate
- modified my_packages/hadoop/bin/hadoop4win-init
- add back $HADOOP_HOME for hadoop 0.20.2
- add files/download.sh
- for downloading package files for hadoop4win-full.nsi
- modified make-release.sh
- remove make-release.sh from the release zip file
- [參考] 如何關閉Windows使用者帳戶控制(UAC)?
- [參考] Disabling User Account Control (UAC) in Windows 7
- [參考] Installation/Uninstallation with UAC enabled for Windows 7 and Vista
2012-07-20
- 不管在 Windows 7 或 Windows XP 上測試,DataNode 都無法正常取得剩餘空間。看起來是 Cygwin 新版的 du 造成的困擾。
Cluster Summary
1 files and directories, 0 blocks = 1 total. Heap Size is 15.5 MB / 123.75 MB (12%)
Configured Capacity : 0 KB DFS Used : 2 KB Non DFS Used : 0 KB DFS Remaining : 0 KB DFS Used% : 100 % DFS Remaining% : 0 % Live Nodes : 1 Dead Nodes : 0 2012-07-20 13:57:04,770 WARN org.apache.hadoop.hdfs.server.datanode.DataNode: java.io.IOException: Expecting a line not the end of stream at org.apache.hadoop.fs.DF.parseExecResult(DF.java:109) at org.apache.hadoop.util.Shell.runCommand(Shell.java:179) at org.apache.hadoop.util.Shell.run(Shell.java:134) at org.apache.hadoop.fs.DF.getCapacity(DF.java:63) at org.apache.hadoop.hdfs.server.datanode.FSDataset$FSVolume.getCapacity(FSDataset.java:346) at org.apache.hadoop.hdfs.server.datanode.FSDataset$FSVolumeSet.getCapacity(FSDataset.java:512) at org.apache.hadoop.hdfs.server.datanode.FSDataset.getCapacity(FSDataset.java:708) at org.apache.hadoop.hdfs.server.datanode.DataNode.offerService(DataNode.java:702) at org.apache.hadoop.hdfs.server.datanode.DataNode.run(DataNode.java:1186) at java.lang.Thread.run(Thread.java:619)
- [參考] Add link to welcome page (MUI) - 在安裝介面加入歡迎頁面(未來可能得加入 NCHC 字樣,,
- [參考] Creating language files and integrating with MUI - 怎麼讓 NSIS 支援 PO 多國語系翻譯
- 既然 hadoop 1.0.3 可以正常在 cygwin 運行 HDFS,卻無法正常運行 MapReduce,而 hadoop 0.20.2 無法正常運行 HDFS,乾脆就從 1.0.3 開始解 Bug 好了。
- 如果需要改某幾行 Code 又不想重新打包整個專案,可以怎麼把某個 Jar 檔的單一或某幾個 class 檔換掉呢?我查了一下 patch jar file 的方法
- [參考] Is there are way to patch jar files? 有提到解法,但是得注意可能會破壞掉有金鑰簽章的 jar 檔。
jar uf foo.jar foo.class
或
jar umf foo.jar foo.class
- 其次也有看到一個工具叫作 jardiff 可以比對兩個 jar 檔的差異。
- 跑法:
jardiff -f 舊的版本.jar -t 新的版本.jar -o html -O diff.html
- 跑法:
- hadoop 1.0.3 在 Win7 上面的問題:
2012-07-20 17:47:35,099 INFO org.apache.hadoop.mapred.TaskTracker: Good mapred local directories are: /hadoop4win/var/hadoop/hadoop-jazz/mapred/local
2012-07-20 17:47:35,099 WARN org.apache.hadoop.util.NativeCodeLoader: Unable to load native-hadoop library for your platform... using builtin-java classes where applicable
2012-07-20 17:47:35,109 ERROR org.apache.hadoop.mapred.TaskTracker: Can not start task tracker because java.io.IOException: Failed to set permissions of path: \hadoop4win\var\hadoop\hadoop-jazz\mapred\local\ttprivate to 0700
	at org.apache.hadoop.fs.FileUtil.checkReturnValue(FileUtil.java:689)
	at org.apache.hadoop.fs.FileUtil.setPermission(FileUtil.java:662)
	at org.apache.hadoop.fs.RawLocalFileSystem.setPermission(RawLocalFileSystem.java:509)
	at org.apache.hadoop.fs.RawLocalFileSystem.mkdirs(RawLocalFileSystem.java:344)
	at org.apache.hadoop.fs.FilterFileSystem.mkdirs(FilterFileSystem.java:189)
	at org.apache.hadoop.mapred.TaskTracker.initialize(TaskTracker.java:728)
	at org.apache.hadoop.mapred.TaskTracker.<init>(TaskTracker.java:1459)
	at org.apache.hadoop.mapred.TaskTracker.main(TaskTracker.java:3742)
2012-07-21
- 目前遇到的狀況已經有人反映在 HADOOP-7682
- [解法] 參考 http://en.wikisource.org/wiki/User:Fkorning/Code/Hadoop-on-Cygwin 或 http://sourceforge.net/p/win-hadoop/wiki/Home/
- 學習用 log4j 進行除錯
- 編輯 ${HADOOP_HOME}/conf/log4j.properties
- Hadoop enable logging
log4j.logger.org.apache.hadoop = DEBUG
- 或把 hadoop.root.logger 從 INFO 改成 DEBUG
hadoop.root.logger=DEBUG,console
- 這次我想看的主要是 TaskTracker 的 BUG,也可以只打開以下的參數 (原 log4j.properties 內容已有這行,刪除註解即可)
log4j.logger.org.apache.hadoop.mapred.TaskTracker=DEBUG
- 由於每次都要 compile code, 更新 jar 檔(用 jar uf),所以乾脆查了一下怎麼用 ant 作 jar 的更新。
- [參考] http://ant.apache.org/manual/Tasks/jar.html
- [參考] http://ant.apache.org/manual/Tasks/javac.html
- 其次,如果 javac 的參數沒有加上 -g 的話,會沒有除錯資訊(例如行號),就會出現類似底下的錯誤訊息。
(unknow source)
- 修改 http://hadoop.nchc.org.tw/~jazz/build.xml 如下:
-
build.xml
old new 2 2 <property name="bindir" value="${basedir}/bin" /> 3 3 <property name="docdir" value="${basedir}/doc" /> 4 4 <property name="srcdir" value="${basedir}/src" /> 5 <property name="jarname" value="${ basedir}/output.jar" />6 <property name="hadoop-home" value=" /usr/lib/hadoop" />5 <property name="jarname" value="${hadoop-home}/hadoop-core-1.0.3.jar" /> 6 <property name="hadoop-home" value="c:/hadoop4win/opt/hadoop" /> 7 7 <property name="hadoop-libs" value="${hadoop-home}/lib" /> 8 8 <property name="hadoop-contrib" value="${hadoop-home}/contrib" /> 9 9 10 10 <target name="compile" description="Compile all Java sources"> 11 11 <mkdir dir="${bindir}" /> 12 <javac de stdir="${bindir}">12 <javac debug="true" destdir="${bindir}"> 13 13 <src path="${srcdir}" /> 14 14 <classpath> 15 15 <fileset dir="${hadoop-libs}"> … … 38 38 </target> 39 39 40 40 <target name="jar" depends="compile,doc" description="Package the classes into a .jar file"> 41 <jar destfile="${jarname}" basedir="${bindir}" />41 <jar update="true" destfile="${jarname}" basedir="${bindir}" /> 42 42 </target> 43 43 44 44 <target name="clean" description="Remove all compilation products to ensure a clean build">
-
- 查詢是否更新
~$ jar tvfm $(cygpath -w /opt/hadoop/hadoop-core-1.0.3.jar) . | grep FileUtil
2012-08-09
- 本來想要父親節把 hadoop 1.0.6 搞定的,結果因為種種因素還是來不及。今天剛好有人在問 HBase 安裝,結果發現 HBase 的父親節禮物~
[DIR] hbase-0.94.1/ 08-Aug-2012 13:32 -
- 好吧~那先來 Hadoop 1.0.3 跟 HBase 0.94.1 的安裝腳本好了~
~$ wget http://hadoop.nchc.org.tw/~jazz/temp/install-hadoop-1.0.3-precise
~$ wget http://hadoop.nchc.org.tw/~jazz/temp/install-hbase-0.94.1-precise
~$ chmod a+x install-*-precise
~$ ./install-hadoop-1.0.3-precise
~$ ./install-hbase-0.94.1-precise
2012-08-10
- 振凱建議可以參考兩個 NSIS Plugin
- 處理惱人的 Win7 UAC 權限問題
- 處理防火牆(Ex. SSH 允許權限, 50030, 50070 開 port 的權限)
2012-12-05
- HBase 2012-11-15 釋出 0.94.3 穩定版本
Index of /Unix/Web/apache/hbase/stable

[   ] hbase-0.94.3-security.tar.gz     15-Nov-2012 05:06   47M
[TXT] hbase-0.94.3-security.tar.gz.asc 15-Nov-2012 05:06  836
[   ] hbase-0.94.3.tar.gz              15-Nov-2012 05:14   46M
[TXT] hbase-0.94.3.tar.gz.asc          15-Nov-2012 05:14  836
- Hadoop 2012-11-19 釋出 1.1.1 穩定版本
Index of /Unix/Web/apache/hadoop/common/stable

[   ] hadoop-1.1.1-bin.tar.gz         19-Nov-2012 18:51   35M
[   ] hadoop-1.1.1.tar.gz             19-Nov-2012 18:51   59M
2012-12-19
- Sakana Max 跟我提到一本書"掌握 Hadoop 翱翔雲端 - Windoop 應用實作指南"
- 看起來是一個簡化在 Windows 上開發 Hadoop 環境的專案
- http://code.google.com/p/windoop/ - 作者說網址簡化為 http://windoop.org 比較好記
2013-01-05
- 研究 windoop 的設計方法
- 捨棄 Cygwin ,改用 MingGW 的 MSYS
- 使用 mintty.exe 可以避免掉 cmd.exe 的問題(Windows 8 最明顯)
- Cygwin 1.7 以後就把 mintty 當成預設的 terminal
- mintty 的 manpage - http://mintty.googlecode.com/svn/branches/1.1/docs/mintty.1.html
- 直接使用 java 啟動 NN, DN, JT, TT 的背景程式
- 有額外加入 -server 參數 - -server 跟 -client 的 JVM 參數差異
2013-01-13
- HBase stable 升級至 0.94.4
[ ] hbase-0.94.4.tar.gz 13-Jan-2013 07:28 47M
2013-03-11
- 因應 hadoop4win sourceforge 網站升級,連 svn 的來源也改了,只好再做一次 git-svn 的轉換
- [參考] 轉換你的 Subversion 到 Git
- 步驟:
## 安裝 git-svn
~$ sudo apt-get install git-svn
## 產生 ID 名稱對應的檔案
~$ cat > authors.txt << EOF
jazz = Jazz Yao-Tsung Wang <jazzwang.tw@gmail.com>
jazzwang = Jazz Yao-Tsung Wang <jazzwang.tw@gmail.com>
EOF
~$ git svn clone https://hadoop4win.svn.sf.net/svnroot/hadoop4win -A authors.txt
~$ cd hadoop4win
~/hadoop4win$ git config --global user.name "USERNAME"
~/hadoop4win$ git config --global user.email "username@email.com"
~/hadoop4win$ git remote add  origin https://github.com/jazzwang/hadoop4win.git
~/hadoop4win$ git pull origin master
- 要合併版本時會出錯:
~/hadoop4win$ git svn dcommit Committing to https://hadoop4win.svn.sf.net/svnroot/hadoop4win ... Authentication realm: <https://hadoop4win.svn.sf.net:443> SourceForge Subversion area Password for 'jazz': Authentication realm: <https://hadoop4win.svn.sf.net:443> SourceForge Subversion area Username: jazzwang Password for 'jazzwang': A repository hook failed: Commit blocked by start-commit hook (exit code 1) with output: This repository has moved to a new location. This project was upgraded to the new SourceForge platform, so a one-time move of this repo was performed. There are instructions for switching to the new location below. You can no longer commit to the repo at this location. Please update your configuration with the following command: svn relocate "svn+ssh://USERNAME@svn.code.sf.net/p/hadoop4win/code/" Older versions of SVN may need to use the command: svn switch --relocate OLD_URL "svn+ssh://USERNAME@svn.code.sf.net/p/hadoop4win/code/" where OLD_URL is the URL from the output of svn info. If you receive an error regarding mismatched UUIDs, or "Can't find entry" see http://sourceforge.net/p/forge/community-docs/SVN%20and%20project%20upgrades/ for instructions on how to resolve it. More information available at: https://sourceforge.net/p/forge/community-docs/Repository%20Upgrade%20FAQ/ at /usr/lib/git-core/git-svn line 4989 - 暫時的解法
## 安裝 git-svn
~$ sudo apt-get install git-svn
## 產生 ID 名稱對應的檔案
~$ cat > authors.txt << EOF
jazz = Jazz Yao-Tsung Wang <jazzwang.tw@gmail.com>
jazzwang = Jazz Yao-Tsung Wang <jazzwang.tw@gmail.com>
EOF
~$ git svn clone "svn+ssh://jazzwang@svn.code.sf.net/p/hadoop4win/code/" -A authors.txt hadoop4win-git
~$ cd hadoop4win-git
~/hadoop4win-git$ git config --global user.name "USERNAME"
~/hadoop4win-git$ git config --global user.email "username@email.com"
~/hadoop4win-git$ git remote add -t master -m master -f origin https://github.com/jazzwang/hadoop4win.git
~/hadoop4win-git$ git pull origin master
~/hadoop4win-git$ git svn dcommit
2013-07-02
- https://cwiki.apache.org/confluence/display/Hive/GettingStarted
DISCLAIMER: Hive has only been tested on unix(linux) and mac systems using Java 1.6 for now -
although it may very well work on other similar platforms. It does not work on Cygwin.
</pre>
- http://forum.hadoop.tw/viewtopic.php?p=43630
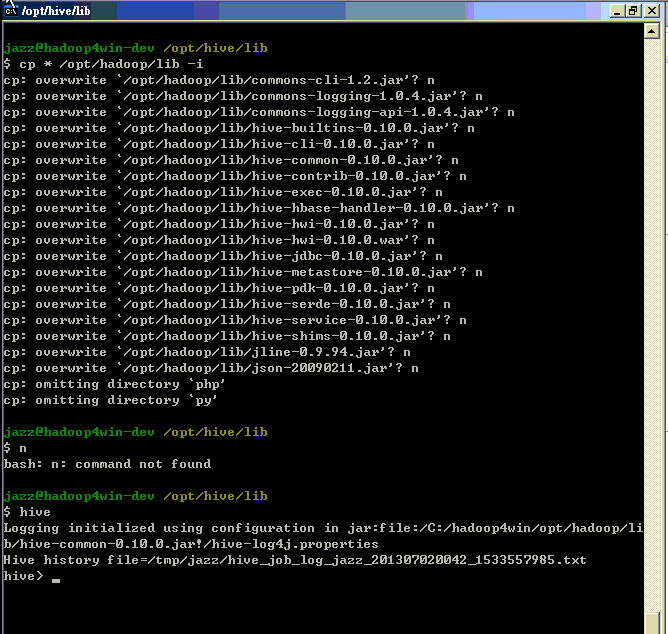
- 追蹤 ${HIVE_HOME}/bin/hive 腳本,發現最後是跑
hadoop jar "c:\hadoop4win\opt\hive\lib\hive-cli-*.jar" org.apache.hadoop.hive.cli.CliDriver
- 所以 classpath 問題,可以暴力用把 ${HIVE_HOME}/lib 複製到 ${HADOOP_HOME}/lib 解決。

Last modified 13 years ago
Last modified on Jul 25, 2013, 5:41:07 PM
Attachments (28)
- 10-12-21_NSISdl_complete.png (14.5 KB) - added by jazz 15 years ago.
- 10-12-21_NSISdl_result.png (13.3 KB) - added by jazz 15 years ago.
- 11-04-15_nsExec_Test.jpg (71.5 KB) - added by jazz 15 years ago.
- 11-04-15_MUI_Basic_1.jpg (96.8 KB) - added by jazz 15 years ago.
- 11-04-15_MUI_Basic_2.jpg (96.6 KB) - added by jazz 15 years ago.
- 11-04-15_MUI_Basic_3.jpg (95.5 KB) - added by jazz 15 years ago.
- 11-04-15_MUI_Basic_4.jpg (75.2 KB) - added by jazz 15 years ago.
- 11-04-15_MUI_Welcome.jpg (114.0 KB) - added by jazz 15 years ago.
- 11-04-15_MUI_Finish.jpg (101.2 KB) - added by jazz 15 years ago.
- 11-04-15_MUI_HeaderBitmap.jpg (99.7 KB) - added by jazz 15 years ago.
- 11-04-15_MUI_StartMenu.jpg (104.3 KB) - added by jazz 15 years ago.
- 11-04-15_MUI_MultiLang_1.jpg (31.6 KB) - added by jazz 15 years ago.
- 11-04-15_MUI_MultiLang_2.jpg (101.8 KB) - added by jazz 15 years ago.
- 11-04-15_MUI_MultiLang_3.jpg (91.9 KB) - added by jazz 15 years ago.
- 11-04-15_MUI_MultiLang_4.jpg (95.4 KB) - added by jazz 15 years ago.
- 11-04-15_MUI_MultiLang_5.jpg (57.6 KB) - added by jazz 15 years ago.
- 11-04-15_MUI_Uninstall.jpg (69.7 KB) - added by jazz 15 years ago.
- 11-04-20_hadoop4win.png (84.4 KB) - added by jazz 15 years ago.
- 11-04-20_hadoop4win-nsis.png (6.1 KB) - added by jazz 15 years ago.
- 11-04-20_hadoop4win-setup-net.jpg (76.0 KB) - added by jazz 15 years ago.
- 11-04-20_hadoop4win-unsetup.jpg (77.4 KB) - added by jazz 15 years ago.
- cygwin-1.5.25.log (2.7 KB) - added by jazz 15 years ago.
- 11-04-26_hadoop4win_size.png (421.1 KB) - added by jazz 15 years ago.
- 11-04-11_win7_conhost_error.png (22.6 KB) - added by jazz 15 years ago.
- 11-05-02_decompress_error.jpg (87.9 KB) - added by jazz 15 years ago.
- 11-05-03_MakeNSIS_Win32.jpg (134.9 KB) - added by jazz 15 years ago.
- 11-05-03_win7_cyg-setup_error.png (25.6 KB) - added by jazz 15 years ago.
- 13-07-01_hive_cygwin.png (19.8 KB) - added by jazz 13 years ago.