
| Version 17 (modified by jazz, 14 years ago) (diff) |
|---|
無人值守自動安裝 Ubuntu 光碟
背景知識
- <參考文件> Install CD Customization (客製化安裝光碟)
- <備註一> 文件中提到這種方式是針對 Alternative 或 Server 版本的安裝光碟,因此不適用 Desktop 版本的安裝光碟。
- <筆記一> 文件中第一段提到 Ubuntu 從 6.06 版以後的 Alternative 與 Server 版本安裝光碟,目錄結構大致上包含三部份。以下採用 Ubuntu 10.10 PC (Intel x86) alternate install CD 為例:
~$ lsb_release -a
No LSB modules are available.
Distributor ID:	Ubuntu
Description:	Ubuntu 10.04.1 LTS
Release:	10.04
Codename:	lucid
~$ wget http://free.nchc.org.tw/ubuntu-cd/10.10/ubuntu-10.10-alternate-i386.iso
~$ mkdir -p /opt/cd-image
~$ sudo mount -o loop ubuntu-10.10-alternate-i386.iso /cdrom
~$ ls -al /cdrom
總計 203
dr-xr-xr-x 11 root root   2048 2010-10-07 23:48 .
drwxrwxrwx 12 root root   4096 2011-10-26 17:07 ..
dr-xr-xr-x  3 root root   2048 2010-10-07 23:48 boot                    ### (1)
-r-xr-xr-x  1 root root   1118 2010-10-04 23:27 cdromupgrade
dr-xr-xr-x  2 root root   2048 2010-10-07 23:47 .disk                   ### (2)
dr-xr-xr-x  3 root root   2048 2010-10-07 23:47 dists                   ### (3)
dr-xr-xr-x  3 root root   2048 2010-10-07 23:47 doc
dr-xr-xr-x  3 root root   2048 2010-10-07 23:48 install                 ### (1)
dr-xr-xr-x  2 root root  16384 2010-10-07 23:48 isolinux                ### (1)
-r--r--r--  1 root root 166833 2010-10-07 23:49 md5sum.txt
dr-xr-xr-x  2 root root   2048 2010-10-07 23:47 pics
dr-xr-xr-x  3 root root   2048 2010-10-07 23:47 pool                    ### (3)
dr-xr-xr-x  2 root root   2048 2010-10-07 23:47 preseed                 ### (2)
-r--r--r--  1 root root    227 2010-10-07 23:47 README.diskdefines
lr-xr-xr-x  1 root root      1 2010-10-07 23:47 ubuntu -> .             ### (3)
- 第一個部份是 Boot Loader - 之後要改變開機時看到的第一個畫面,就是改這一個部份。
boot-loader (ISOLINUX on AMD64/x86 systems, yaboot on PowerPC) and its configuration (which starts everything up);
- 從 10.10 alternative cd 的結構來看,主要包括這兩個目錄:
dr-xr-xr-x  3 root root   2048 2010-10-07 23:48 boot
dr-xr-xr-x  2 root root  16384 2010-10-07 23:48 isolinux
dr-xr-xr-x  3 root root   2048 2010-10-07 23:48 install
- 第二個部份是 Debian Installer (亦稱為 d-i) - 這一塊則是決定自動安裝的程序(亦即 preseed 的腳本跟自動安裝的相關 Shell Script)
debian-installer (also known as d-i, which in this case is really a specialized miniature Ubuntu system);
- 從 10.10 alternative cd 的結構來看,主要包括這兩個目錄:
dr-xr-xr-x  2 root root   2048 2010-10-07 23:47 preseed
dr-xr-xr-x  2 root root   2048 2010-10-07 23:47 .disk
- 第三個部份是 Debian 套件庫 - 這一塊是用在當不透過網路安裝時,可以把會用到的套件都收錄在光碟,必要時必須自行手動更動這裡面的套件庫。
Debian-style repository structure, which is what takes up disk space in the directories "pool" and "dists".
- 從 10.10 alternative cd 的結構來看,主要包括這三個目錄:
dr-xr-xr-x  3 root root   2048 2010-10-07 23:47 dists
dr-xr-xr-x  3 root root   2048 2010-10-07 23:47 pool
lr-xr-xr-x  1 root root      1 2010-10-07 23:47 ubuntu -> .
- 其餘的檔案,有的是文件檔(Ex. doc、pics)。有的是升級的腳本(cdromupgrade)
- <備註一> boot 目錄中放的是記憶體測試的 GRUB 腳本,install 目錄中放的是開機用的 RAM Disk 跟 Linux 核心。isolinux 則是光碟開機的設定檔存放位置。
~$ cat /cdrom/boot/grub/loopback.cfg
menuentry "Test memory" {
  linux16 /install/mt86plus
}
~$ $ tree -L 1 /cdrom/install/
/cdrom/install/
├── initrd.gz                        ### ISO 光碟開機用 Initial RAM Disk
├── vmlinuz                          ### ISO 光碟開機用 Linux Kernel
├── mt86plus                         ### ISO 光碟跑記憶體測試用
├── netboot                          ### 這個目錄應該是拿來做網路開機光碟用的設定檔
├── README.sbm                       ### About the Smart Boot Manager image (說明檔)
└── sbm.bin                          ### Smart Boot Manager image (sbm.bin: DOS floppy 1440k, x86 hard disk boot sector)
- Ubuntu 的圖形選單是透過 SuSE 的 Gfxboot 來達成。
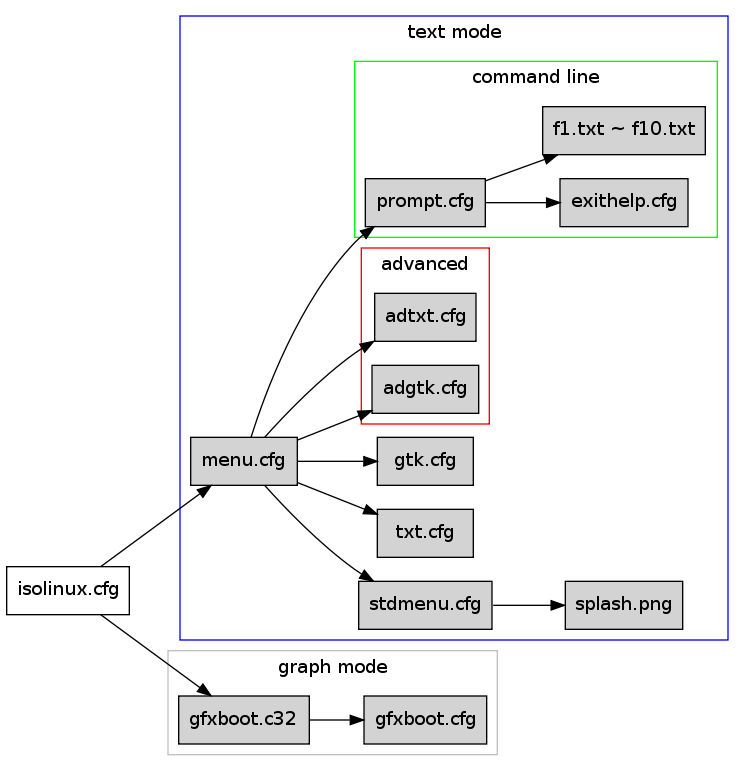
- 底下是 isolinux 目錄裡面的檔案關聯圖:
客製化初探
- 首先將 ISO 內容拷貝到 /opt/cd-image,須注意如果使用 /cdrom/* 的話,會忽略 .disk 這個隱藏目錄!
~$ cp -rT /cdrom /opt/cd-image
- 接著讓我們來新增 Ezilla 的客製化安裝程序到安裝光碟中。
- 為了簡化起見,我們直接產生一個 isolinux.cfg 來作我們想做的事情。
~$
LABEL Ezilla
  menu label ^Ezilla installation
  kernel /install/vmlinuz
  append  preseed/file=/cdrom/preseed/ezilla.seed debian-installer/locale=zh_TW initrd=/install/initrd.gz ramdisk_size=16384 root=/dev/ram rw quiet --
- 接著複製我們想要的 preseed 設定檔到 preseed 目錄下,還有 ISO 背景圖檔(如 ezilla.png)。
~$ sudo wget http://ezilla-nchc.sf.net/d-i/maverick/preseed.cfg -O /opt/cd-image/preseed/ezilla.seed
~$ sudo wget http://trac.nchc.org.tw/grid/raw-attachment/wiki/jazz/11-10-13/ezilla.png -O /opt/cd-image/isolinux/ezilla.png
- 最後重新產生光碟片 ISO 檔
~$ cat > mk_custom_cd << EOF
#!/bin/bash
IMAGE=custom.iso
BUILD=/opt/cd-image/

mkisofs -r -V "Ezilla Install CD" \\
            -cache-inodes \\
            -J -l -b isolinx/isolinux.bin \\
            -c isolinux/boot.cat -no-emul-boot \\
            -boot-load-size 4 -boot-info-table \\
            -o \$IMAGE \$BUILD
EOF
~$ chmod a+x mk_custom_cd
~$ sudo ./mk_custom_cd
備忘
- isohybrid - Postprocess ISO images for hybrid mode
- 看 max huang 分享的 利用 syslinux 內建的 isohybrid 指令快速建立 USB Linux 隨身碟
~$ sudo isohybrid ${YOUR_ISO_FILE}.iso
- 看 max huang 分享的 利用 syslinux 內建的 isohybrid 指令快速建立 USB Linux 隨身碟