
無人值守自動安裝 Ubuntu 光碟
背景知識
- <參考文件> Install CD Customization (客製化安裝光碟)
- <備註一> 文件中提到這種方式是針對 Alternative 或 Server 版本的安裝光碟,因此不適用 Desktop 版本的安裝光碟。
- <筆記一> 文件中第一段提到 Ubuntu 從 6.06 版以後的 Alternative 與 Server 版本安裝光碟,目錄結構大致上包含三部份。以下採用 Ubuntu 10.10 PC (Intel x86) alternate install CD 為例:
~$ lsb_release -a
No LSB modules are available.
Distributor ID:	Ubuntu
Description:	Ubuntu 10.04.1 LTS
Release:	10.04
Codename:	lucid
~$ wget http://free.nchc.org.tw/ubuntu-cd/10.10/ubuntu-10.10-alternate-i386.iso
~$ sudo mkdir -p /opt/cd-image
~$ sudo mount -o loop ubuntu-10.10-alternate-i386.iso /cdrom
~$ ls -al /cdrom/
總計 203
dr-xr-xr-x 11 root root   2048 2010-10-07 23:48 .
drwxrwxrwx 12 root root   4096 2011-10-26 17:07 ..
dr-xr-xr-x  3 root root   2048 2010-10-07 23:48 boot                    ### (1)
-r-xr-xr-x  1 root root   1118 2010-10-04 23:27 cdromupgrade
dr-xr-xr-x  2 root root   2048 2010-10-07 23:47 .disk                   ### (2)
dr-xr-xr-x  3 root root   2048 2010-10-07 23:47 dists                   ### (3)
dr-xr-xr-x  3 root root   2048 2010-10-07 23:47 doc
dr-xr-xr-x  3 root root   2048 2010-10-07 23:48 install                 ### (1)
dr-xr-xr-x  2 root root  16384 2010-10-07 23:48 isolinux                ### (1)
-r--r--r--  1 root root 166833 2010-10-07 23:49 md5sum.txt
dr-xr-xr-x  2 root root   2048 2010-10-07 23:47 pics
dr-xr-xr-x  3 root root   2048 2010-10-07 23:47 pool                    ### (3)
dr-xr-xr-x  2 root root   2048 2010-10-07 23:47 preseed                 ### (2)
-r--r--r--  1 root root    227 2010-10-07 23:47 README.diskdefines
lr-xr-xr-x  1 root root      1 2010-10-07 23:47 ubuntu -> .             ### (3)
- 第一個部份是 Boot Loader - 之後要改變開機時看到的第一個畫面,就是改這一個部份。
boot-loader (ISOLINUX on AMD64/x86 systems, yaboot on PowerPC) and its configuration (which starts everything up);
- 從 10.10 alternative cd 的結構來看,主要包括這兩個目錄:
dr-xr-xr-x  3 root root   2048 2010-10-07 23:48 boot
dr-xr-xr-x  2 root root  16384 2010-10-07 23:48 isolinux
dr-xr-xr-x  3 root root   2048 2010-10-07 23:48 install
- 第二個部份是 Debian Installer (亦稱為 d-i) - 這一塊則是決定自動安裝的程序(亦即 preseed 的腳本跟自動安裝的相關 Shell Script)
debian-installer (also known as d-i, which in this case is really a specialized miniature Ubuntu system);
- 從 10.10 alternative cd 的結構來看,主要包括這兩個目錄:
dr-xr-xr-x  2 root root   2048 2010-10-07 23:47 preseed
dr-xr-xr-x  2 root root   2048 2010-10-07 23:47 .disk
- 第三個部份是 Debian 套件庫 - 這一塊是用在當不透過網路安裝時,可以把會用到的套件都收錄在光碟,必要時必須自行手動更動這裡面的套件庫。
Debian-style repository structure, which is what takes up disk space in the directories "pool" and "dists".
- 從 10.10 alternative cd 的結構來看,主要包括這三個目錄:
dr-xr-xr-x  3 root root   2048 2010-10-07 23:47 dists
dr-xr-xr-x  3 root root   2048 2010-10-07 23:47 pool
lr-xr-xr-x  1 root root      1 2010-10-07 23:47 ubuntu -> .
- 其餘的檔案,有的是文件檔(Ex. doc、pics)。有的是升級的腳本(cdromupgrade)
- <備註一> boot 目錄中放的是記憶體測試的 GRUB 腳本,install 目錄中放的是開機用的 RAM Disk 跟 Linux 核心。isolinux 則是光碟開機的設定檔存放位置。
~$ cat /cdrom/boot/grub/loopback.cfg
menuentry "Test memory" {
  linux16 /install/mt86plus
}
~$ $ tree -L 1 /cdrom/install/
/cdrom/install/
├── initrd.gz                        ### ISO 光碟開機用 Initial RAM Disk
├── vmlinuz                          ### ISO 光碟開機用 Linux Kernel
├── mt86plus                         ### ISO 光碟跑記憶體測試用
├── netboot                          ### 這個目錄應該是拿來做網路開機光碟用的設定檔
├── README.sbm                       ### About the Smart Boot Manager image (說明檔)
└── sbm.bin                          ### Smart Boot Manager image (sbm.bin: DOS floppy 1440k, x86 hard disk boot sector)
- <備註二> Ubuntu 的圖形選單是透過 SuSE 的 Gfxboot 來達成。
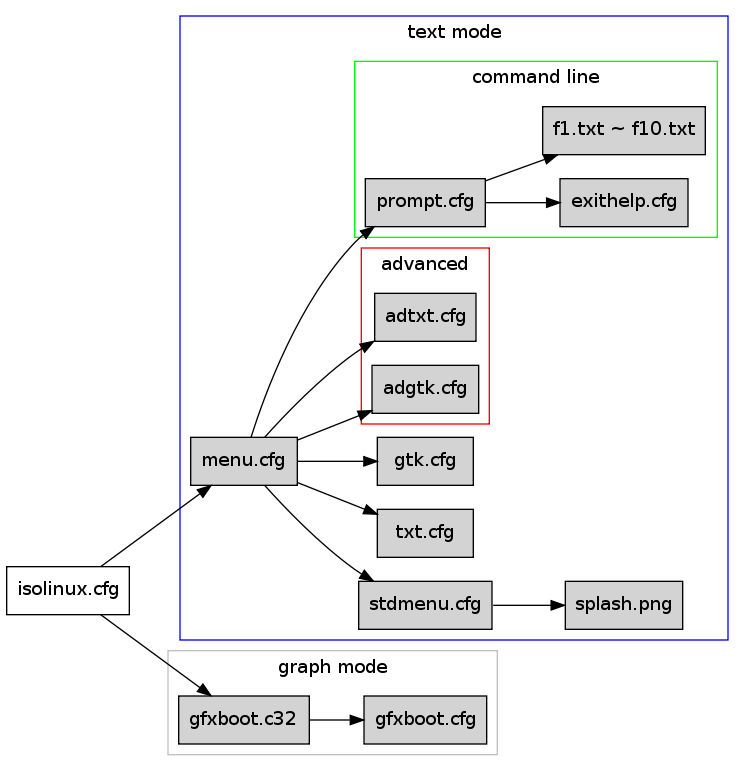
- <備註三> 底下是 isolinux 目錄裡面的檔案關聯圖:
- <備註四> ubuntu 光碟的 preseed 其實蠻單純的
~$ cat /opt/cd-image/preseed/ubuntu.seed
# Enable extras.ubuntu.com.
d-i apt-setup/extras  boolean true
# Install the Ubuntu desktop.
tasksel tasksel/first multiselect ubuntu-desktop
d-i preseed/early_command string . /usr/share/debconf/confmodule; db_get debconf/priority; case $RET in low|medium) db_fset tasksel/first seen false ;; esac
# On live DVDs, don't spend huge amounts of time removing substantial
# application packages pulled in by language packs. Given that we clearly
# have the space to include them on the DVD, they're useful and we might as
# well keep them installed.
ubiquity  ubiquity/keep-installed string icedtea6-plugin openoffice.org
~$ cat /opt/cd-image/preseed/cli.seed
# Only install the standard system and language packs.
tasksel tasksel/first multiselect
d-i preseed/early_command string . /usr/share/debconf/confmodule; db_get debconf/priority; case $RET in low|medium) db_fset tasksel/first seen false ;; esac
d-i pkgsel/language-pack-patterns string
# No language support packages.
d-i pkgsel/install-language-support boolean false
客製化初探
- 首先將 ISO 內容拷貝到 /opt/cd-image,須注意如果使用 /cdrom/* 的話,會忽略 .disk 這個隱藏目錄!
~$ sudo cp -rT /cdrom/ /opt/cd-image/
- 接著讓我們來新增 Ezilla 的客製化安裝程序到安裝光碟中。
- 為了簡化起見,我們直接產生一個 isolinux.cfg 來作我們想做的事情。
~$
LABEL Ezilla
  menu label ^Ezilla installation
  kernel /install/vmlinuz
  append  preseed/file=/cdrom/preseed/ezilla.seed debian-installer/locale=zh_TW initrd=/install/initrd.gz ramdisk_size=16384 root=/dev/ram rw quiet --
- 接著複製我們想要的 preseed 設定檔到 preseed 目錄下,還有 ISO 背景圖檔(如 ezilla.png)。
~$ sudo wget http://ezilla-nchc.sf.net/d-i/maverick/preseed.cfg -O /opt/cd-image/preseed/ezilla.seed
~$ sudo wget http://trac.nchc.org.tw/grid/raw-attachment/wiki/jazz/11-10-13/ezilla.png -O /opt/cd-image/isolinux/ezilla.png
- 最後重新產生光碟片 ISO 檔
~$ cat > mk_custom_cd << EOF
#!/bin/bash
IMAGE=custom.iso
BUILD=/opt/cd-image/

mkisofs -r -V "Ezilla Install CD" \\
            -cache-inodes \\
            -J -l -b isolinx/isolinux.bin \\
            -c isolinux/boot.cat -no-emul-boot \\
            -boot-load-size 4 -boot-info-table \\
            -o \$IMAGE \$BUILD
EOF
~$ chmod a+x mk_custom_cd
~$ sudo ./mk_custom_cd
備忘
- isohybrid - Postprocess ISO images for hybrid mode
- 看 max huang 分享的 利用 syslinux 內建的 isohybrid 指令快速建立 USB Linux 隨身碟
~$ sudo isohybrid ${YOUR_ISO_FILE}.iso
- 看 max huang 分享的 利用 syslinux 內建的 isohybrid 指令快速建立 USB Linux 隨身碟
- <備忘> 不過 Ubuntu 必須在 11.10 以後才支援 Hybrid ISO。其他版本應該是 initrd.gz 裡頭並沒有處理這一塊,所以無法辨別 USB 安裝拇指碟
- 其實 debian / ubuntu live cd 都可以使用 casper-rw 來當做 unionfs 的空間。今天遇到一個狀況就是:如果 casper-rw 空間不夠的話,該怎麼放大呢?有篇討論提供的作法挺不賴:
Re: Resize Casper-rw file (persistent store of ubuntu on usb pendrive)? You can also resize the filesystem. First, you need to extend the image file to the desired size. If you want increase the size from 500MB to 1GB, you'll need to add 500MB of zeroes to the end of the file. It's a good idea to backup the image first. 1. add 500MB of zeroes to the end of the image casper-rw. Make sure you use >> (append) and not > (overwrite). dd if=/dev/zero bs=1M count=500 >> casper-rw 2. resize the filesystem to cover the entire image file resize2fs casper-rw That should be it. - 甚至切一個磁區,命名為 casper-rw 也可以喔!
- 如何產生 MD5 Hash 的密碼呢?可以用 md5pass 指令!
syslinux-common: /usr/bin/md5pass
DEBUG 除錯技巧
- [參考] B.3. Creating a preconfiguration file
To check possible values for questions, you can use nano to examine the files in /var/lib/cdebconf
while an installation is in progress. View templates.dat for the raw templates and questions.dat for
the current values and for the values assigned to variables.

To check if the format of your preconfiguration file is valid before performing an install, you can
use the command debconf-set-selections -c preseed.cfg.
- 安裝過程中,可以按 ALT-F2 換到另一個 console,並使用 nano 編輯器檢查 /var/lib/cdebconf 底下的 questions.dat 來得知可能會詢問的問題
- 可以使用以下指令驗證 preseed 設定檔是否正確
~$ sudo debconf-set-selections -c preseed.cfg
Last modified 12 years ago
Last modified on Nov 21, 2013, 9:37:15 AM