| Version 51 (modified by jazz, 11 years ago) (diff) |
|---|
- Linux Performance
- [參考] http://www.ufsdump.org/ - 這個網站有許多關於效能調校的細部說明
- [參考] System Tuning Info for Linux Servers (有點舊了)
- [文件] Linux Performance and Tuning Guidelines - IBM Redbooks(PDF)
- [文件] Red Hat Enterprise Linux Performance Tuning Guide (PDF)
- [工具] 以下是 http://www.ufsdump.org/ 文件中提到的幾個工具
- system & disk I/O
- network
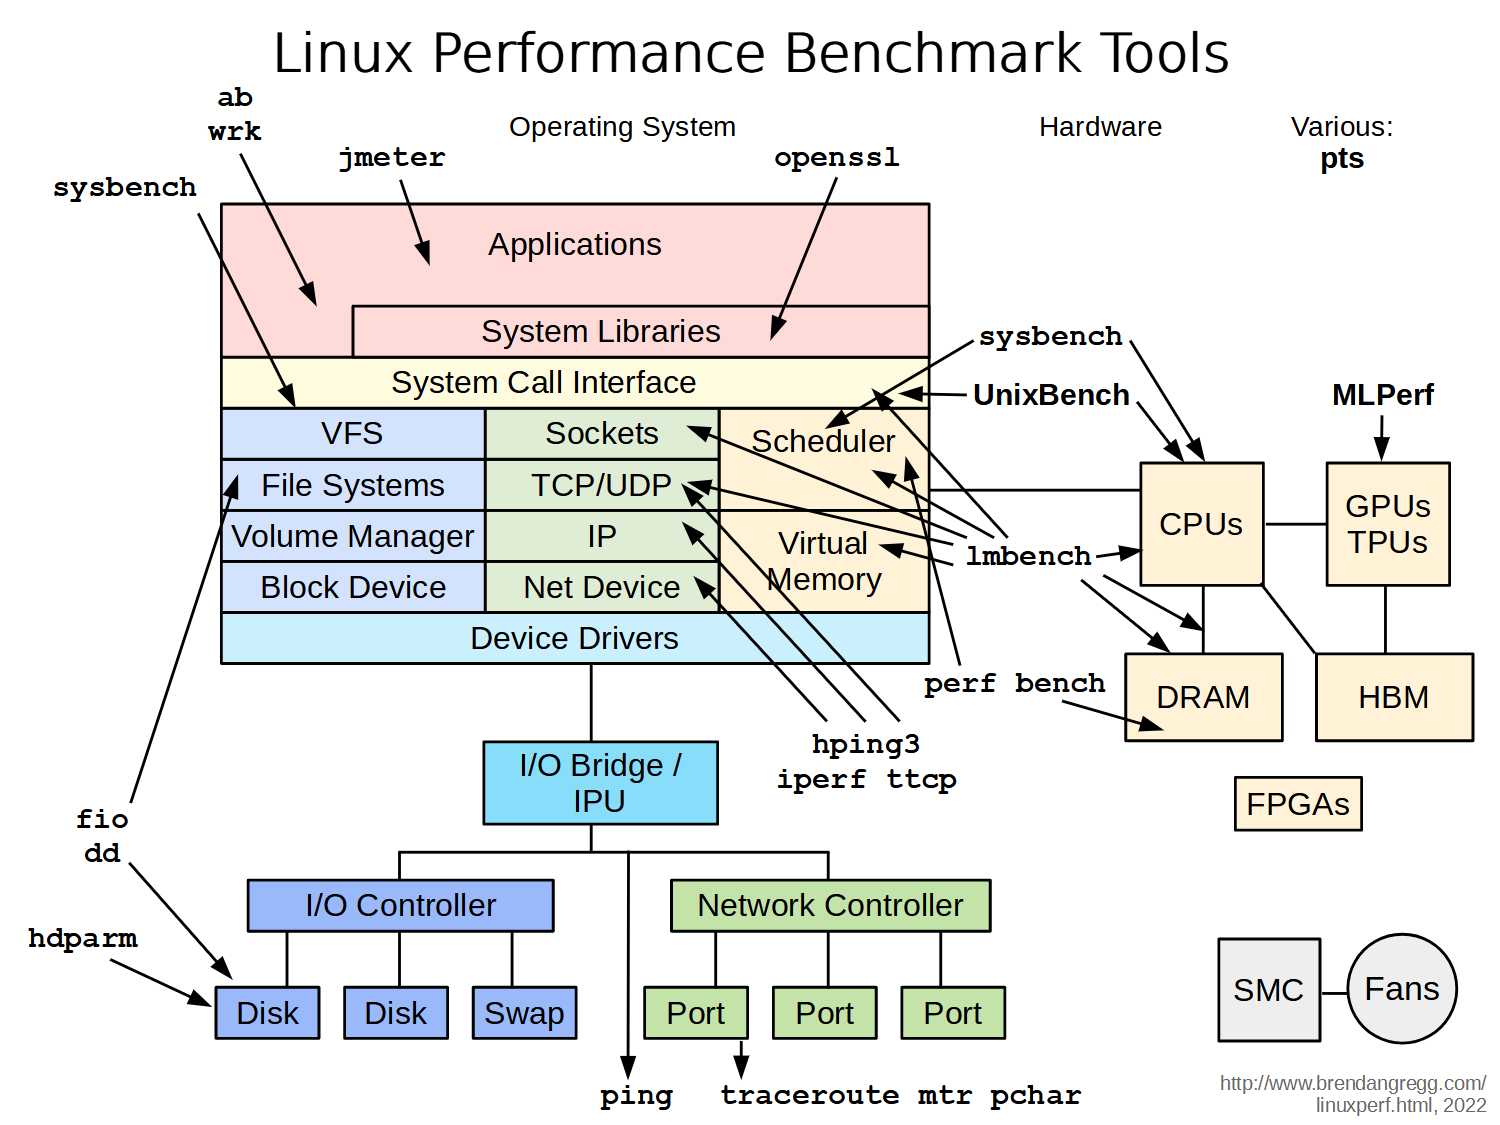
- [工具] Open Source Performance Test Tools 列舉了許多自由軟體相關的效能測試工具
- [工具] 16 Linux Server Monitoring Commands You Really Need To Know
- [參考] Performance tuning
- [參考] Linux performance tuning guide (Redhat, PDF)
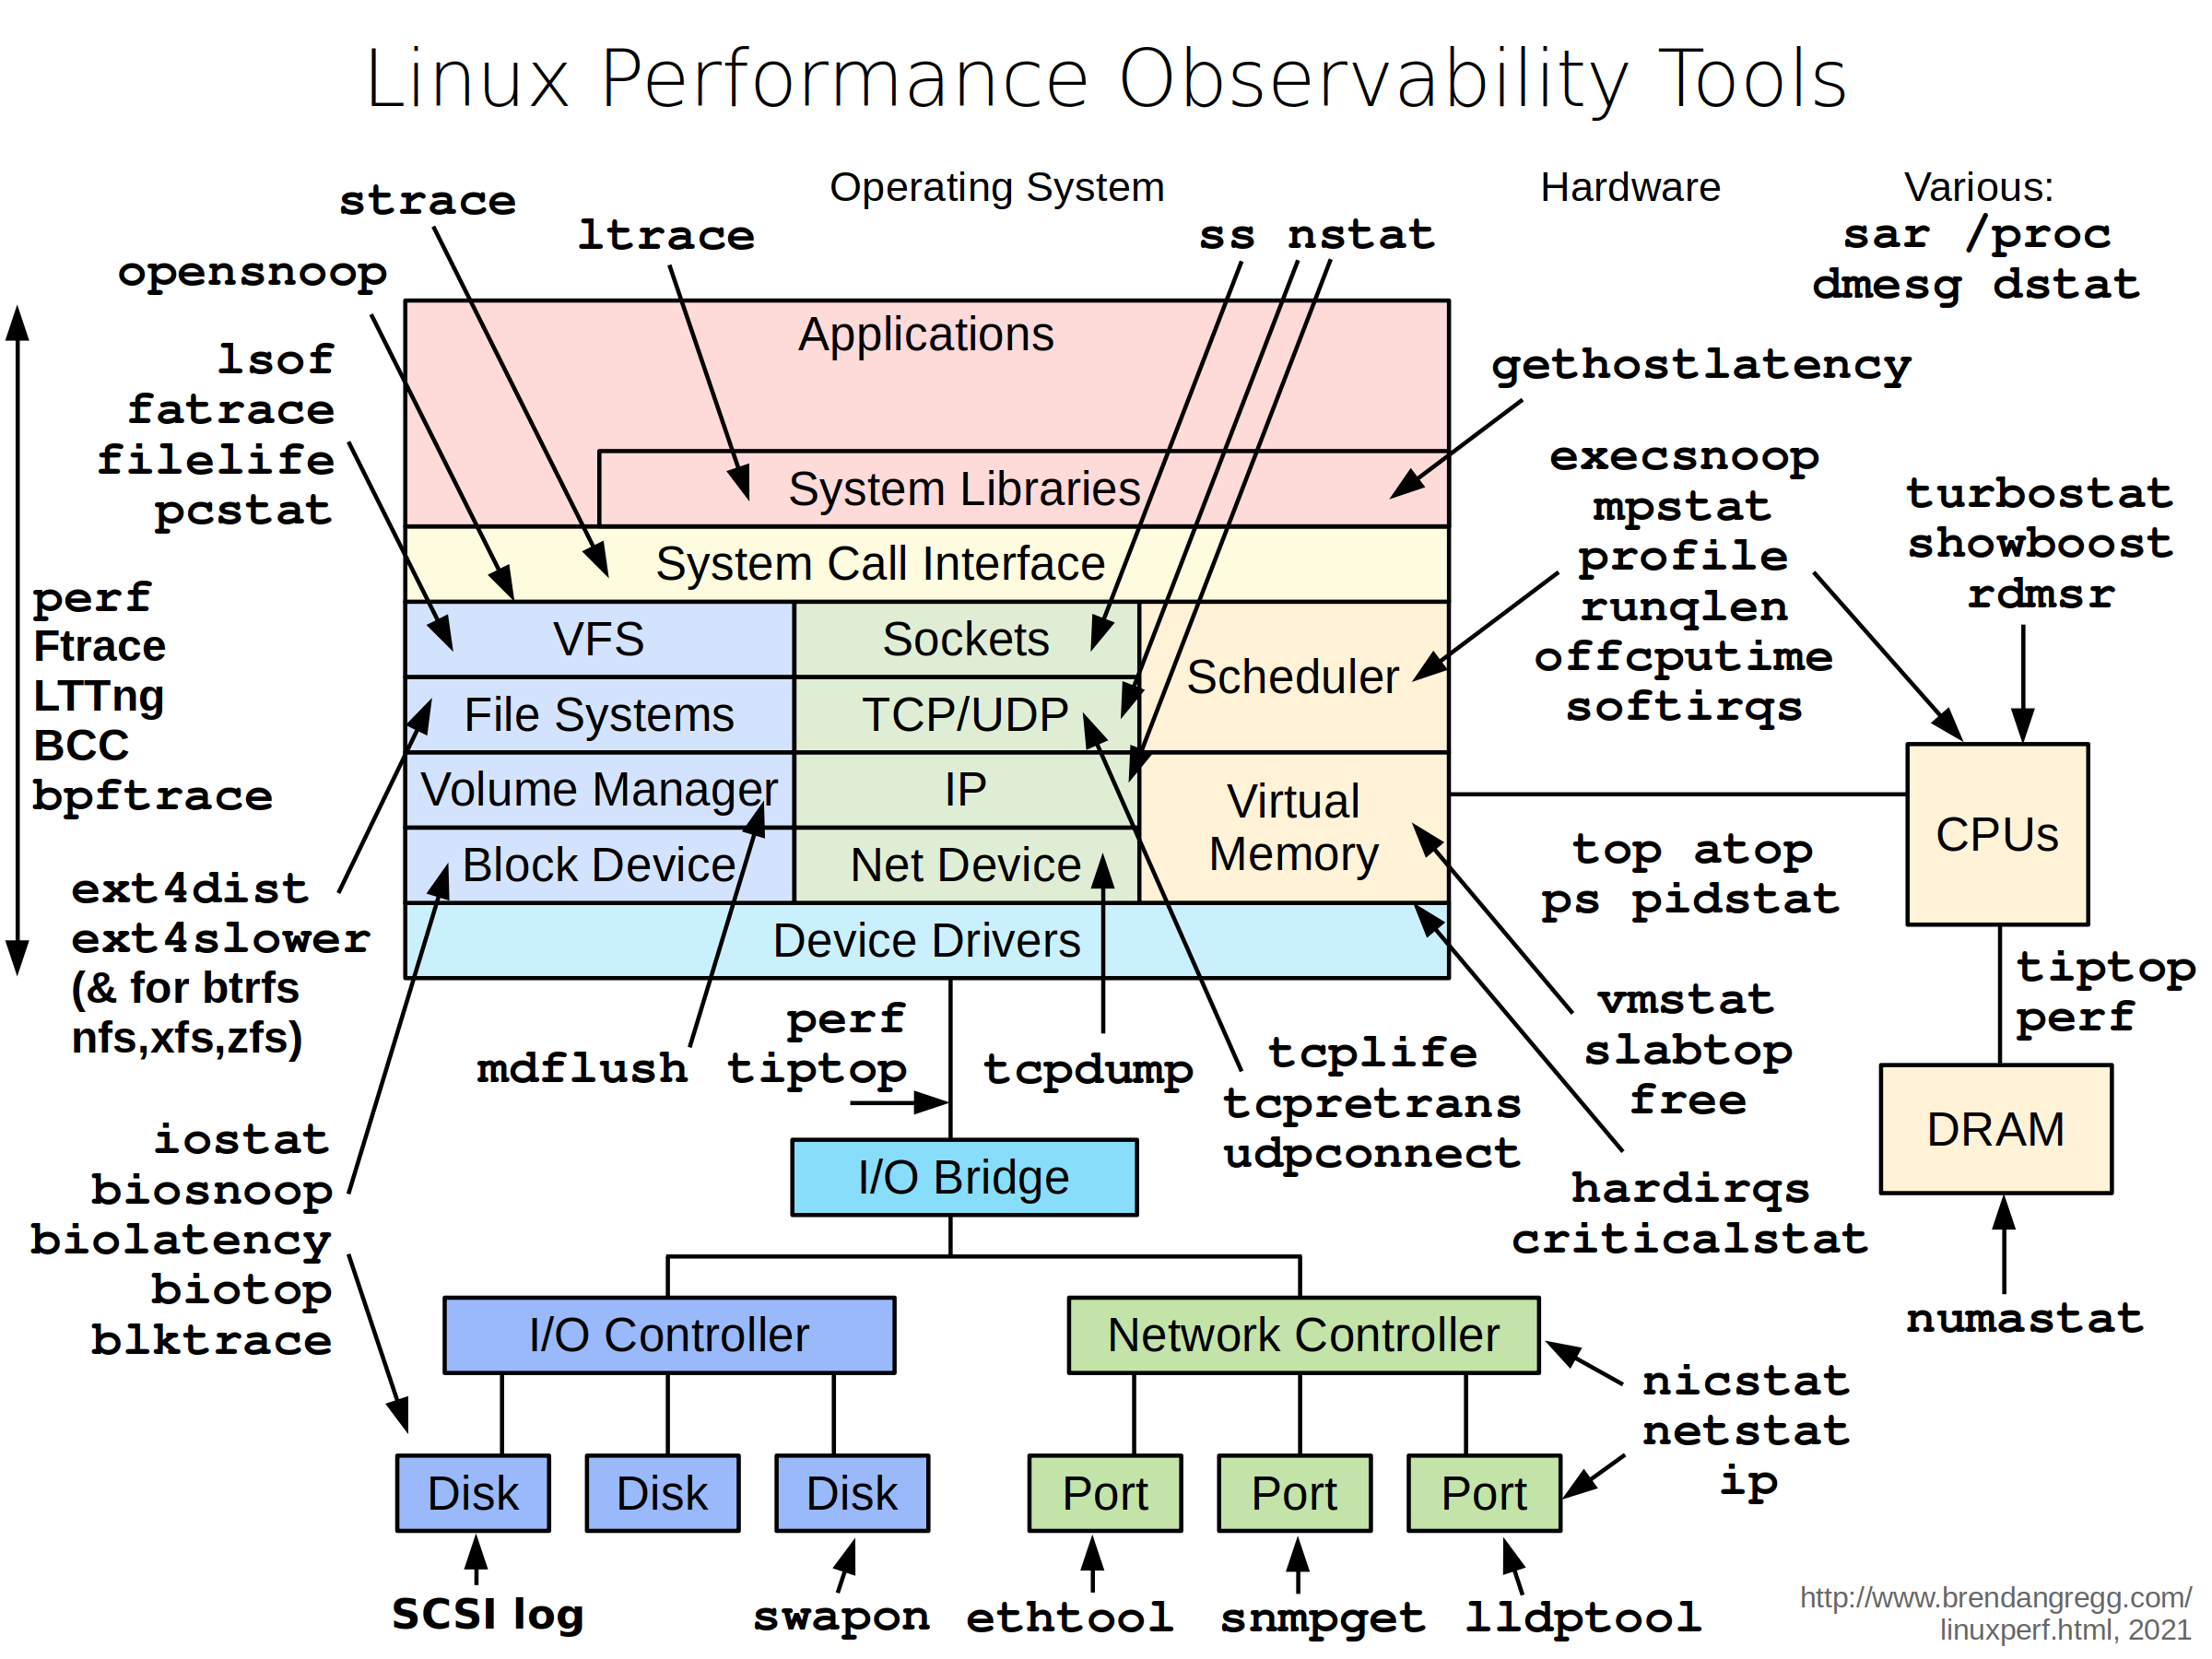
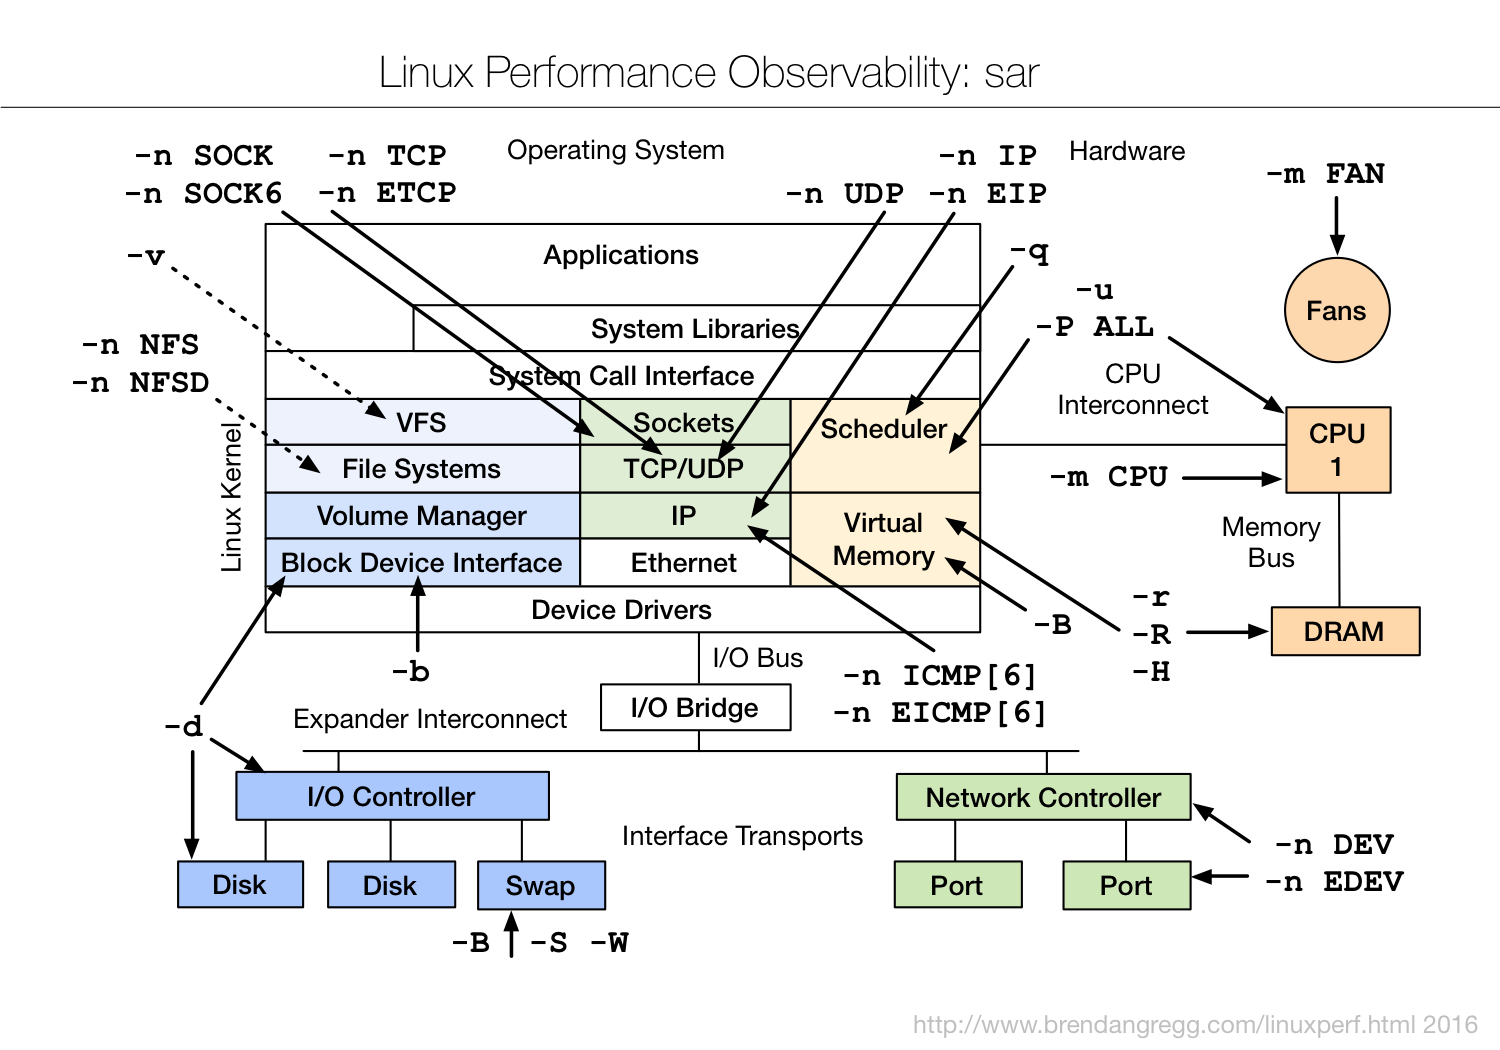
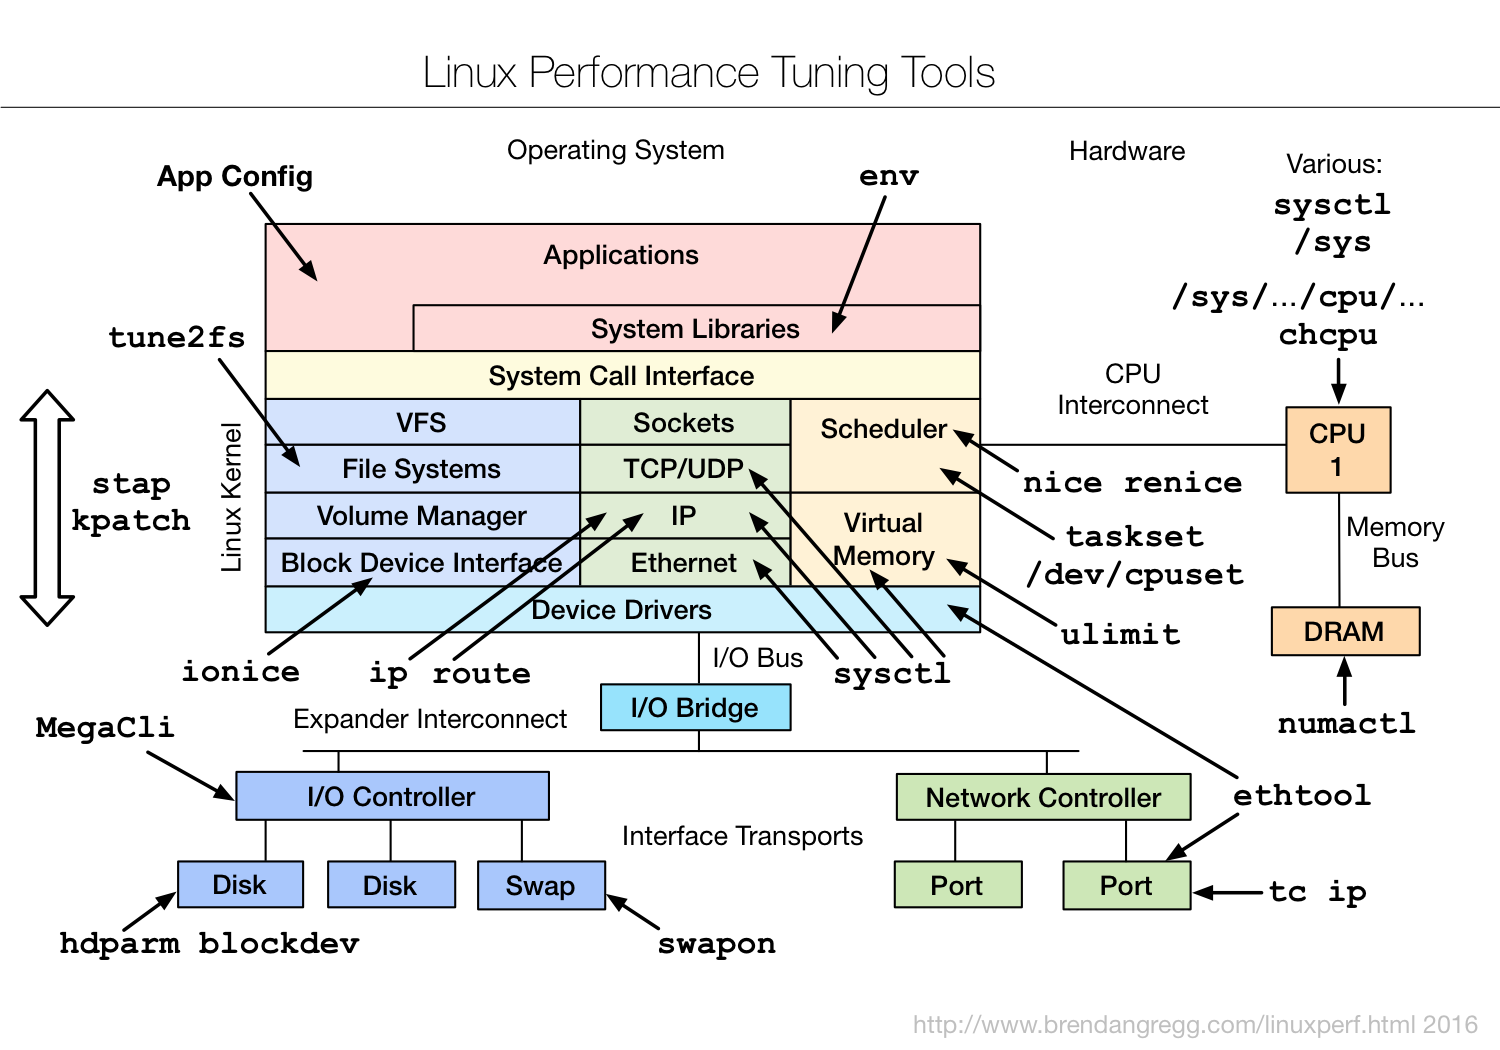
- [參考] Linux Performance and Development Tools - 列舉了許多自由軟體的效能分析工具(Performance Analysis Tools)
- [參考] The USE Method: Linux Performance Checklist - 列舉了效能調校的檢查清單
- [參考] Big List of 20 Common Bottlenecks - 效能瓶頸大致上可以歸納為 20 個情境
Performance Tuning
System Performance Tuning : CPU
- 檢查 CPU 是否為 64 位元的方法 - 參考自 Ubuntu 論壇
~$ sudo lshw -C cpu | grep width width: 32 bits ---> 為 32 位元 ======= width: 64 bits ---> 為 64 位元 - 檢查 CPU 是否支援虛擬化 - 旗標(flags)分別是: Intel (vmx) 與AMD (svm) (KVM 安裝 (rock))
~$ cat /proc/cpuinfo | egrep 'vmx|svm' --color
- 執行時間過久:
[1786800.621065] "echo 0 > /proc/sys/kernel/hung_task_timeout_secs" disables this message.
System Performance Tuning : Memory
- 查詢記憶體時脈與單一條的大小
$ sudo dmidecode
搜尋 Memory Device 會看到類似的結果
Memory Device
       Array Handle: 0x1000
       Error Information Handle: Not Provided
       Total Width: 64 bits
       Data Width: 64 bits
       Size: 2048 MB
       Form Factor: DIMM
       Set: None
       Locator: DIMM_4
       Bank Locator: Not Specified
       Type: DDR2
       Type Detail: Synchronous
       Speed: 800 MHz (1.2 ns)
       Manufacturer: 7F4F000000000000
       Serial Number: 0007D1E4
       Asset Tag: 540834
       Part Number: TS256MLQ64V8U
- Share Memory - 有些程式需要用到比較多 Share Memory (共享記憶體), 如: Kerrighed (2008-03-20 (rock/rider))
echo "kernel.shmall = 796917578" >> /etc/sysctl.conf
echo "kernel.shmmax = 796917578" >> /etc/sysctl.conf
echo "kernel.shmmni = 4096"      >> /etc/sysctl.conf
- Cache Memroy - [參考] 回收 Linux cached memory
- 設定 vm.drop_caches 觸發 kernel 回收用於 cache 的記憶體。 至於 1, 2, 3 的等級,可參考 LinuxInsight 的說明
- 1: free pagecache
- 2: free dentries and inodes
- 3: free pagecache, dentries and inodes
echo 1 > /proc/sys/vm/drop_caches
sysctl -w vm.drop_caches=1
- 設定 vm.vfs_cache_pressure 使 kernel 更勤於回收 cache。
sysctl -w vm.vfs_cache_pressure=n (n > 100)
- 設定 vm.drop_caches 觸發 kernel 回收用於 cache 的記憶體。 至於 1, 2, 3 的等級,可參考 LinuxInsight 的說明
- 如何清除使用中的 SWAP 呢?(把 SWAP 的內容釋放出來) - <參考> How do I free virtual memory in Ubuntu?
sudo swapoff -a
sudo swapon -a
- 關於 /proc/sys/vm/swappiness 或 vm.swappiness (2011-02-27)
- 代表意義:Aggressiveness of swapping
- 數值範圍:0 ~ 100,通常預設值為 60 (越高越積極搬 SWAP)
- 0 : 除非有必要才把虛擬記憶體搬到 SWAP
- 100 : 非常頻繁地將虛擬記憶體(VIRT)搬到 SWAP
- <參考> Understanding swap files in Linux
- 如何加速桌面應用 - <參考> Tales from responsivenessland: why Linux feels slow, and how to fix that
- 不過這樣的設定不能用在 VM Server 上,會讓 VM Server 的記憶體很快被用完。
sysctl -w vm.swappiness=1
sysctl -w vm.vfs_cache_pressure=50
- (2011-02-27)
- 從「Virtual Memory Usage from Java under Linux, too much memory used」這篇討論,學到一個指令:pmap,隸屬於 procps 套件中。用法是 pmap -x $PID (不同身份時,得透過 sudo 取得記憶體狀態)
procps: /usr/bin/pmap
~$ sudo pmap -x $PID
jazz@drbl:~$ sudo pmap 24972
24972:   /usr/bin/php5-cgi
0000000000400000   5144K r-x--  /usr/bin/php5-cgi
0000000000b06000    356K rw---  /usr/bin/php5-cgi
0000000000b5f000     32K rw---    [ anon ]
00000000010da000   2212K rw---    [ anon ]
00007f418a02b000     40K r-x--  /lib/libnss_files-2.7.so
00007f418a035000   2048K -----  /lib/libnss_files-2.7.so
00007f418a235000      8K rw---  /lib/libnss_files-2.7.so
00007f418a237000     28K r-x--  /usr/lib/php5/20060613/pdo_mysql.so
00007f418a23e000   2044K -----  /usr/lib/php5/20060613/pdo_mysql.so
00007f418a43d000      4K rw---  /usr/lib/php5/20060613/pdo_mysql.so
... 略 ...
System Performance Tuning : File System
- (2010-05-11)
- 如何調整每個使用者可以開啟的檔案個數
- [參考] Increasing the file descriptor limit
- [參考] GNU/Linux - How Many Open Files?
- 注意:修改 /etc/security/limits.conf 中間必須確定是 TAB ,如果有設定 vim 的 softwaretab 的話,得特別當心!!!
- /proc/sys/fs/file-max - 核心預設最多可以開啟的檔案個數
~$ cat /proc/sys/fs/file-max
743964
- 修改方法: 使用 sysctl 指令或編輯 /etc/sysctl.conf
sysctl -w fs.file-max=100000
- 修改方法: 使用 sysctl 指令或編輯 /etc/sysctl.conf
- /proc/sys/fs/file-nr - 目前已開啟檔案個數、可供開啟檔案個數、總開啟檔案上限
[root@srv-4 proc]# cat /proc/sys/fs/file-nr
3391    969     52427
|	 |       |
|	 |       |
|        |       maximum open file descriptors
|        total free allocated file descriptors
total allocated file descriptors
(the number of file descriptors allocated since boot)
- /etc/security/limits.conf - 每個程序(process)可以開啟檔案的個數(number limits of open files per process) - 像 HDFS 的 DataNode 就需要調整這種參數(2010-02-22)
-
/etc/security/limits.conf
old new 49 49 #ftp - chroot /ftp 50 50 #@student - maxlogins 4 51 51 52 * soft nofile 4096 53 * hard nofile 743964 54 52 55 # End of file
-
- /etc/pam.d/login - 告訴系統要用 /etc/security/limits.conf 來設定一些上限
# Sets up user limits according to /etc/security/limits.conf
# (Replaces the use of /etc/limits in old login)
session    required   pam_limits.so
- 指令: ulimit - 可以告訴你一些系統限制,並且設定想要的値
jazz@Wdebian:~$ ulimit -a
core file size          (blocks, -c) 0
data seg size           (kbytes, -d) unlimited
scheduling priority             (-e) 0
file size               (blocks, -f) unlimited
pending signals                 (-i) 72704
max locked memory       (kbytes, -l) 32
max memory size         (kbytes, -m) unlimited
open files                      (-n) 1024
pipe size            (512 bytes, -p) 8
POSIX message queues     (bytes, -q) 819200
real-time priority              (-r) 0
stack size              (kbytes, -s) 8192
cpu time               (seconds, -t) unlimited
max user processes              (-u) 72704
virtual memory          (kbytes, -v) unlimited
file locks                      (-x) unlimited
- 假設 /proc/sys/fs/file-max 跟 /etc/security/limits.conf 都有設定上限為 743964,且 /etc/pam.d/login 也有打開,但是 ulimit -a 指令仍顯示 1024 (預設),可以修改 /etc/rc.local 或 /etc/profile 強制用 ulimit -n 743964 來提高開檔個數。
~$ ulimit -n 743964
- [備註] 如果 ulimit 超出可容許範圍,會顯示 Operation not permitted,此時請檢查相關設定値
~$ ulimit -n 7439640
-bash: ulimit: open files: cannot modify limit: Operation not permitted
- 如果遇到以上情形,請改用 - 參考來源
~$ ulimit -Sn unlimited
- 幫 Hadoop HDFS 調整系統資源限制
-
/etc/security/limits.conf
old new 49 49 #ftp - chroot /ftp 50 50 #@student - maxlogins 4 51 51 52 * soft nofile 8192 53 52 54 # End of file
-
I/O Performance Tuning : NFS
- NFS Tuning - /etc/fstab - 加大 NFS read/write size 可以提升檔案系統的 I/O 效率 (2008-03-20 (rock/rider))
192.168.0.111:/home /home nfs rw,bg,soft,intr,rsize=262144,wsize=262144 0 4
192.168.0.111:/opt  /opt  nfs ro,bg,soft,intr,rsize=262144,wsize=262144 0 4
192.168.0.111:/usr  /usr  nfs ro,bg,soft,intr,rsize=262144,wsize=262144 0 4
I/O Performance Tuning : IOWait
- 2010-03-31 : 高 IOWait 有什麼好的解決之道呢??
- How to identify what processes are generating IO Wait load?
Jun run "pidstat -d 5" and it will print the list of processes doing IO over the last 5 seconds.
- Re: Major problems: High Iowait. Change filesystem from etx4 to xfs/ext3/jfs?
vm.dirty_writeback_centisecs=100
vm.dirty_expire_centisecs=100"
- iowait problem - 顯示了使用 vmstat , iostat , hdparm 的技巧
- 在 Linux 底下查硬碟型號(hard disk model and serial number)
- [參考一] 查看 Linux 系統資訊常用指令
- [參考二] Linux: Find out serial / model number and vendor information for SATA and IDE hard disk
- [參考三] Hard-disk model and manufacturer - linux-misc
- [工具一] hdparm - Debian 有 hdparm 套件 - 可以拿來測試硬碟效能
jazz@Wdebian:~$ sudo apt-get install hdparm jazz@Wdebian:~$ sudo hdparm -I /dev/sda | grep "Model Number" Model Number: ST31500341AS - 如果要測試硬碟 I/O 速度,可以用 hdparm -t
jazz@Wdebian:~$ sudo hdparm -t /dev/sda
- [工具二] smartctl - Debian 有 smartmontools 套件 - 也可以拿來測試硬碟效能
jazz@Wdebian:~$ sudo apt-get install smartmontools
jazz@Wdebian:~$ sudo smartctl -a /dev/sda | grep "Device Model:"
Device Model:     ST31500341AS
- [低階指令一] 如果是 SCSI 或 SATA 硬碟,可以查 /proc/scsi/scsi
jazz@Wdebian:~$ cat /proc/scsi/scsi
Attached devices:
Host: scsi0 Channel: 00 Id: 00 Lun: 00
  Vendor: ATA      Model: ST31500341AS     Rev: CC1H
  Type:   Direct-Access                    ANSI  SCSI revision: 05
Host: scsi1 Channel: 00 Id: 00 Lun: 00
  Vendor: TSSTcorp Model: DVD-ROM TS-H353B Rev: D500
  Type:   CD-ROM                           ANSI  SCSI revision: 05
Host: scsi2 Channel: 00 Id: 00 Lun: 00
  Vendor: ATA      Model: ST3640323AS      Rev: SD35
  Type:   Direct-Access                    ANSI  SCSI revision: 05
- [低階指令二] 如果是 IDE 硬碟,可以查 /proc/ide/hd*/model
jazz@lenny:~$ sudo cat /proc/ide/hda/model
VBOX HARDDISK
Network Performance Tuning
- TCP Tuning - (2008-03-20 (LSI))
echo 262144               > /proc/sys/net/core/rmem_default
echo 8388608              > /proc/sys/net/core/wmem_max
echo 8388608              > /proc/sys/net/core/rmem_max
echo "4096 87380 4194304" > /proc/sys/net/ipv4/tcp_rmem
echo "4096 65536 4194304" > /proc/sys/net/ipv4/tcp_wmem
- TCP TIME_WAIT & Reuse - 適用網站伺服器 (2010-03-26)
sysctl net.ipv4.tcp_fin_timeout=10
sysctl net.ipv4.tcp_tw_reuse=1
sysctl net.ipv4.tcp_tw_recycle=1
- 如果沒辦法 ping 224.0.0.1 的話,代表 Broadcast ICMP 封包被濾掉了,因為預設 Linux kernel 2.6 是 disable 的。解法如下:(2009-09-07)
echo "0" > /proc/sys/net/ipv4/icmp_echo_ignore_broadcasts
~# echo "net.ipv4.icmp_echo_ignore_broadcasts = 0" >> /etc/sysctl.conf
~# sysctl -p
net.ipv4.ip_forward = 1
net.ipv4.icmp_echo_ignore_broadcasts = 0
- 如何在 Linux System 當中偵測網路線是否有接上? (2009-05-05)
$ cat /sys/class/net/eth0/carrier
Power Management
- 啟動 SATA ALPM 電源管理功能 - powertop 提供之建議
echo min_power > /sys/class/scsi_host/host0/link_power_management_policy
- 虛擬機器的 clocksource (2010-02-11)
echo acpi_pm > /sys/devices/system/clocksource/clocksource0/current_clocksource
- 直接修改系統參數讓 Linux 休眠 (2010-03-03 (rock))
# echo 4 > /proc/acpi/sleep  /** 適用 Kernel 2.4 (swsusp)**/
# echo disk > /sys/power/state  /** 適用 Kernel 2.4 & 2.6 (swsusp)**/
Security / Management Tip
- [緣起] 有時因為 Kernel 顯示 DEBUG 訊息,縱使下 reboot 或 shutdown, halt 都無效時,可以使用這個技巧。
- [備忘] 強迫重新開機 - 使用以下指令或按下 ALT + SysRq + b
echo 1 > /proc/sys/kernel/sysrq
echo b > /proc/sysrq-trigger
- [備忘] 強迫直接關機 - 使用以下指令或按下 ALT + SysRq + o
echo 1 > /proc/sys/kernel/sysrq
echo o > /proc/sysrq-trigger
- [備忘] 強迫重新開機 - 使用以下指令或按下 ALT + SysRq + b
- 關於 /proc/sysrq-trigger (2009-11-17)
- Redhat 手冊的說明 - /proc/sysrq-trigger
- 其實除了 CTRL+ALT+DEL 外,Linux 還可以透過 System Request (Sys Rq) 按鍵 來做一些特殊除錯工作。這個 Sys Rq 鍵,通常跟 Print Screen 鍵做在一起。
- 要啟用這個功能,首先必須確認核心的 CONFIG_MAGIC_SYSRQ 參數是否有 enable。
- 維基百科除了說明 SYSRQ 可以做哪些事情外,還介紹了sysrqd這個軟體,讓管理者可以遠端執行 SYSRQ 的指令。PS.sysrqd 也有 debian 套件!!
- 關於 /proc/sys/kernel/sysrq (2009-11-17)
- [備忘] Linux 遇到 kernel panic 後可自動重新開機(Auto Reboot)
或者編輯 /etc/sysctl.conf 加入
$ sudo sysctl -w kernel.panic = 20
kernel.panic = 20


