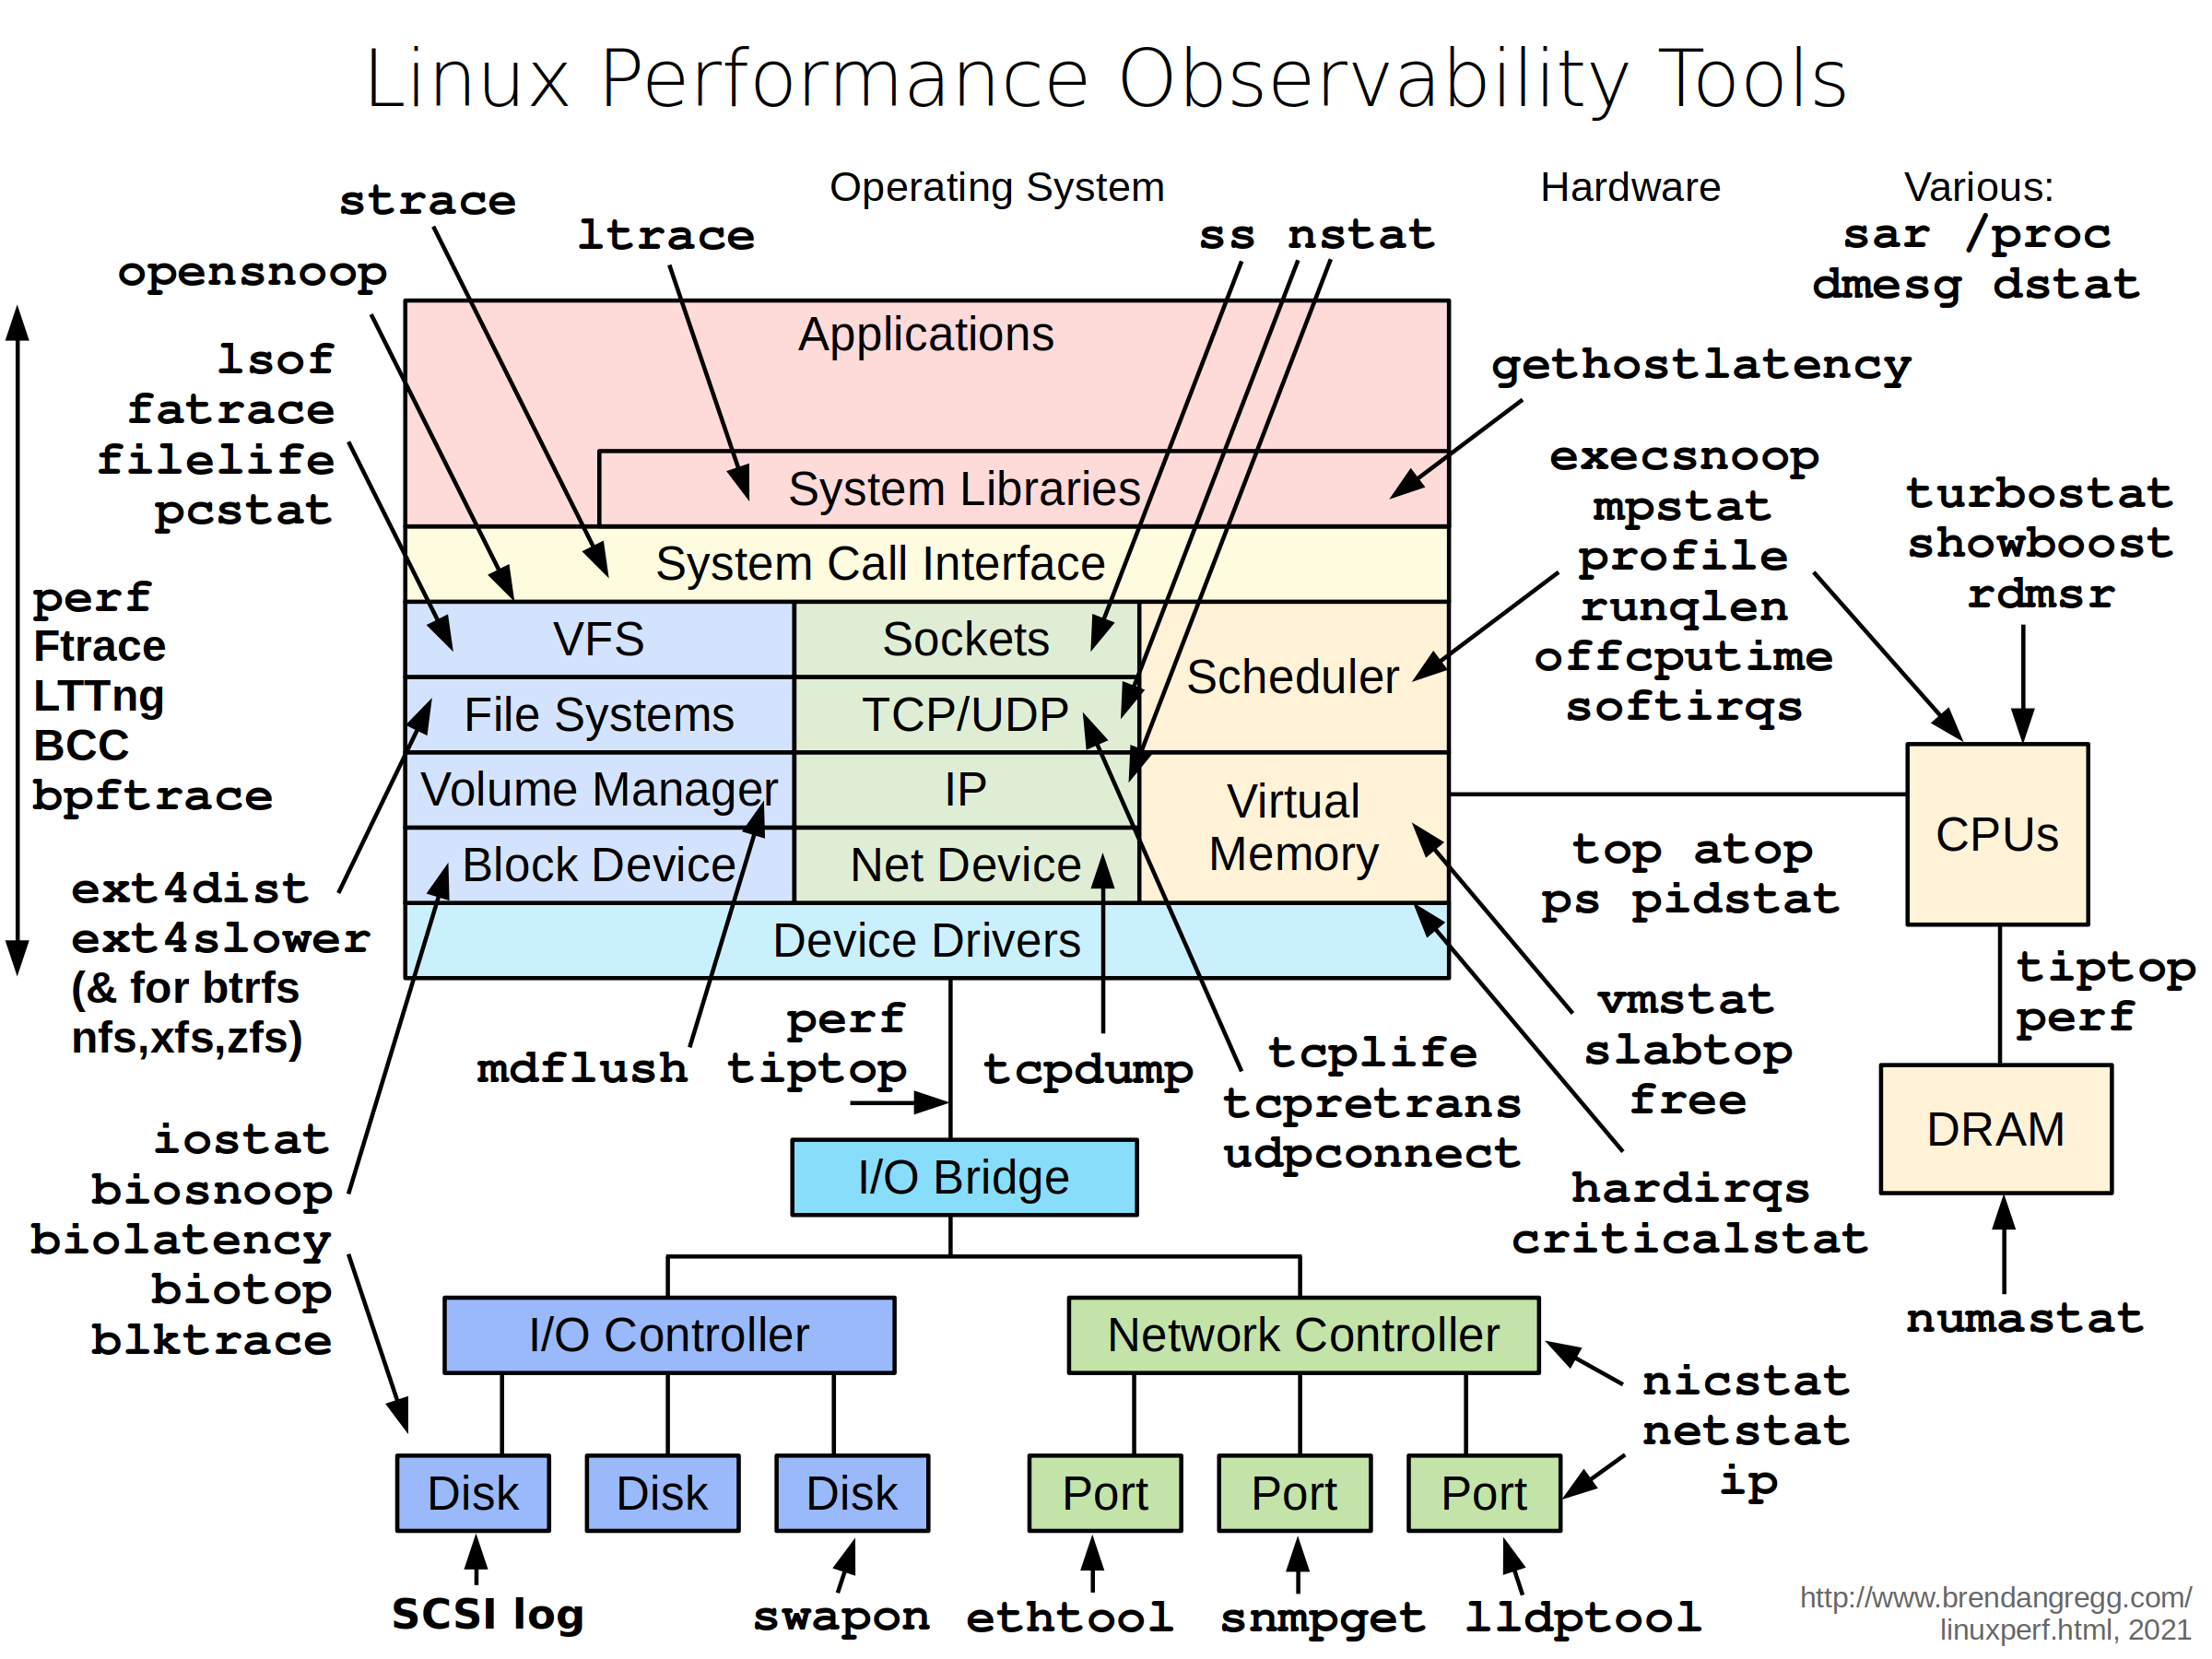
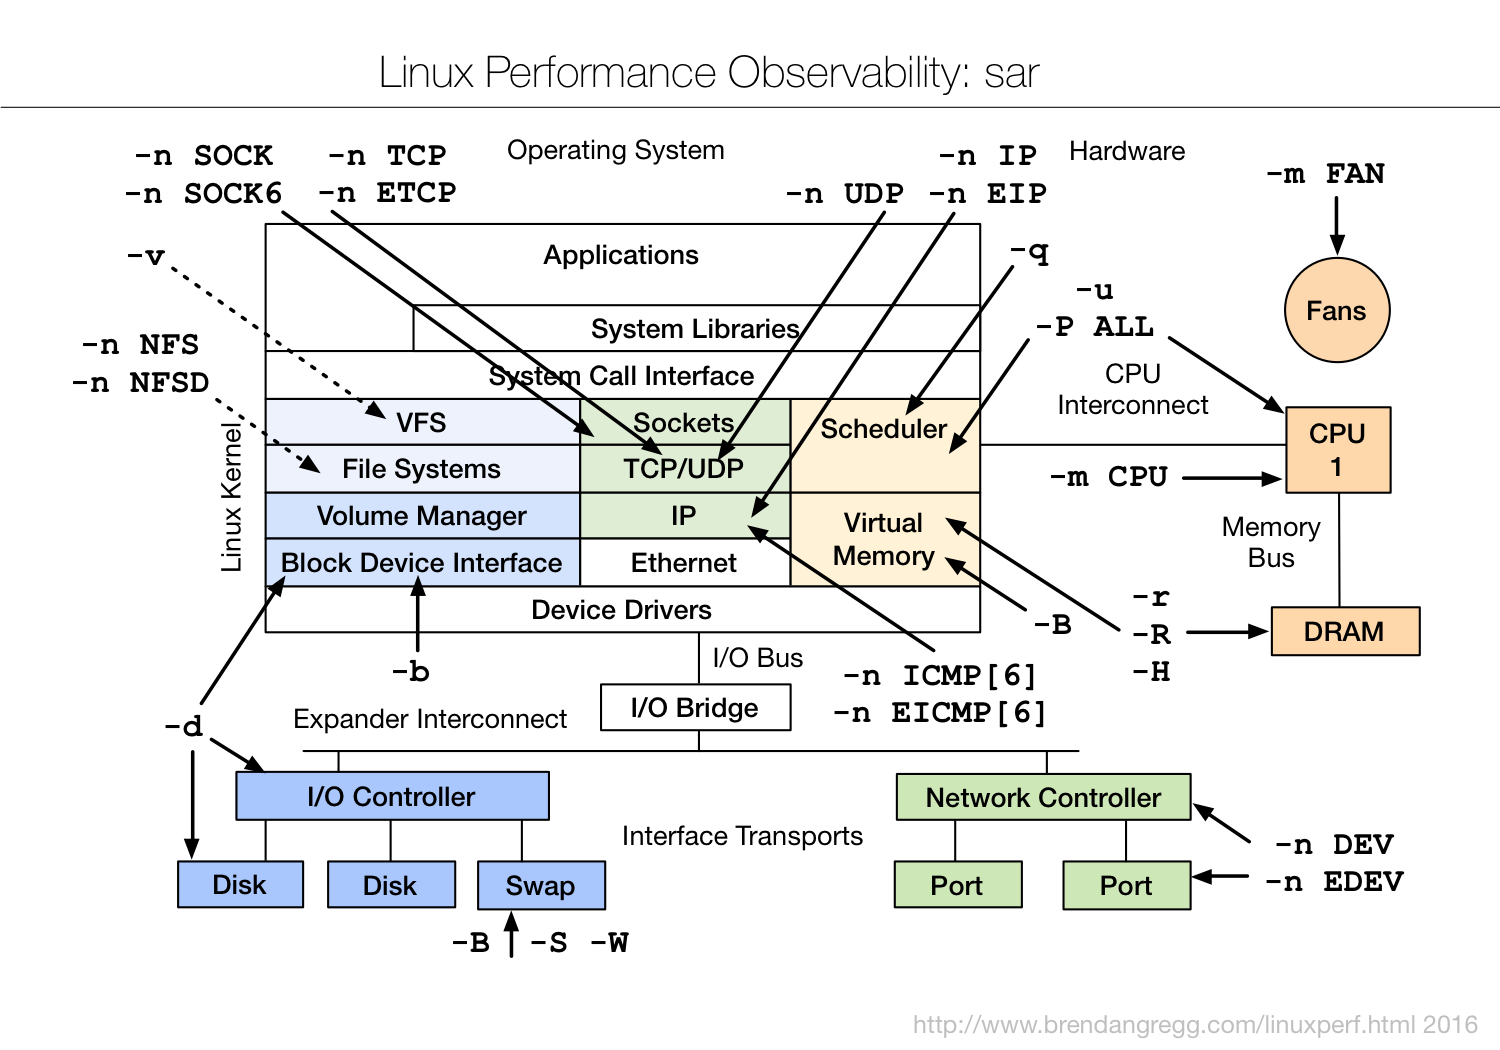
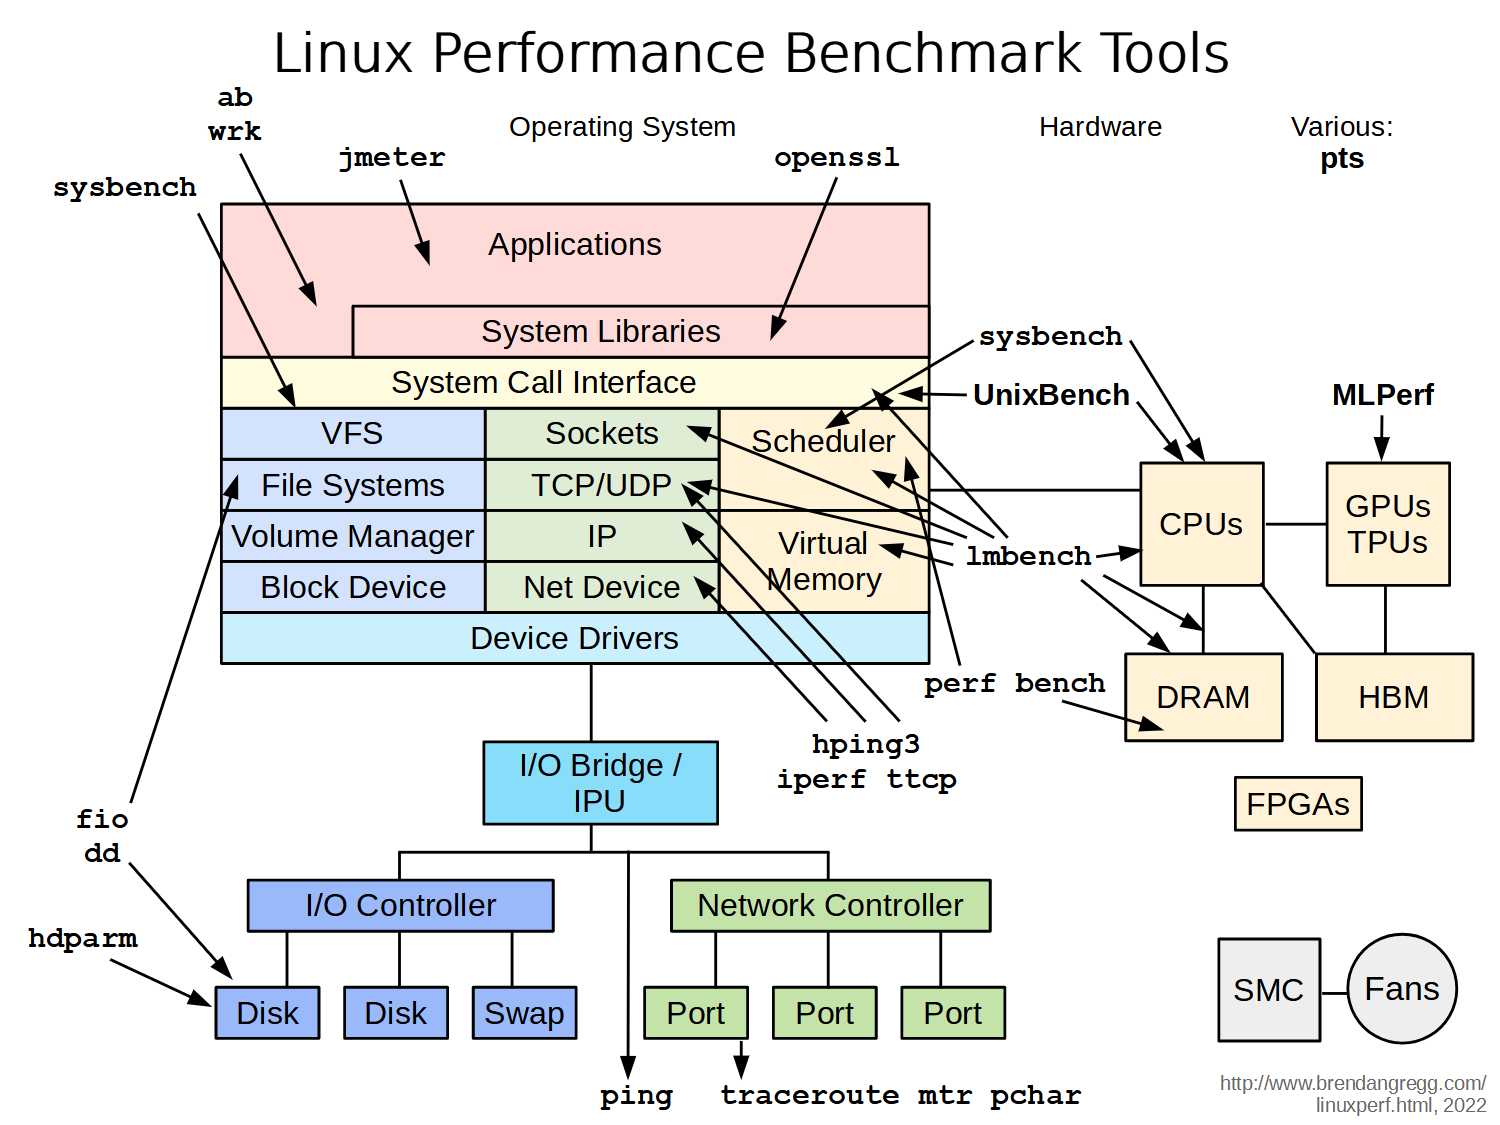
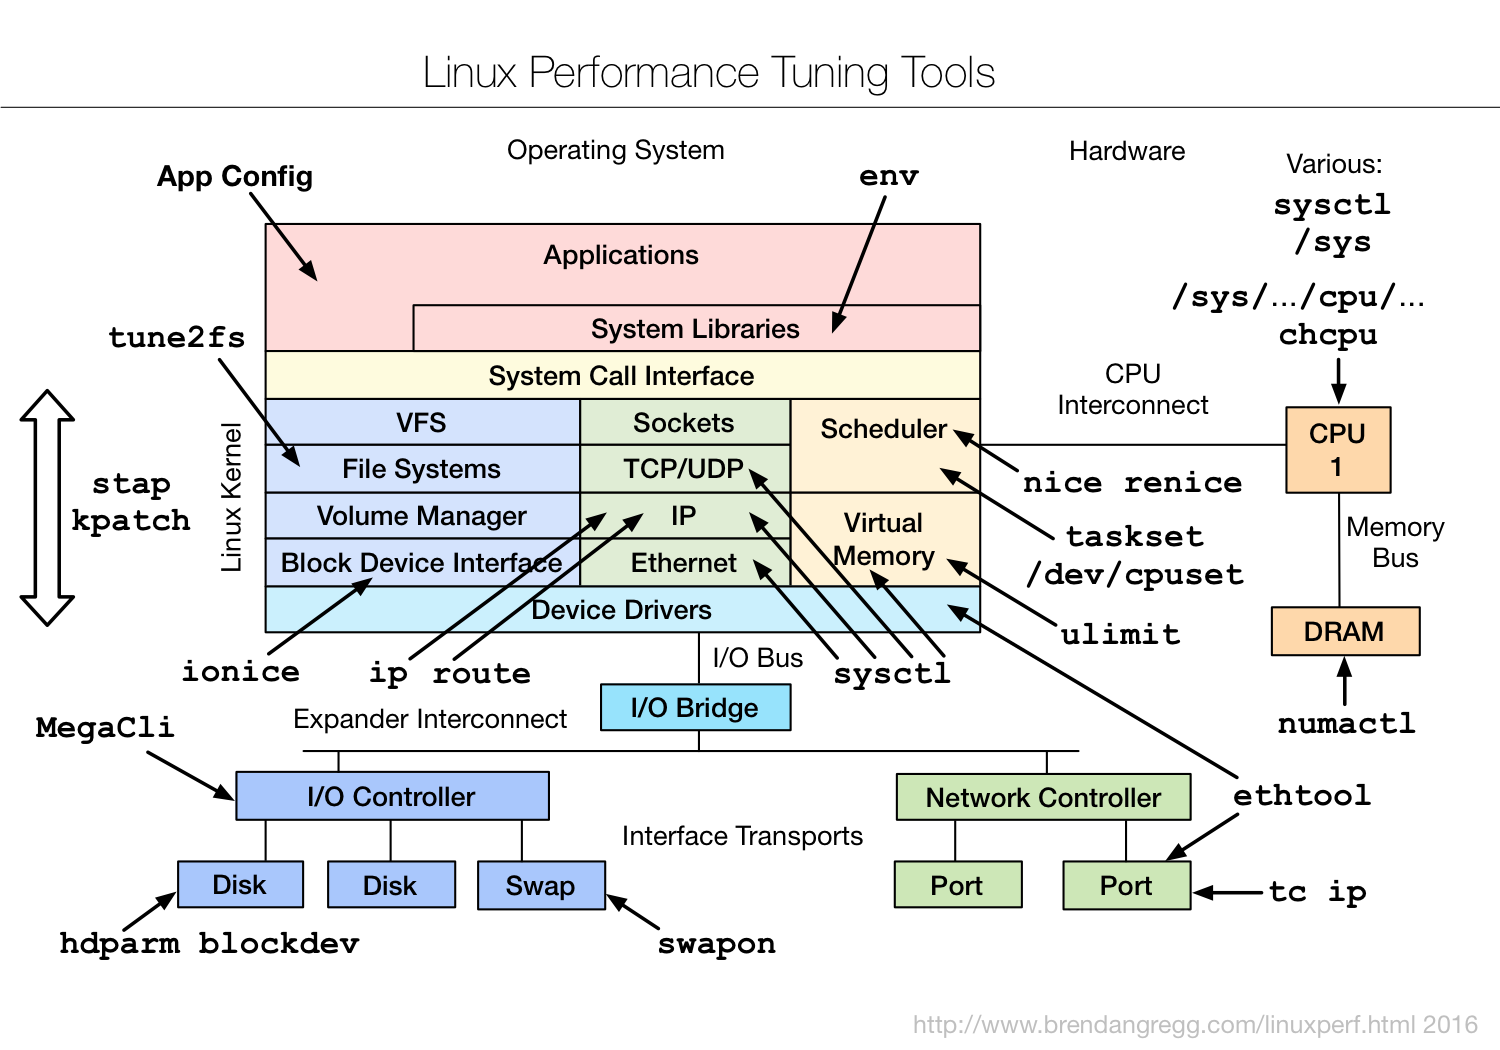
- Linux Performance
- [參考] http://www.ufsdump.org/ - 這個網站有許多關於效能調校的細部說明
- [參考] System Tuning Info for Linux Servers (有點舊了)
- [文件] Linux Performance and Tuning Guidelines - IBM Redbooks(PDF)
- [文件] Red Hat Enterprise Linux Performance Tuning Guide (PDF)
- [工具] 以下是 http://www.ufsdump.org/ 文件中提到的幾個工具
- system & disk I/O
- network
- [工具] Open Source Performance Test Tools 列舉了許多自由軟體相關的效能測試工具
- [工具] 16 Linux Server Monitoring Commands You Really Need To Know
- [參考] Performance tuning
- [參考] Linux performance tuning guide (Redhat, PDF)
- [參考] Linux Performance and Development Tools - 列舉了許多自由軟體的效能分析工具(Performance Analysis Tools)
- [參考] The USE Method: Linux Performance Checklist - 列舉了效能調校的檢查清單
- [參考] Big List of 20 Common Bottlenecks - 效能瓶頸大致上可以歸納為 20 個情境
Performance Tuning
System Performance Tuning : CPU
- 檢查 CPU 是否為 64 位元的方法 - 參考自 Ubuntu 論壇
- <參考> Linux: Find If Processor (CPU) is 64 bit / 32 bit
~$ sudo lshw -C cpu | grep width
       width: 32 bits ---> 為 32 位元
=======
       width: 64 bits ---> 為 64 位元
$ getconf LONG_BIT 64
~$ grep flags /proc/cpuinfo | grep " lm " --color
~$ grep -o -w 'lm' /proc/cpuinfo | sort -u
lm
- <參考> Linux: Find If Processor (CPU) is 64 bit / 32 bit
- 檢查 CPU 是否支援虛擬化 - 旗標(flags)分別是: Intel (vmx) 與AMD (svm) (KVM 安裝 (rock))
~$ cat /proc/cpuinfo | egrep 'vmx|svm' --color
- 執行時間過久:
[1786800.621065] "echo 0 > /proc/sys/kernel/hung_task_timeout_secs" disables this message.
- 實體機專用 - 檢查 Intel CPU 的節電狀態
cat /sys/devices/system/cpu/cpu0/cpufreq/scaling_available_governors
System Performance Tuning : Memory
- 查詢記憶體時脈與單一條的大小
$ sudo dmidecode
搜尋 Memory Device 會看到類似的結果
Memory Device
       Array Handle: 0x1000
       Error Information Handle: Not Provided
       Total Width: 64 bits
       Data Width: 64 bits
       Size: 2048 MB
       Form Factor: DIMM
       Set: None
       Locator: DIMM_4
       Bank Locator: Not Specified
       Type: DDR2
       Type Detail: Synchronous
       Speed: 800 MHz (1.2 ns)
       Manufacturer: 7F4F000000000000
       Serial Number: 0007D1E4
       Asset Tag: 540834
       Part Number: TS256MLQ64V8U
- Share Memory - 有些程式需要用到比較多 Share Memory (共享記憶體), 如: Kerrighed (2008-03-20 (rock/rider))
echo "kernel.shmall = 796917578" >> /etc/sysctl.conf
echo "kernel.shmmax = 796917578" >> /etc/sysctl.conf
echo "kernel.shmmni = 4096"      >> /etc/sysctl.conf
- Cache Memroy - [參考] 回收 Linux cached memory
- 設定 vm.drop_caches 觸發 kernel 回收用於 cache 的記憶體。 至於 1, 2, 3 的等級,可參考 LinuxInsight 的說明
- 1: free pagecache
- 2: free dentries and inodes
- 3: free pagecache, dentries and inodes
echo 1 > /proc/sys/vm/drop_caches
sysctl -w vm.drop_caches=1
- 設定 vm.vfs_cache_pressure 使 kernel 更勤於回收 cache。
sysctl -w vm.vfs_cache_pressure=n (n > 100)
- 設定 vm.drop_caches 觸發 kernel 回收用於 cache 的記憶體。 至於 1, 2, 3 的等級,可參考 LinuxInsight 的說明
- 如何清除使用中的 SWAP 呢?(把 SWAP 的內容釋放出來) - <參考> How do I free virtual memory in Ubuntu?
sudo swapoff -a
sudo swapon -a
- 關於 /proc/sys/vm/swappiness 或 vm.swappiness (2011-02-27)
- 代表意義:Aggressiveness of swapping
- 數值範圍:0 ~ 100,通常預設值為 60 (越高越積極搬 SWAP)
- 0 : 除非有必要才把虛擬記憶體搬到 SWAP
- 100 : 非常頻繁地將虛擬記憶體(VIRT)搬到 SWAP
- <參考> Understanding swap files in Linux
- 如何加速桌面應用 - <參考> Tales from responsivenessland: why Linux feels slow, and how to fix that
- 不過這樣的設定不能用在 VM Server 上,會讓 VM Server 的記憶體很快被用完。
sysctl -w vm.swappiness=1
sysctl -w vm.vfs_cache_pressure=50
- (2011-02-27)
- 從「Virtual Memory Usage from Java under Linux, too much memory used」這篇討論,學到一個指令:pmap,隸屬於 procps 套件中。用法是 pmap -x $PID (不同身份時,得透過 sudo 取得記憶體狀態)
procps: /usr/bin/pmap
~$ sudo pmap -x $PID
jazz@drbl:~$ sudo pmap 24972
24972:   /usr/bin/php5-cgi
0000000000400000   5144K r-x--  /usr/bin/php5-cgi
0000000000b06000    356K rw---  /usr/bin/php5-cgi
0000000000b5f000     32K rw---    [ anon ]
00000000010da000   2212K rw---    [ anon ]
00007f418a02b000     40K r-x--  /lib/libnss_files-2.7.so
00007f418a035000   2048K -----  /lib/libnss_files-2.7.so
00007f418a235000      8K rw---  /lib/libnss_files-2.7.so
00007f418a237000     28K r-x--  /usr/lib/php5/20060613/pdo_mysql.so
00007f418a23e000   2044K -----  /usr/lib/php5/20060613/pdo_mysql.so
00007f418a43d000      4K rw---  /usr/lib/php5/20060613/pdo_mysql.so
... 略 ...
System Performance Tuning : File System
- (2010-05-11)
- 如何調整每個使用者可以開啟的檔案個數
- [參考] Increasing the file descriptor limit
- [參考] GNU/Linux - How Many Open Files?
- 注意:修改 /etc/security/limits.conf 中間必須確定是 TAB ,如果有設定 vim 的 softwaretab 的話,得特別當心!!!
- /proc/sys/fs/file-max - 核心預設最多可以開啟的檔案個數
~$ cat /proc/sys/fs/file-max
743964
- 修改方法: 使用 sysctl 指令或編輯 /etc/sysctl.conf
sysctl -w fs.file-max=100000
- 修改方法: 使用 sysctl 指令或編輯 /etc/sysctl.conf
- /proc/sys/fs/file-nr - 目前已開啟檔案個數、可供開啟檔案個數、總開啟檔案上限
[root@srv-4 proc]# cat /proc/sys/fs/file-nr
3391    969     52427
|	 |       |
|	 |       |
|        |       maximum open file descriptors
|        total free allocated file descriptors
total allocated file descriptors
(the number of file descriptors allocated since boot)
- /etc/security/limits.conf - 每個程序(process)可以開啟檔案的個數(number limits of open files per process) - 像 HDFS 的 DataNode 就需要調整這種參數(2010-02-22)
-
/etc/security/limits.conf
old new 49 49 #ftp - chroot /ftp 50 50 #@student - maxlogins 4 51 51 52 * soft nofile 4096 53 * hard nofile 743964 54 52 55 # End of file
-
- /etc/pam.d/login - 告訴系統要用 /etc/security/limits.conf 來設定一些上限
# Sets up user limits according to /etc/security/limits.conf
# (Replaces the use of /etc/limits in old login)
session    required   pam_limits.so
- 指令: ulimit - 可以告訴你一些系統限制,並且設定想要的値
jazz@Wdebian:~$ ulimit -a
core file size          (blocks, -c) 0
data seg size           (kbytes, -d) unlimited
scheduling priority             (-e) 0
file size               (blocks, -f) unlimited
pending signals                 (-i) 72704
max locked memory       (kbytes, -l) 32
max memory size         (kbytes, -m) unlimited
open files                      (-n) 1024
pipe size            (512 bytes, -p) 8
POSIX message queues     (bytes, -q) 819200
real-time priority              (-r) 0
stack size              (kbytes, -s) 8192
cpu time               (seconds, -t) unlimited
max user processes              (-u) 72704
virtual memory          (kbytes, -v) unlimited
file locks                      (-x) unlimited
- 假設 /proc/sys/fs/file-max 跟 /etc/security/limits.conf 都有設定上限為 743964,且 /etc/pam.d/login 也有打開,但是 ulimit -a 指令仍顯示 1024 (預設),可以修改 /etc/rc.local 或 /etc/profile 強制用 ulimit -n 743964 來提高開檔個數。
~$ ulimit -n 743964
- [備註] 如果 ulimit 超出可容許範圍,會顯示 Operation not permitted,此時請檢查相關設定値
~$ ulimit -n 7439640
-bash: ulimit: open files: cannot modify limit: Operation not permitted
- 如果遇到以上情形,請改用 - 參考來源
~$ ulimit -Sn unlimited
- 幫 Hadoop HDFS 調整系統資源限制
-
/etc/security/limits.conf
old new 49 49 #ftp - chroot /ftp 50 50 #@student - maxlogins 4 51 51 52 * soft nofile 8192 53 52 54 # End of file
-
- [參考] http://lzone.de/cheat-sheet/ulimit
- 指令: prlimit - 可以告訴你特定 process 的限制,並且設定想要的値
$ sudo prlimit --pid 641 --nofile=743964:743964
$ sudo prlimit --pid 641
RESOURCE   DESCRIPTION                             SOFT      HARD UNITS
AS         address space limit                unlimited unlimited 位元組
CORE       max core file size                         0 unlimited blocks
CPU        CPU time                           unlimited unlimited seconds
DATA       max data size                      unlimited unlimited 位元組
FSIZE      max file size                      unlimited unlimited blocks
LOCKS      max number of file locks held      unlimited unlimited
MEMLOCK    max locked-in-memory address space     65536     65536 位元組
MSGQUEUE   max bytes in POSIX mqueues            819200    819200 位元組
NICE       max nice prio allowed to raise             0         0
NOFILE     max number of open files              743964    743964
NPROC      max number of processes                56030     56030
RSS        max resident set size              unlimited unlimited pages
RTPRIO     max real-time priority                     0         0
RTTIME     timeout for real-time tasks        unlimited unlimited microsecs
SIGPENDING max number of pending signals          56030     56030
STACK      max stack size                       8388608 unlimited 位元組
- 低階指令: 直接查 procfs
cat /proc/<pid>/limits
- 指令: prlimit - 可以告訴你特定 process 的限制,並且設定想要的値
I/O Performance Tuning : NFS
- NFS Tuning - /etc/fstab - 加大 NFS read/write size 可以提升檔案系統的 I/O 效率 (2008-03-20 (rock/rider))
192.168.0.111:/home /home nfs rw,bg,soft,intr,rsize=262144,wsize=262144 0 4
192.168.0.111:/opt  /opt  nfs ro,bg,soft,intr,rsize=262144,wsize=262144 0 4
192.168.0.111:/usr  /usr  nfs ro,bg,soft,intr,rsize=262144,wsize=262144 0 4
I/O Performance Tuning : IOWait
- 2010-03-31 : 高 IOWait 有什麼好的解決之道呢??
- How to identify what processes are generating IO Wait load?
Jun run "pidstat -d 5" and it will print the list of processes doing IO over the last 5 seconds.
- Re: Major problems: High Iowait. Change filesystem from etx4 to xfs/ext3/jfs?
vm.dirty_writeback_centisecs=100
vm.dirty_expire_centisecs=100"
- iowait problem - 顯示了使用 vmstat , iostat , hdparm 的技巧
- 在 Linux 底下查硬碟型號(hard disk model and serial number)
- [參考一] 查看 Linux 系統資訊常用指令
- [參考二] Linux: Find out serial / model number and vendor information for SATA and IDE hard disk
- [參考三] Hard-disk model and manufacturer - linux-misc
- [工具一] hdparm - Debian 有 hdparm 套件 - 可以拿來測試硬碟效能
jazz@Wdebian:~$ sudo apt-get install hdparm jazz@Wdebian:~$ sudo hdparm -I /dev/sda | grep "Model Number" Model Number: ST31500341AS - 如果要測試硬碟 I/O 速度,可以用 hdparm -t
sudo hdparm -t /dev/sda
sudo hdparm -T /dev/sda
sudo hdparm --direct -t /dev/sda
sudo hdparm --direct -T /dev/sda
- [工具二] smartctl - Debian 有 smartmontools 套件 - 也可以拿來測試硬碟效能
jazz@Wdebian:~$ sudo apt-get install smartmontools
jazz@Wdebian:~$ sudo smartctl -a /dev/sda | grep "Device Model:"
Device Model:     ST31500341AS
- [低階指令一] 如果是 SCSI 或 SATA 硬碟,可以查 /proc/scsi/scsi
jazz@Wdebian:~$ cat /proc/scsi/scsi
Attached devices:
Host: scsi0 Channel: 00 Id: 00 Lun: 00
  Vendor: ATA      Model: ST31500341AS     Rev: CC1H
  Type:   Direct-Access                    ANSI  SCSI revision: 05
Host: scsi1 Channel: 00 Id: 00 Lun: 00
  Vendor: TSSTcorp Model: DVD-ROM TS-H353B Rev: D500
  Type:   CD-ROM                           ANSI  SCSI revision: 05
Host: scsi2 Channel: 00 Id: 00 Lun: 00
  Vendor: ATA      Model: ST3640323AS      Rev: SD35
  Type:   Direct-Access                    ANSI  SCSI revision: 05
- [低階指令二] 如果是 IDE 硬碟,可以查 /proc/ide/hd*/model
jazz@lenny:~$ sudo cat /proc/ide/hda/model
VBOX HARDDISK
Network Performance Tuning
- TCP Tuning - (2008-03-20 (LSI))
echo 262144               > /proc/sys/net/core/rmem_default
echo 8388608              > /proc/sys/net/core/wmem_max
echo 8388608              > /proc/sys/net/core/rmem_max
echo "4096 87380 4194304" > /proc/sys/net/ipv4/tcp_rmem
echo "4096 65536 4194304" > /proc/sys/net/ipv4/tcp_wmem
- TCP TIME_WAIT & Reuse - 適用網站伺服器 (2010-03-26)
sysctl net.ipv4.tcp_fin_timeout=10
sysctl net.ipv4.tcp_tw_reuse=1
sysctl net.ipv4.tcp_tw_recycle=1
- 如果沒辦法 ping 224.0.0.1 的話,代表 Broadcast ICMP 封包被濾掉了,因為預設 Linux kernel 2.6 是 disable 的。解法如下:(2009-09-07)
echo "0" > /proc/sys/net/ipv4/icmp_echo_ignore_broadcasts
~# echo "net.ipv4.icmp_echo_ignore_broadcasts = 0" >> /etc/sysctl.conf
~# sysctl -p
net.ipv4.ip_forward = 1
net.ipv4.icmp_echo_ignore_broadcasts = 0
- 如何在 Linux System 當中偵測網路線是否有接上? (2009-05-05)
$ cat /sys/class/net/eth0/carrier
- 有時候不見得有安裝 net-tools 套件,沒有 netstat 指令,有沒有辦法透過 procfs 去排查是否有太多 TIME_WAIT 呢?
- 若單純看 TIME_WAIT 的話,可以觀察 /proc/slabinfo
cat /proc/slabinfo | grep tw_sock
- 另一個方式是觀察 /proc/net/tcp 與 /proc/net/tcp6 的 st 欄位
$ cat /proc/net/tcp | awk '{ print $4 }' | sort | uniq -c 3 01 14 06 5 0A 1 st - 對應的數值可於 tcp_states.h 查到
	TCPF_ESTABLISHED = (1 << 1),
	TCPF_SYN_SENT	 = (1 << 2),
	TCPF_SYN_RECV	 = (1 << 3),
	TCPF_FIN_WAIT1	 = (1 << 4),
	TCPF_FIN_WAIT2	 = (1 << 5),
	TCPF_TIME_WAIT	 = (1 << 6),
	TCPF_CLOSE	 = (1 << 7),
	TCPF_CLOSE_WAIT	 = (1 << 8),
	TCPF_LAST_ACK	 = (1 << 9),
	TCPF_LISTEN	 = (1 << 10),
	TCPF_CLOSING	 = (1 << 11),
	TCPF_NEW_SYN_RECV = (1 << 12),
- 若單純看 TIME_WAIT 的話,可以觀察 /proc/slabinfo
Power Management
- 啟動 SATA ALPM 電源管理功能 - powertop 提供之建議
echo min_power > /sys/class/scsi_host/host0/link_power_management_policy
- 虛擬機器的 clocksource (2010-02-11)
echo acpi_pm > /sys/devices/system/clocksource/clocksource0/current_clocksource
- 直接修改系統參數讓 Linux 休眠 (2010-03-03 (rock))
# echo 4 > /proc/acpi/sleep  /** 適用 Kernel 2.4 (swsusp)**/
# echo disk > /sys/power/state  /** 適用 Kernel 2.4 & 2.6 (swsusp)**/
Security / Management Tip
- [緣起] 有時因為 Kernel 顯示 DEBUG 訊息,縱使下 reboot 或 shutdown, halt 都無效時,可以使用這個技巧。
- [備忘] 強迫重新開機 - 使用以下指令或按下 ALT + SysRq + b
echo 1 > /proc/sys/kernel/sysrq
echo b > /proc/sysrq-trigger
- [備忘] 強迫直接關機 - 使用以下指令或按下 ALT + SysRq + o
echo 1 > /proc/sys/kernel/sysrq
echo o > /proc/sysrq-trigger
- [備忘] 強迫重新開機 - 使用以下指令或按下 ALT + SysRq + b
- 關於 /proc/sysrq-trigger (2009-11-17)
- Redhat 手冊的說明 - /proc/sysrq-trigger
- 其實除了 CTRL+ALT+DEL 外,Linux 還可以透過 System Request (Sys Rq) 按鍵 來做一些特殊除錯工作。這個 Sys Rq 鍵,通常跟 Print Screen 鍵做在一起。
- 要啟用這個功能,首先必須確認核心的 CONFIG_MAGIC_SYSRQ 參數是否有 enable。
- 維基百科除了說明 SYSRQ 可以做哪些事情外,還介紹了sysrqd這個軟體,讓管理者可以遠端執行 SYSRQ 的指令。PS.sysrqd 也有 debian 套件!!
- 關於 /proc/sys/kernel/sysrq (2009-11-17)
- [備忘] Linux 遇到 kernel panic 後可自動重新開機(Auto Reboot)
或者編輯 /etc/sysctl.conf 加入
$ sudo sysctl -w kernel.panic = 20
kernel.panic = 20
Last modified 9 years ago
Last modified on Apr 19, 2017, 3:00:09 PM


