
實作三: SSH 遠端登入
前言
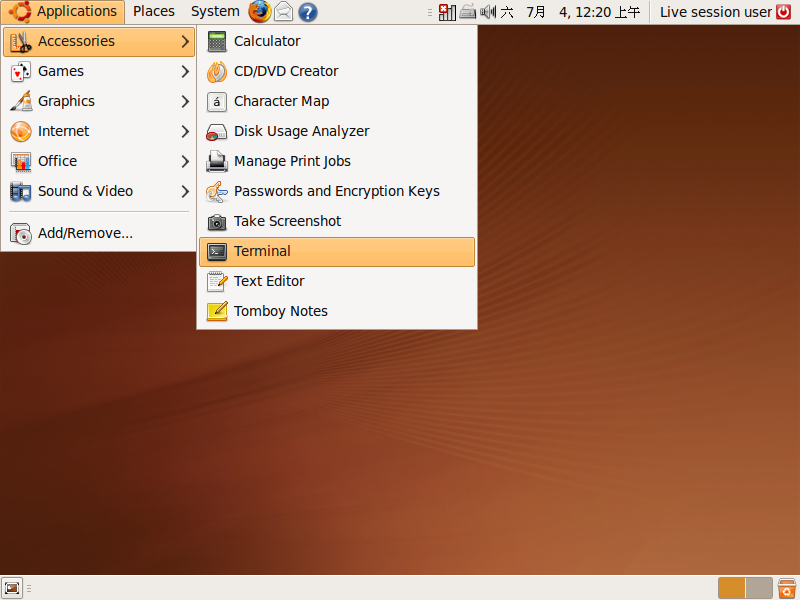
- 首先,請使用 Ubuntu 9.04 安裝光碟開機。然後選擇 Application > Accessories > Terminal

1. ssh
1.1 ssh 登入遠端主機練習
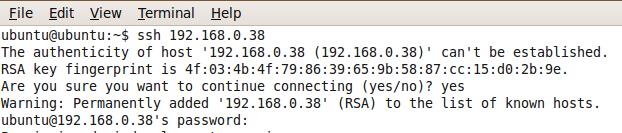
- 在 Linux 下,你可以用以下指令連線
$ ssh bio.classcloud.org
- 此時 ssh 會使用你目前正在使用的使用者名稱登入,並要求輸入密碼
- 在 Windows 底下,你可以使用各種 SSH Client 連線,例如: PuTTY (英文) 或 PieTTY (中文)
- 下載 PieTTY - http://ntu.csie.org/~piaip/pietty - 另存
- 開啟 PieTTY
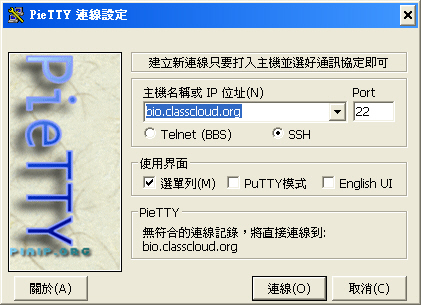
- 確認選擇 SSH 而非 Telnet , PORT (連接埠) 數值為 22
- 輸入 IP 位址
bio.classcloud.org
- PieTTY 會詢問使用者名稱與密碼


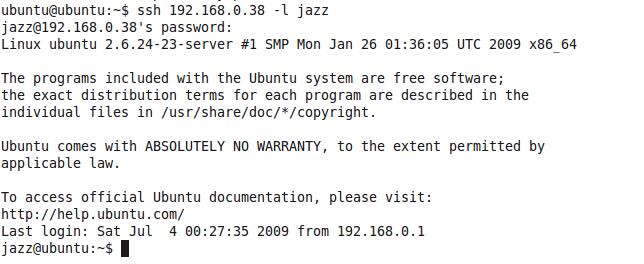
1.2 ssh 連線指定使用者名稱
- 在 Linux 下,你可以用以下指令來指定欲登入的使用者名稱
$ ssh bio.classcloud.org -l ym24
或
$ ssh ym24@bio.classcloud.org
- 要結束 ssh 連線,請輸入 exit
$ exit
- [練習] 請使用發給各位的帳號與密碼登入此次課程專用的叢集

1.3 ssh 連線非預設 22 連接埠
- 在 Linux 下,你可以用以下指令連線
$ ssh bio.classcloud.org -u ym24 -p 8022

- 在 Windows 底下,你可以直接修改 PORT 的數?

1.4 不用登入也可以執行指令
- 在 Linux 下,你可以用以下指令直接執行指令
$ ssh ym24@bio.classcloud.org ls


2. scp
2.1 使用 scp 將本地端檔案複製到遠端
- 在 Linux 底下,可以用以下指令複製本地端檔案到遠端
ubuntu@ubuntu:~$ scp /etc/profile ym24@bio.classcloud.org:.
ym24@bio.classcloud.org's password:
profile                                      100%  497     0.5KB/s   00:00
- 檢查有沒有複製成功呢??
ubuntu@ubuntu:~$ ssh ym24@bio.classcloud.org ls
ym24@bio.classcloud.org's password:
profile
2.2 使用 scp 從遠端複製檔案到本地端
- 在 Linux 底下,可以用以下指令複製遠端檔案到本地端
ubuntu@ubuntu:~$ scp ym24@bio.classcloud.org:profile .
ym24@bio.classcloud.org's password:
profile                                      100%  497     0.5KB/s   00:00
ubuntu@ubuntu:~$ ls
profile
2.3 懶得打密碼??請交換 SSH 認證金鑰
- 在 Linux 下,你可以用以下指令產生 SSH 認證金鑰
ubuntu@ubuntu:~$ ssh-keygen
Generating public/private rsa key pair.
Enter file in which to save the key (/home/ubuntu/.ssh/id_rsa):
Enter passphrase (empty for no passphrase):
Enter same passphrase again:
Your identification has been saved in /home/ubuntu/.ssh/id_rsa.
Your public key has been saved in /home/ubuntu/.ssh/id_rsa.pub.
The key fingerprint is:
ad:40:81:53:dc:4b:6f:41:b2:71:82:4b:a7:3a:63:8d ubuntu@ubuntu
- 然後用 ssh 指令在遠端建立 .ssh 目錄
ubuntu@ubuntu:~$ ssh ym24@bio.classcloud.org mkdir -p .ssh
ym24@bio.classcloud.org's password:
- 把 .ssh/id_rsa.pub 拷貝到遠端 .ssh/authorized_keys
ubuntu@ubuntu:~$ scp .ssh/id_rsa.pub ym24@bio.classcloud.org:.ssh/authorized_keys
ym24@bio.classcloud.org's password:
id_rsa.pub                                   100%  395     0.4KB/s   00:00
- 此時要透過 ssh 在遠端執行 ls 指令就不用密碼了
ubuntu@ubuntu:~$ ssh ym24@bio.classcloud.org ls
profile
2.4 複製本地目錄到遠端
- 我們可以透過 -r 參數說明要複製的是目錄
ubuntu@ubuntu:~$ scp -r temp/ ym24@bio.classcloud.org:.
ubuntu@ubuntu:~$ ssh ym24@bio.classcloud.org ls
profile
temp
- 若是不加 -r 的話,scp 指令會警告你 "not a regular file"
ubuntu@ubuntu:~$ scp temp ym24@bio.classcloud.org:.
temp: not a regular file
2.5 複製遠端目錄到本地
- 我們可以透過 -P (注意大寫) 來指定要連線的 PORT
ubuntu@ubuntu:~$ scp -r -P 8022 ym24@bio.classcloud.org:temp temp2
ubuntu@ubuntu:~$ ls
profile  temp  temp2
2.6 WinSCP 操作
- 在 Windows 底下,可以下載 WinSCP,就可以像使用 FTP 軟體一樣直接上傳下載檔案。
- 下載位址:http://winscp.net
3. screen
- 有些時候,為了在不同的檔案之間複製、貼上,要開好幾個終端機 (Terminal) 或 PieTTY,其實 Linux 本身就內建這樣的功能,這個指令叫做 screen
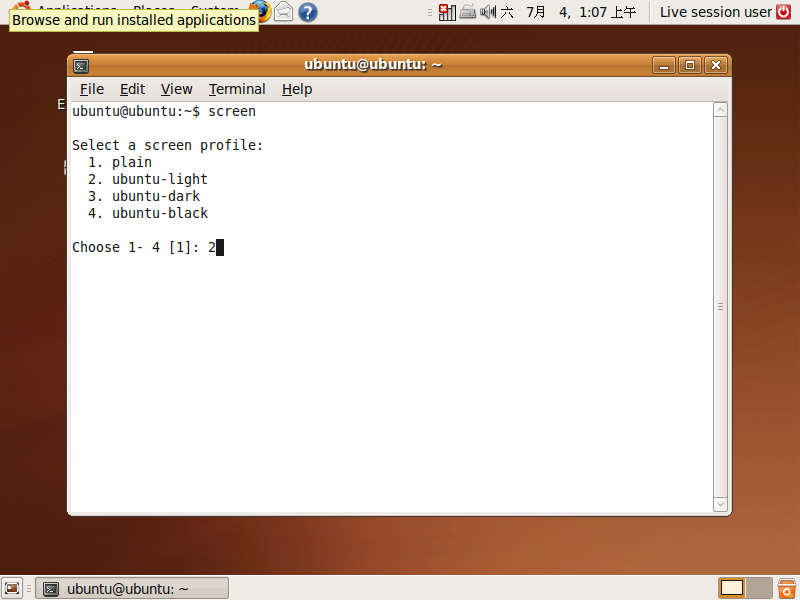
3.1 啟用 screen
- 執行 screen 指令,即可進入 screen
ubuntu@ubuntu:~$ screen
- [註] Ubuntu 9.04 有特別設計了幾種情境的 screen 可以使用,一般並不會出現這樣的訊息。

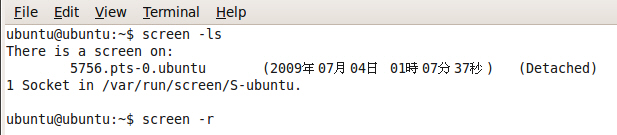
3.2 列出 screen 資訊與強制關閉 screen
- 我們可以透過 screen -ls 來查詢目前開啟的 screen 有哪些
- 縱使在 screen 中,還是可以強制用 screen -D 關閉目前的畫面


3.3 接續斷線的 screen
- screen 的狀態如果是 Detached 就可以用 -r 接續
- screen 的狀態如果是 Attached 就必須用 -R 接續

3.4 練習 screen 快速鍵
- 請按下 CTRL+a 後按下 CTRL+c 可以新增一個視窗,編號為 1
- 請按下 CTRL+a 後按下 CTRL+a 可以切換為視窗 1。同樣快速鍵,會切回視窗 0。
- 請按下 CTRL+a 後按下 CTRL+c 可以新增一個視窗,編號為 2
- 請按下 CTRL+a 後按下 0 可以切換為視窗 0
- 請按下 CTRL+a 後按下 1 可以切換為視窗 1
- 請按下 CTRL+a 後按下 2 可以切換為視窗 2
- 請按下 CTRL+a 後按下 CTRL+d 可以強制離開 screen
4. chown / chgrp / chmod
4.1 查詢檔案目前的權限
- 我們以 2.2 拷貝的 profile 這個檔案為例,使用 ls -al 來查詢權限狀態
ubuntu@ubuntu:~$ ls -al profile
-rw-r--r-- 1 ubuntu ubuntu 497 2009-07-04 00:50 profile
- 由前面的 -rw-r--r-- 我們可以知道它是一個檔案,擁有者可以讀/寫,同群組的其他使用者可以讀,不同群組的其他使用者可以讀。
- 擁有者是 ubuntu,所屬群組為 ubuntu,改變時間為 2009-07-04 00:50
4.2 使用 chown 來改變檔案之擁有人
- 欲使用 chown 必須擁有 sudo 權限或跟新擁有者同群組的權限,否則會有 "Operation not permitted" 的錯誤
ubuntu@ubuntu:~$ chown ym24 profile
chown: changing ownership of `profile': Operation not permitted
- 這裡我們用 sudo 來改擁有者
ubuntu@ubuntu:~$ sudo chown root profile
- 改好之後,再查詢現在的擁有者是 root
ubuntu@ubuntu:~$ ls -al profile
-rw-r--r-- 1 root ubuntu 497 2009-07-04 00:50 profile
- 如果用 vi 開啟 profile 檔案,那會發現畫面上顯示 "profile" [readonly] 的訊息,代表 ubuntu 現在只是同群組的使用者,只能讀,不能寫了。
4.3 使用 chgrp 來改變檔案的群組
- 這裡我們用 sudo 來執行 chgrp 改變檔案的群組
ubuntu@ubuntu:~$ sudo chgrp root profile
ubuntu@ubuntu:~$ ls -al profile
-rw-r--r-- 1 root root 497 Jul  4 00:50 profile
4.4 使用 chmod 來改變檔案的權限
- 這裡我們用 sudo 來執行 chmod 改變檔案的權限
- 權限是以二進位計算,因此 7 = 111 = rwx 而 0 = 000 = ---
ubuntu@ubuntu:~$ sudo chmod 700 profile
ubuntu@ubuntu:~$ ls -al profile
-rwx------ 1 root root 497 Jul  4 00:50 profile
- 權限是以二進位計算,因此 7 = 111 = rwx 而 0 = 000 = ---
- 此時,用 cat profile 會有 Permission denied 的錯誤
ubuntu@ubuntu:~$ cat profile
cat: profile: Permission denied
- 我們若把擁有者身分換回 ubuntu 就會恢復可讀寫的狀態
ubuntu@ubuntu:~$ sudo chown ubuntu:ubuntu profile
ubuntu@ubuntu:~$ ls -al profile
-rwx------ 1 ubuntu ubuntu 497 Jul  4 00:50 profile
ubuntu@ubuntu:~$ cat profile
5. ps
- 查詢自己目前正在跑的程序,其中 PID 的意思是 Process ID 意即每個執行的程序都有一個自己識別用的編號
ubuntu@ubuntu:~$ ps
  PID TTY          TIME CMD
 6017 pts/1    00:00:00 bash
 6391 pts/1    00:00:00 ps
- 加上 -l 參數,顯示詳細資料,這裡的 UID = User ID, PPID = Parent Process ID
ubuntu@ubuntu:~$ ps -l
F S   UID   PID  PPID  C PRI  NI ADDR SZ WCHAN  TTY          TIME CMD
0 R  1003  6491  6490  3  80   0 -  5257 -      pts/0    00:00:00 bash
0 R  1003  6507  6491  0  80   0 -  1661 -      pts/0    00:00:00 ps
- 加上 -ef 看所有執行中的程序
ubuntu@ubuntu:~$ ps -ef
UID        PID  PPID  C STIME TTY          TIME CMD
root         1     0  0 00:06 ?        00:00:01 /sbin/init
root         2     0  0 00:06 ?        00:00:00 [kthreadd]
root         3     2  0 00:06 ?        00:00:00 [migration/0]
root         4     2  0 00:06 ?        00:00:00 [ksoftirqd/0]
root         5     2  0 00:06 ?        00:00:00 [watchdog/0]
root         6     2  0 00:06 ?        00:00:00 [events/0]
root         7     2  0 00:06 ?        00:00:00 [khelper]
...略...
- 加上 -ejH 看所有程序的樹狀關係
ubuntu@ubuntu:~$ ps -ejH
  PID  PGID   SID TTY          TIME CMD
    2     0     0 ?        00:00:00 kthreadd
    3     0     0 ?        00:00:00   migration/0
    4     0     0 ?        00:00:00   ksoftirqd/0
    5     0     0 ?        00:00:00   watchdog/0
    6     0     0 ?        00:00:00   events/0
    7     0     0 ?        00:00:00   khelper
   39     0     0 ?        00:00:00   kblockd/0
   42     0     0 ?        00:00:00   kacpid
   43     0     0 ?        00:00:00   kacpi_notify
  103     0     0 ?        00:00:00   kseriod
  145     0     0 ?        00:00:00   pdflush
  146     0     0 ?        00:00:00   pdflush
  147     0     0 ?        00:00:00   kswapd0
  190     0     0 ?        00:00:00   aio/0
 1377     0     0 ?        00:00:00   ata/0
 1381     0     0 ?        00:00:00   ata_aux
 1520     0     0 ?        00:00:00   scsi_eh_0
 1682     0     0 ?        00:00:00   scsi_eh_1
 1684     0     0 ?        00:00:00   scsi_eh_2
 2529     0     0 ?        00:00:00   kjournald
 2952     0     0 ?        00:00:00   kpsmoused
    1     1     1 ?        00:00:01 init
 2736  2736  2736 ?        00:00:12   udevd
 4208  4208  4208 tty4     00:00:00   getty
 4209  4209  4209 tty5     00:00:00   getty
 4213  4213  4213 tty2     00:00:00   getty
 4215  4215  4215 tty3     00:00:00   getty
 4216  4216  4216 tty6     00:00:00   getty
 ...略...
6. bg / fg / jobs / kill
- 這裡我們以 sleep 60 來產生一個展示用的程序,下完指令後按 CTRL + z 會顯示 Stopped
ubuntu@ubuntu:~$ sleep 60

[1]+  Stopped                 sleep 60
ubuntu@ubuntu:~$
- 此時下 bg 指令,會看到程序又恢復執行,只是後面多加上 & 符號。
- 我們可以使用 jobs 指令來看背景有哪些指令在執行。
ubuntu@ubuntu:~$ bg
[1]+ sleep 60 &
ubuntu@ubuntu:~$ jobs
[1]+  Running                 sleep 60 &
- 因此,如果你要直接把某個程序丟到背景執行,可以直接加上 & 符號
ubuntu@ubuntu:~$ sleep 60 &
[2] 6684
ubuntu@ubuntu:~$ sleep 60 &
[3] 6685
ubuntu@ubuntu:~$ sleep 60 &
[4] 6686
ubuntu@ubuntu:~$ jobs
[1]   Running                 sleep 60 &
[2]   Running                 sleep 60 &
[3]-  Running                 sleep 60 &
[4]+  Running                 sleep 60 &
- 如果要恢復特定的背景程序,可以用 fg 加上識別 ID 來恢復
ubuntu@ubuntu:~$ fg 1
- 當某個背景程序跑完時,會顯示 Done 訊息。
[1] Done sleep 60
- 我們如果用 ps 來觀察目前正在執行的程序,會發現還有三個留著。
ubuntu@ubuntu:~$ ps -a
  PID TTY          TIME CMD
 6684 pts/0    00:00:00 sleep
 6685 pts/0    00:00:00 sleep
 6686 pts/0    00:00:00 sleep
 6691 pts/0    00:00:00 ps
ubuntu@ubuntu:~$ jobs
[2]   Running                 sleep 60 &
[3]-  Running                 sleep 60 &
[4]+  Running                 sleep 60 &
- 如果想要移除某個執行中的程序,可以用 kill PID 方式
ubuntu@ubuntu:~$ kill
kill: usage: kill [-s sigspec | -n signum | -sigspec] pid | jobspec ... or kill -l [sigspec]
ubuntu@ubuntu:~$ kill 6684
[2]   Terminated              sleep 60
7. top
- 為了查詢系統負載,可以用 top 指令觀察目前 CPU 與記憶體的使用率
ubuntu@ubuntu:~$ top
- 這裡主要是看 Cpu(s) 的 %us (使用百分比)與 Mem 的 total 總使用量
top - 02:41:00 up 2:34, 2 users, load average: 0.08, 0.09, 0.03 Tasks: 43 total, 1 running, 42 sleeping, 0 stopped, 0 zombie Cpu(s): 0.0%us, 0.0%sy, 0.0%ni,100.0%id, 0.0%wa, 0.0%hi, 0.0%si, 0.0%st Mem: 253072k total, 85812k used, 167260k free, 5668k buffers Swap: 915664k total, 39472k used, 876192k free, 26360k cached PID USER PR NI VIRT RES SHR S %CPU %MEM TIME+ COMMAND 1 root 20 0 4020 804 672 S 0.0 0.3 0:01.29 init 2 root 15 -5 0 0 0 S 0.0 0.0 0:00.00 kthreadd 3 root RT -5 0 0 0 S 0.0 0.0 0:00.00 migration/0 4 root 15 -5 0 0 0 S 0.0 0.0 0:00.00 ksoftirqd/0 - 可以按 s 然後輸入更新秒數,例如:1
Change delay from 3.0 to: 1
- 如果系統是多核心系統,當按下 1 時,會切換顯示 Cpu0, Cpu1 ...
Cpu0  :  0.0%us,  0.1%sy,  0.0%ni, 99.8%id,  0.1%wa,  0.0%hi,  0.0%si,  0.0%st
Cpu1  :  0.0%us,  0.1%sy,  0.0%ni, 99.8%id,  0.1%wa,  0.0%hi,  0.0%si,  0.0%st
- 欲結束 top 程式,請按 q
8. uptime
- 我們可以用 uptime 指令查看系統已經連續運行的多久
ubuntu@ubuntu:~$ uptime
 02:45:22 up  2:38,  2 users,  load average: 0.08, 0.04, 0.01
9. who
- 我們可以用 who 與 w 指令查詢目前系統有幾個人連線。以下是在 ssh 連線到遠端的示範情形。
ubuntu@ubuntu:~$ who
ubuntu   pts/0        2009-07-04 02:01 (192.168.0.253)
ubuntu@ubuntu:~$ w
 02:46:24 up  2:39,  2 users,  load average: 0.03, 0.03, 0.00
USER     TTY      FROM              LOGIN@   IDLE   JCPU   PCPU WHAT
ubuntu   pts/0    192.168.0.253    02:01    0.00s  0.34s  0.00s w
10. las
- 我們可以用 last 查詢歷史登入的紀錄
ubuntu@ubuntu:~$ last
ubuntu   pts/0        192.168.0.253    Sat Jul  4 02:01   still logged in
ubuntu   pts/3        192.168.0.253    Sat Jul  4 01:59 - 02:00  (00:01)
jazz     pts/3        192.168.0.253    Sat Jul  4 01:58 - 01:58  (00:00)
...略...
- 可加上 -n 參數,指定要觀看的個數
ubuntu@ubuntu:~$ last -n 2
ubuntu   pts/0        192.168.0.253    Sat Jul  4 02:01   still logged in
ubuntu   pts/3        192.168.0.253    Sat Jul  4 01:59 - 02:00  (00:01)

wtmp begins Thu Mar 19 12:53:15 2009
- 可加入使用者名稱,指定要觀看的使用者登入紀錄
ubuntu@ubuntu:~$ last jazz
jazz     pts/3        192.168.0.253    Sat Jul  4 01:58 - 01:58  (00:00)
jazz     pts/0        192.168.0.253    Sat Jul  4 01:23 - 01:23  (00:00)
... 略 ...
- 可指定 TTY 名稱,觀看從特定 TTY 進來的使用者
ubuntu@ubuntu:~$ last pts/0
ubuntu   pts/0        192.168.0.253    Sat Jul  4 02:01   still logged in
ubuntu   pts/0        192.168.0.253    Sat Jul  4 01:23 - 02:01  (00:37)
jazz     pts/0        192.168.0.253    Sat Jul  4 01:23 - 01:23  (00:00)
ubuntu   pts/0        192.168.0.253    Sat Jul  4 01:22 - 01:23  (00:01)
11. whoami
- 有時候當你在主機裡有多個帳號,又有權限 su 或 sudo 這時候 whoami 可以幫你確認目前的身分
ubuntu@ubuntu:~$ whoami
ubuntu
ubuntu@ubuntu:~$ sudo whoami
root
12. pwd / du / df / free
- 我們可以用 pwd 顯示目前工作目錄
ubuntu@ubuntu:~$ pwd
/home/ubuntu
ubuntu@ubuntu:~$ cd temp
ubuntu@ubuntu:~/temp$ pwd
/home/ubuntu/temp
ubuntu@ubuntu:~/temp$ cd
ubuntu@ubuntu:~$
- 我們可以用 du 查詢空間使用量
ubuntu@ubuntu:~$ du
4       ./temp
4       ./temp2
16      ./.ssh
52      .
- 加上 -a 可顯示全部檔案(包含以 . 開頭的隱藏檔),加上 -h 可以用人看得懂的格式(K, M, G, T)顯示
ubuntu@ubuntu:~$ du -ah
4.0K    ./.profile
... 略 ...
- 我們也可以用 df 來觀看整個系統的硬碟使用量。加上 -h 參數可以用人看得懂的格式(K, M, G, T)顯示
ubuntu@ubuntu:~$ df
Filesystem           1K-blocks      Used Available Use% Mounted on
/dev/sda1             19891060   2574416  16314192  14% /
varrun                  126536        48    126488   1% /var/run
varlock                 126536         0    126536   0% /var/lock
udev                    126536        40    126496   1% /dev
devshm                  126536         0    126536   0% /dev/shm
ubuntu@ubuntu:~$ df -h
Filesystem            Size  Used Avail Use% Mounted on
/dev/sda1              19G  2.5G   16G  14% /
varrun                124M   48K  124M   1% /var/run
varlock               124M     0  124M   0% /var/lock
udev                  124M   40K  124M   1% /dev
devshm                124M     0  124M   0% /dev/shm
- 最後,要查詢系統的記憶體使用量,可以使用 free 指令,可加上 -k 或 -m 參數指定顯示單位
ubuntu@ubuntu:~$ free
             total       used       free     shared    buffers     cached
Mem:        253072      86472     166600          0       6140      26572
-/+ buffers/cache:      53760     199312
Swap:       915664      39472     876192
ubuntu@ubuntu:~$ free -k
             total       used       free     shared    buffers     cached
Mem:        253072      86488     166584          0       6140      26584
-/+ buffers/cache:      53764     199308
Swap:       915664      39472     876192
ubuntu@ubuntu:~$ free -m
             total       used       free     shared    buffers     cached
Mem:           247         84        162          0          5         25
-/+ buffers/cache:         52        194
Swap:          894         38        855
Last modified 17 years ago
Last modified on Jul 5, 2009, 12:42:33 AM
Attachments (11)
- Lab3-01.jpg (1.4 MB) - added by jazz 17 years ago.
- Lab3-02.jpg (25.2 KB) - added by jazz 17 years ago.
- Lab3-03.jpg (98.4 KB) - added by jazz 17 years ago.
- Lab3-04.jpg (13.8 KB) - added by jazz 17 years ago.
- Lab3-05.jpg (34.3 KB) - added by jazz 17 years ago.
- Lab3-06.jpg (43.8 KB) - added by jazz 17 years ago.
- Lab3-07.jpg (24.0 KB) - added by jazz 17 years ago.
- Lab3-08.jpg (1.4 MB) - added by jazz 17 years ago.
- Lab3-09.jpg (47.3 KB) - added by jazz 17 years ago.
- Lab3-10.jpg (62.2 KB) - added by jazz 17 years ago.
- pietty0327.exe (316.5 KB) - added by jazz 17 years ago.