
XCP 安裝
【前言】
[0. 設備需求]
- x86 機器 (單台機器最多 128GB RAM、6 張網卡、32 Cores) (若要使用 windows VM,CPU必須支援 Intel-VTx 或 AMD-V)
[1. 檔案下載]
從 Xen 官方網站下載 ISO 檔 Base Package,安裝路徑有兩種一是燒成 CD 來安裝,二是用 PXE 安裝。若之後只要開啟 Windows VM 只需安裝一片即可,若要開啟 Linux VM 則必須再安裝第2個 Linux Package。
[2. 安裝程序]
- 安裝過程中,可以切換到三個 terminal -> Alt+F1:安裝畫面,Alt+F2:事件log檔,Alt+F3:控制console
- 安裝 log 可到 /install/tmp/ 查詢
- 開機選單也是使用 mboot.c32
[3. 儲存機制]
- XCP 提供三種儲存機制:
- local
- NFS
- iSCSI
[4. 操作程序]
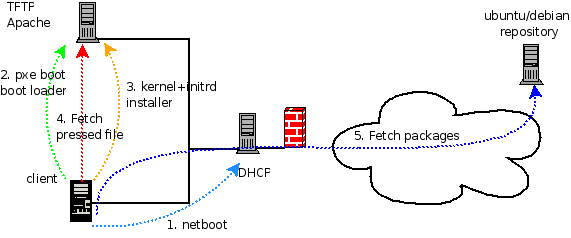
【利用 PXE 佈署 XCP】
[1. 前言]
- 因 XCP 提供 PXE 安裝的方式,此部份可與 DRBL 結合 (透過 DRBL 來方便設置 PXE Installation)
- 官方描述建制 PXE Installation 需要:
- TFTP Server
- DHCP Server
- NFS, FTP, or TFTP Server (放置安裝檔案)
- XML answer file (自動執行 unattended installations)
- 機器必須有支援 PXE 的網卡
[2. 官方設定步驟]
2.1 設定 TFTP 能支援 PXE 開機
- 需有 SYSLINUX 3.11 以上的版本,從 /usr/lib/syslinux 複製 mboot.c32 和 pxelinux.o 到 tftp 設定的路徑下(這邊是 /tftpboot)
- 從 Base Package 的 /boot 複製 install.img、Vmlinuz 和 xen.gz 到 /tftpboot/xenserver
- 建立 /tftpboot/pxelinux.cfg 資料夾,並開啟一個檔案為 /tftpboot/pxelinux.cfg/default
$ sudo vim /tftpboot/pxelinux.cfg/default
default xenserver
label xenserver
 kernel mboot.c32
 append /tftpboot/xenserver/xen.gz dom0_mem=752M com1=115200,8n1 \
 console=com1,tty --- /tftpboot/xenserver/vmlinuz \
 xencons=hvc console=hvc0 console=tty0 \
 --- /tftpboot/xenserver/install.img
- 上面的安裝程序必須由人來確認每一個步驟,底下可加入 answer file 來做到無人自動安裝
# sudo vim /tftpboot/pxelinux.cfg/default
default xenserver-auto
label xenserver-auto
   kernel mboot.c32
   append /tftpboot/xenserver/xen.gz dom0_mem=752M com1=115200,8n1 \
      console=com1,tty --- /tftpboot/xenserver/vmlinuz \
      xencons=hvc console=hvc0 console=tty0 \
      answerfile=http://pxehost.example.com/5.0.0-answerfile \
      install --- /tftpboot/xenserver/install.img
2.2 設定 DHCP
- 安裝 DHCP Server
- 編輯 dhcpd.conf
$ sudo vim /etc/dhcp/dhcpd.conf
allow booting;
allow bootp;
class "pxeclients" {
    match if substring(option vendor-class-identifier, 0, 9) = "PXEClient";
    next-server ;
    filename "pxelinux.0";
}
2.3 設定安裝檔案位置
- 可用 http, ftp 和 nfs
- Base package 的 packages.main 目錄複製出來,
- 若要開啟 Linux VM,必須複製 Linux Package 的 packages.linux 目錄出來
- 將路徑寫於 answaer file (XML 檔) 的 source 標籤內(底下有三種寫法)
# 安裝 Base 和 Linux Packages
<source type="url">http://pxehost.example.com/XenServer_5.0.0</source>

# 只安裝 Base Package
<source type="url">
http://pxehost.example.com/XenServer_&PRODUCT_VERSION;/packages.main
</source>

# 可加上帳密
<source type="url">
http://<username>:<password>@pxehost.example.com/XenServer_0.1/packages.main
<source>
2.4 Answer File 編輯
- 範例檔 (一定要有 installation tag)
<?xml version="1.0"?>
   <installation>
      <primary-disk>sda</primary-disk>
      <guest-disk>sdb</guest-disk>
      <guest-disk>sdc</guest-disk>
      <keymap>us</keymap>
      <root-password>mypassword</root-password>
      <source type="url">http://pxehost.example.com</source>
   <post-install-script type="url">
   http://pxehost.example.com/myscripts/post-install-script
   </post-install-script>
      <admin-interface name="eth0" proto="dhcp" />
      <timezone>Europe/London</timezone>
   </installation>
- 範例檔 tag 介紹
| 標籤 | 說明 | 是否必要 |
| <primary-disk> | 要安裝的 storage device,也可以給予 gueststorage 屬性值(yes/no) <rimary-disk gueststorage="no">sda</primary-disk> 此屬性質預設為 yes,之後在 guest-disk 必須給予值 | Y |
| <guest-disk> | 儲存 guest VM 的印象檔 | N |
| <keymap> | 安裝時使用的 keymap 一般都是使用美國鍵盤 <keymap>us</keymap> | Y |
| <root-password> | 設定 root 密碼 | Y |
| <source> | packages 的安裝路徑,屬性值有 url, nfs 或 local: <source type="url"> http://server/packages </source> <source type="local" /> <source type="nfs"> server:packages </source> | Y |
| <driver-source> | 安裝設備的 driver 套件路徑,屬性值有 url, nfs 或 local: <driver-source type="url"> http://server/drivers </driver-source> <driver-source type="local" /> <driver-source type="nfs"> server:drivers </driver-source> | N |
| <post-install-script> | post-install-script 的路徑,屬性值有 url, nfs 或 local: <post-install-script type="url"> http://server/scripts </post-install-script> <post-install-script type="local" /> <post-install-script type="nfs"> server:scripts </post-install-script> | Y |
| <admin-interface> | 需要使用的網路設備,屬性值有 proto:dhcp或static, name:eth0,當 proto="static" 時的子屬性值有 <ip> <subnet-mask> <gateway> | N |
| <time_zone> | TZ 變數 ex. Europe/London?, or America/Los_Angeles | Y |
| <name_server> | 可設定己組的 name server | N |
| <hostname> | 主機名稱 | N |
| <bootloader> | 可指定要安裝那種 bootloader (目前有兩個有選,預設是 extlinux 和 grub) | N |
- 也可透過 answer file 來做到自動更新 (需設定 reinstall 和 existing-installation)
<?xml version="1.0"?>
   <installation mode="reinstall">
      <existing-installation>sda</existing-installation>
      <keymap>us</keymap>
      <root-password>mypassword</root-password>
      <source type="url">http://pxehost.example.com</source>
   <post-install-script type="url">
   http://pxehost.example.com/myscripts/post-install-script
   </post-install-script>
      <admin-interface name="eth0" proto="dhcp" />
      <timezone>Europe/London</timezone>
   </installation>
【利用 DRBL 佈署 XCP】

Last modified 16 years ago
Last modified on May 27, 2010, 3:06:04 PM
Attachments (1)
- pxe-netinstall.png (12.8 KB) - added by rock 16 years ago.
Download all attachments as: .zip