
Mac 設定
開發環境設定
#install xcode command tool
xcode-select --install
# check
xcode-select -p
# install home-brew
ruby -e "$(curl -fsSL https://raw.githubusercontent.com/Homebrew/install/master/install)"
# check brew
brew doctor
brew update
# install develop environment
brew install ansible
brew install gradle
brew cask install java
brew cask install intellij-idea-ce ## community edition
# install JSON toolkits
brew install jq
brew install npm
npm install json2csv -g
# install azure-cli
npm install azure-cli -g
辦公環境設定
# install firefox
brew cask install firefox-zh-tw
# 編輯器
brew cask install sublime-text
# Markdown 筆記用:
brew cask install macdown
# Markdown 寫文件用:
brew cask install gitbook-editor
brew cask install pandoc
# 群組溝通用:slack
brew cask install slack
# 資料分析用
brew cask install tableau-public ## 拿來分析一些 CSV 用
# MS Office 日常文書用
brew cask install microsoft-office
網路環境設定
- Mac 無線網路設定
[[File:Funp_wifi.png|480px]]
- Android 手機無線網路設定
[[File:Android_WiFi.png|240px]]
鍵盤快速鍵
- 首先,認識一下選單上的鍵盤符號對應:

終端機設定
- 一開始覺得很奇怪,為何用 screen 有顏色,不用就沒有顏色。
- 原因是預設的 TERM 不支援,需改為 xterm-256color 才行。
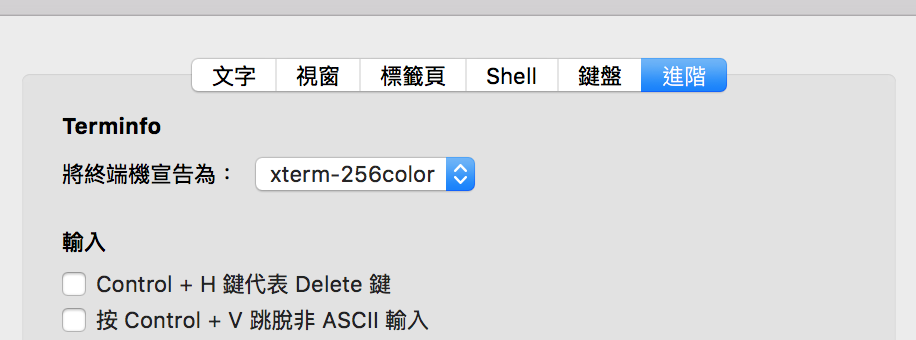
- 修改後,查詢 $TERM 環境變數應該會看到:
~$ echo $TERM
xterm-256color

Azure
- 若要使用命令列建立與管理 Azure 資源,您必須具備以下條件:
- 有 Azure 帳戶 (免費試用版) - 註冊 Azure - https://azure.microsoft.com/zh-tw/
- 安裝 Azure CLI - https://azure.microsoft.com/zh-tw/documentation/articles/xplat-cli-install/
- 登入使用您帳戶的相關 Azure 資源 - https://azure.microsoft.com/zh-tw/documentation/articles/xplat-cli-connect/
Azure CLI 安裝
Mac OS X
brew install npm
npm install azure-cli -g
- 雖然 homebrew 裡也有 azure-cli,但版本比較舊,建議用 npm 的版本。
~$ brew info azure-cli
azure-cli: stable 0.10.6 (bottled), HEAD
Docker
- Docker Hub - https://hub.docker.com/r/microsoft/azure-cli/
- azure-cli 的 github - https://github.com/azure/azure-xplat-cli
- 在 Docker主機中,執行:
docker run -it microsoft/azure-cli
小技巧
- 在 Docker 主機中,有 azure.completion.sh 可以讓 Azure CLI 提供指令的建議。若有需要,請在 Mac OS 的家目錄建立 .bashrc 與 .bash_profile 檔案,並 source 路徑/azure.completion.sh
- 如果懶得從 docker image 裡面取得 azure.completion.sh 可至以下 gist 路徑取得:
- 以下是我的設定,供參考:
.bash_profile
# ~/.profile: executed by the command interpreter for login shells.
# This file is not read by bash(1), if ~/.bash_profile or ~/.bash_login
# exists.
# see /usr/share/doc/bash/examples/startup-files for examples.
# the files are located in the bash-doc package.

# the default umask is set in /etc/profile; for setting the umask
# for ssh logins, install and configure the libpam-umask package.
#umask 022

# if running bash
if [ -n "$BASH_VERSION" ]; then
    # include .bashrc if it exists
    if [ -f "$HOME/.bashrc" ]; then
	. "$HOME/.bashrc"
    fi
fi

# set PATH so it includes user's private bin if it exists
if [ -d "$HOME/bin" ] ; then
    PATH="$HOME/bin:$PATH"
fi
.bashrc
## for Intellij IDEA
export JAVA_HOME="$(/usr/libexec/java_home)"
## for terminal
export CLICOLOR=1
export LSCOLORS="Gxfxcxdxbxegedabagacad"
alias ls='ls -GFh'
source /usr/local/etc/bash_completion.d/git-completion.bash
source /usr/local/etc/bash_completion.d/azure.completion.sh
source /usr/local/etc/bash_completion.d/docker
source /usr/local/etc/bash_completion.d/brew
source /usr/local/etc/bash_completion.d/brew-cask
source /usr/local/etc/bash_completion.d/gradle
Azure 術語與觀念
- Azure 建立和處理資源的部署模型有二種: 資源管理員和傳統
- 傳統的文件入口:https://azure.microsoft.com/zh-tw/documentation/articles/virtual-machines-command-line-tools/
- Microsoft 建議大部分的新部署使用 Resource Manager model。(常看到的 ARM 縮寫,指的就是 Azure Resource Manager)
- 資源管理員文件入口:https://azure.microsoft.com/zh-tw/documentation/articles/xplat-cli-azure-resource-manager/
| 縮寫 | 全文 | 說明 |
|---|---|---|
| ASM | ||
| ARM | Azure Resource Manager | Azure 資源管理員 |
| Resource Group |
Azure CLI 操作與管理
- 安裝好 Azure CLI 之後,您就能從命令列使用者介面 (Bash、終端機及命令提示字元等) 中執行 azure 命令。例如,若要執行 [說明] 命令,請輸入下列命令:
azure help
- 若要查看您所安裝的 Azure CLI 版本,請輸入下列命令:
azure --version
- 參考 https://azure.microsoft.com/zh-tw/documentation/articles/xplat-cli-connect/ 完成帳號綁定
- 因為使用的是 0.9.10 以後的版本,所以直接使用 azure login
azure login
~# azure --version
0.9.19 (node: 4.2.4)
root@azure:~# azure login
info:    Executing command login
-info:    To sign in, use a web browser to open the page https://aka.ms/devicelogin. Enter the code G*K*N*D*L to authenticate.
/info:    Added subscription Free Trial
info:    Setting subscription "Free Trial" as default
+
info:    login command OK
azure account
- 檢查 account 狀態
~# azure account list
info:    Executing command account list
data:    Name        Id                                    Current  State
data:    ----------  ------------------------------------  -------  -------
data:    Free Trial  ####################################  true     Enabled
info:    account list command OK
azure config
- 由於預設是 ASM 模式,可以透過 azure config mode arm 改成 ARM 模式。
azure config mode arm
azure location
- 查詢目前 Azure 的機房位置
~$ azure location list
info:    Executing command location list
warn:    The "location list" commands is changed to list subscription's locations. For old information, use "provider list or show" commands.
info:    Getting locations...
data:    Name                Display Name         Latitude  Longitude
data:    ------------------  -------------------  --------  ---------
data:    eastasia            East Asia            22.267    114.188
data:    southeastasia       Southeast Asia       1.283     103.833
data:    centralus           Central US           41.5908   -93.6208
data:    eastus              East US              37.3719   -79.8164
data:    eastus2             East US 2            36.6681   -78.3889
data:    westus              West US              37.783    -122.417
data:    northcentralus      North Central US     41.8819   -87.6278
data:    southcentralus      South Central US     29.4167   -98.5
data:    northeurope         North Europe         53.3478   -6.2597
data:    westeurope          West Europe          52.3667   4.9
data:    japanwest           Japan West           34.6939   135.5022
data:    japaneast           Japan East           35.68     139.77
data:    brazilsouth         Brazil South         -23.55    -46.633
data:    australiaeast       Australia East       -33.86    151.2094
data:    australiasoutheast  Australia Southeast  -37.8136  144.9631
data:    southindia          South India          12.9822   80.1636
data:    centralindia        Central India        18.5822   73.9197
data:    westindia           West India           19.088    72.868
data:    canadacentral       Canada Central       43.653    -79.383
data:    canadaeast          Canada East          46.817    -71.217
info:    location list command OK
azure vm
azure vm list
- 檢查 vm 狀態
~$ azure vm list
info:    Executing command vm list
+ Getting virtual machines
data:    ResourceGroupName    Name                    ProvisioningState  PowerState      Location       Size
data:    -------------------  ----------------------  -----------------  --------------  -------------  --------------
info:    vm list command OK
azure vm image list
- 查詢作業系統範本 Image
~$ azure vm image list
info:    Executing command vm image list
Location: southeastasia
Publisher: OpenLogic
+ Getting virtual machine image offers (Publisher: "OpenLogic" Location:"southeastasia")
data:    Publisher  Offer       Sku  OS     Version       Location       Urn
data:    ---------  ----------  ---  -----  ------------  -------------  -------------------------------------
data:    OpenLogic  CentOS      6.5  Linux  6.5.201501    southeastasia  OpenLogic:CentOS:6.5:6.5.201501
data:    OpenLogic  CentOS      6.5  Linux  6.5.201503    southeastasia  OpenLogic:CentOS:6.5:6.5.201503
data:    OpenLogic  CentOS      6.5  Linux  6.5.201506    southeastasia  OpenLogic:CentOS:6.5:6.5.201506
data:    OpenLogic  CentOS      6.5  Linux  6.5.20150904  southeastasia  OpenLogic:CentOS:6.5:6.5.20150904
data:    OpenLogic  CentOS      6.5  Linux  6.5.20160309  southeastasia  OpenLogic:CentOS:6.5:6.5.20160309
data:    OpenLogic  CentOS      6.6  Linux  6.6.201501    southeastasia  OpenLogic:CentOS:6.6:6.6.201501
data:    OpenLogic  CentOS      6.6  Linux  6.6.201503    southeastasia  OpenLogic:CentOS:6.6:6.6.201503
data:    OpenLogic  CentOS      6.6  Linux  6.6.201506    southeastasia  OpenLogic:CentOS:6.6:6.6.201506
data:    OpenLogic  CentOS      6.6  Linux  6.6.20150706  southeastasia  OpenLogic:CentOS:6.6:6.6.20150706
data:    OpenLogic  CentOS      6.6  Linux  6.6.20150731  southeastasia  OpenLogic:CentOS:6.6:6.6.20150731
data:    OpenLogic  CentOS      6.6  Linux  6.6.20160309  southeastasia  OpenLogic:CentOS:6.6:6.6.20160309
data:    OpenLogic  CentOS      6.7  Linux  6.7.20150815  southeastasia  OpenLogic:CentOS:6.7:6.7.20150815
data:    OpenLogic  CentOS      6.7  Linux  6.7.20160303  southeastasia  OpenLogic:CentOS:6.7:6.7.20160303
data:    OpenLogic  CentOS      6.7  Linux  6.7.20160310  southeastasia  OpenLogic:CentOS:6.7:6.7.20160310
data:    OpenLogic  CentOS      6.8  Linux  6.8.20160620  southeastasia  OpenLogic:CentOS:6.8:6.8.20160620
data:    OpenLogic  CentOS      7.0  Linux  7.0.20150128  southeastasia  OpenLogic:CentOS:7.0:7.0.20150128
data:    OpenLogic  CentOS      7.0  Linux  7.0.20150325  southeastasia  OpenLogic:CentOS:7.0:7.0.20150325
data:    OpenLogic  CentOS      7.0  Linux  7.0.20150605  southeastasia  OpenLogic:CentOS:7.0:7.0.20150605
data:    OpenLogic  CentOS      7.0  Linux  7.0.20150904  southeastasia  OpenLogic:CentOS:7.0:7.0.20150904
data:    OpenLogic  CentOS      7.0  Linux  7.0.20160309  southeastasia  OpenLogic:CentOS:7.0:7.0.20160309
data:    OpenLogic  CentOS      7.1  Linux  7.1.20150410  southeastasia  OpenLogic:CentOS:7.1:7.1.20150410
data:    OpenLogic  CentOS      7.1  Linux  7.1.20150605  southeastasia  OpenLogic:CentOS:7.1:7.1.20150605
data:    OpenLogic  CentOS      7.1  Linux  7.1.20150731  southeastasia  OpenLogic:CentOS:7.1:7.1.20150731
data:    OpenLogic  CentOS      7.1  Linux  7.1.20160308  southeastasia  OpenLogic:CentOS:7.1:7.1.20160308
data:    OpenLogic  CentOS      7.2  Linux  7.2.20160303  southeastasia  OpenLogic:CentOS:7.2:7.2.20160303
data:    OpenLogic  CentOS      7.2  Linux  7.2.20160308  southeastasia  OpenLogic:CentOS:7.2:7.2.20160308
data:    OpenLogic  CentOS      7.2  Linux  7.2.20160620  southeastasia  OpenLogic:CentOS:7.2:7.2.20160620
data:    OpenLogic  CentOS-HPC  6.5  Linux  6.5.20160408  southeastasia  OpenLogic:CentOS-HPC:6.5:6.5.20160408
data:    OpenLogic  CentOS-HPC  7.1  Linux  7.1.20160408  southeastasia  OpenLogic:CentOS-HPC:7.1:7.1.20160408
info:    vm image list command OK
azure vm sizes
- 查詢 VM 大小種類
所需參數:--location 或 --vm-name
~$ azure vm sizes --location southeastasia
azure vm quick-create
- 快速建立新的 VM
Usage: vm quick-create [options] <resource-group> <name> <location> <os-type> <image-urn> <admin-username> <admin-password>
變數 可用選項 location 詳見 azure location listos-type - Windows
- Linux
image-urn 詳見 azure vm image list - 範例:
~$ azure vm quick-create cassandra cassandra12v2 southeastasia Linux OpenLogic:CentOS:7.2:latest jazz TenM@x1234
azure vm create
- 手動建立 VM
Usage: vm create [options] <resource-group> <name> <location> <os-type>
- 範例:使用現成 OS 碟,附掛到新的 VM
-f, --nic-name <nic-name> ## 可使用相同 resource group 的現有 NIC (必須先 detach)
~$ azure vm create -g cassandra -n test -l southeastasia -y Linux \
   --vm-size Standard_DS3_v2 \
   --os-disk-vhd https://cli17432911802090392708.blob.core.windows.net/vhds/cli7ee1f2e662a40b58-os-1467009098723.vhd \
   -f testnic
azure storage
- 官方文件:使用 Azure CLI 搭配 Azure 儲存體
- azure storage account list 可以查詢目前建立的 storage account
~$ azure storage account list
info:    Executing command storage account list
+ Getting storage accounts
data:    Name                      Type          Location       Resource Group
data:    ------------------------  ------------  -------------  -------------------
data:    tenmaxsglog               Standard_LRS  southeastasia  tenmax-sg-data
info:    storage account list command OK
- azure storage account keys list <name> 可以查詢 storage account key
~$ azure storage account keys list tenmaxsglog
info:    Executing command storage account keys list
Resource group name: tenmax-sg-data
+ Getting storage account keys
data:    Primary:   ***********
data:    Secondary: ***********
info:    storage account keys list command OK
AzureKit 安裝與使用
- pop 寫的 command line 工具
原始碼: http://github.com/tenmax/azurekit
- Mac OS X 安裝
~$ brew tap tenmax/azure
~$ brew install azurekit
設定檔
- azurekit 包含 azurecat, azuresink, azuresas 三個小工具
- 設定檔放在 ${HOME}/.azure/storagekeys, 內容包括:
DefaultEndpointsProtocol=https;
AccountName=.........;
AccountKey=.......
azurecat
- A CLI tool to cat microsoft azure blob storage
- 直接 cat 遠端 Azure Blob Storage 的檔案
azuresink
- A CLI tool to pipe standard in to microsoft azure blob storage
- 將本機檔案上傳到 Azure Blob Storage
azuresas
- 取得 Azure Blob Storage 的 sharing URL
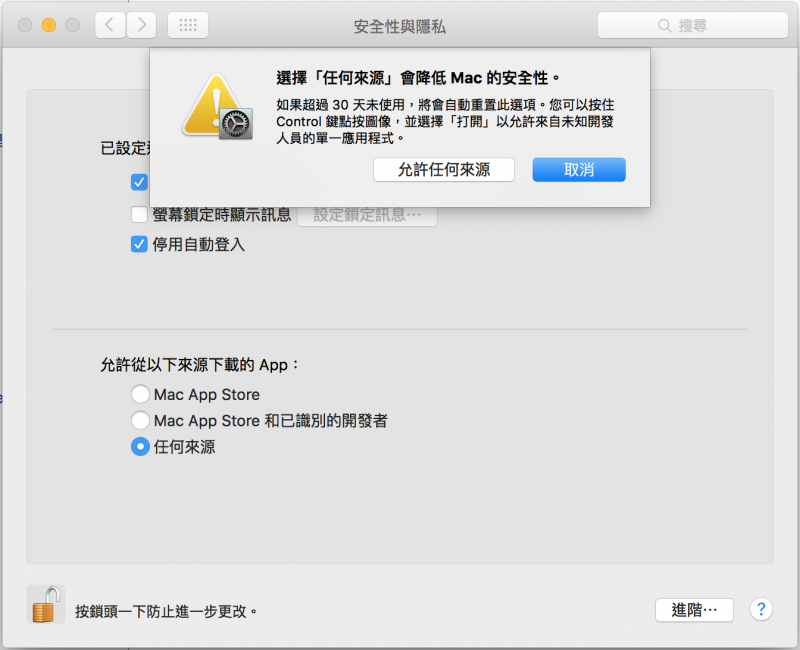
GUI 界面
Microsoft Azure Storage Explorer
- http://storageexplorer.com/
- 注意:需打開 MAC 安全性設定,才能進行安裝。

Cyberduck
- Mac OS X 安裝
brew install Caskroom/cask/cyberduck
其他 CLI 工具
Cassandra
內部文件
自學教材
by C Y Kan Publisher: Packt Publishing Release Date: November 2013 ISBN: 9781782164203 Running time: 2:51:40
維運技巧
加機器
跨資料中心
- 跨資料中心時,Cassandra Driver 最好加上 Compression 的設定
- [參考] https://datastax.github.io/java-driver/2.1.7/features/compression/

Ansible
Ansible 快速入門
- sysadmincasts 三小時入門
Gradle
參考書目
安裝 gradle
- Mac 安裝
brew install gradle
- Debian / Ubuntu 安裝
apt-get -y install gradle
- 習慣 bash completion 的可以額外下載 gradle 的自動命令補完,並加入對應的 .bashrc 設定
curl -L -s https://gist.github.com/nolanlawson/8694399/raw/gradle-tab-completion.bash -o /usr/local/etc/bash_completion.d/gradle
gradle init
- 使用 gradle init 產生 gradle 專案目錄的範本
~$ mkdir -p gradle-sample
~$ cd gradle-sample
~/gradle-sample$ gradle init
:wrapper
:init

BUILD SUCCESSFUL

Total time: 2.419 secs

This build could be faster, please consider using the Gradle Daemon: https://docs.gradle.org/2.12/userguide/gradle_daemon.html
- gradle init 產生的目錄結構如下:
.
├── build.gradle
├── gradle
│   └── wrapper
│       ├── gradle-wrapper.jar
│       └── gradle-wrapper.properties
├── gradlew
├── gradlew.bat
└── settings.gradle

2 directories, 6 files
- gradle init 支援產生不同的範本,包括:
gradle init --type basic gradle init --type groovy-library gradle init --type java-library gradle init --type pom gradle init --type scala-library
gradle tasks
- 可以用 gradle tasks 了解目前定義了哪些 task
:tasks

------------------------------------------------------------
All tasks runnable from root project
------------------------------------------------------------

Build Setup tasks
-----------------
init - Initializes a new Gradle build. [incubating]
wrapper - Generates Gradle wrapper files. [incubating]

Help tasks
----------
buildEnvironment - Displays all buildscript dependencies declared in root project 'gradle-sample'.
components - Displays the components produced by root project 'gradle-sample'. [incubating]
dependencies - Displays all dependencies declared in root project 'gradle-sample'.
dependencyInsight - Displays the insight into a specific dependency in root project 'gradle-sample'.
help - Displays a help message.
model - Displays the configuration model of root project 'gradle-sample'. [incubating]
projects - Displays the sub-projects of root project 'gradle-sample'.
properties - Displays the properties of root project 'gradle-sample'.
tasks - Displays the tasks runnable from root project 'gradle-sample'.

BUILD SUCCESSFUL

Total time: 1.994 secs

This build could be faster, please consider using the Gradle Daemon: https://docs.gradle.org/2.12/userguide/gradle_daemon.html
gradle build
- 編譯並產生 distribution
gradle build
gradle clean
- 清除編譯好的 build
gradle clean
plugin: 'application'
gradle distZip
- 產生 Release 用的 Zip 檔
~/git/tenmax-log-toolkit$ gradle distZip
:compileJava
Note: Some input files use or override a deprecated API.
Note: Recompile with -Xlint:deprecation for details.
Note: Some input files use unchecked or unsafe operations.
Note: Recompile with -Xlint:unchecked for details.
:processResources UP-TO-DATE
:classes
:jar
:elandbidStartScript
:elandproductStartScript
:elandreqStartScript
:elandreqoldStartScript
:imaxaggreStartScript
:pmaxaggreStartScript
:pmaxexportStartScript
:startScripts
:distZip

BUILD SUCCESSFUL

Total time: 7.461 secs

This build could be faster, please consider using the Gradle Daemon: https://docs.gradle.org/2.12/userguide/gradle_daemon.html
jazz@jazzbook ~/git/tenmax-log-toolkit$ ls build/distributions/tenmax-log-toolkit.zip
build/distributions/tenmax-log-toolkit.zip
plugin: 'spring-boot'
gradle bootRun
Application tasks
-----------------
bootRun - Run the project with support for auto-detecting main class and reloading static resources
學習資源
Others
brew
| 指令 | 描述 | 範例 |
|---|---|---|
brew doctor |
檢查 brew 系統是否有潛在問題 | ~$ brew doctor Please note that these warnings are just used to help the Homebrew maintainers with debugging if you file an issue. If everything you use Homebrew for is working fine: please don't worry and just ignore them. Thanks! Warning: Your Homebrew is outdated. You haven't updated for at least 24 hours. This is a long time in brewland! To update Homebrew, run `brew update`. |
brew desc |
顯示套件的簡單描述 | ~$ brew desc mysql mysql: Open source relational database management system |
brew info |
顯示套件的詳細描述 | ~$ brew info mysql
mysql: stable 5.7.12 (bottled)
Open source relational database management system
https://dev.mysql.com/doc/refman/5.7/en/
Conflicts with: mariadb, mariadb-connector-c, mysql-cluster, mysql-connector-c, percona-server
Not installed
From: https://github.com/Homebrew/homebrew-core/blob/master/Formula/mysql.rb
==> Dependencies
Build: cmake ✘
Required: openssl ✔
==> Options
--with-archive-storage-engine
Compile with the ARCHIVE storage engine enabled
--with-blackhole-storage-engine
Compile with the BLACKHOLE storage engine enabled
--with-debug
Build with debug support
--with-embedded
Build the embedded server
--with-local-infile
Build with local infile loading support
--with-test
Build with unit tests
==> Caveats
We've installed your MySQL database without a root password. To secure it run:
mysql_secure_installation
To connect run:
mysql -uroot
To have launchd start mysql now and restart at login:
brew services start mysql
Or, if you don't want/need a background service you can just run:
mysql.server start
|
建立自己的 Cask
- 參考文件:https://github.com/caskroom/homebrew-cask/blob/master/doc/development/adding_a_cask.md
- STEP 1:
~$ brew cask create microsoft-azure-storage-explorer
- STEP 2: 照著修改內容 - 可以先看一下別人的 Pull Request 常被檢討什麼
cask 'microsoft-azure-storage-explorer' do
  version :latest
  sha256 :no_check

  url 'https://go.microsoft.com/fwlink/?LinkId=708342'
  name 'Microsoft Azure Storage Explorer'
  homepage 'http://storageexplorer.com/'
  license :gratis

  app 'Microsoft Azure Storage Explorer.app'
end
- STEP 3: 檢驗是否可以正常下載
~$ brew cask audit --download microsoft-azure-storage-explorer
- STEP 4: 檢驗語法是否正確
~$ cd "$(brew --repository)"/Library/Taps/caskroom/homebrew-cask
homebrew-cask$ brew cask style --fix Casks/microsoft-azure-storage-explorer.rb
- STEP 5: 檢查安裝與反安裝是否正確
homebrew-cask$ brew cask install microsoft-azure-storage-explorer
homebrew-cask$ brew cask uninstall microsoft-azure-storage-explorer
- STEP 6: 建立新的 branch 分支
homebrew-cask$ git checkout -b microsoft-azure-storage-explorer
- STEP 7: 加入新的 Cask Formulae
homebrew-cask$ git add Casks/microsoft-azure-storage-explorer.rb
homebrew-cask$ git diff --cached
homebrew-cask$ git commit -v
- STEP 8: 送上自己的 gitlab 用來提交 Pull Request ( PS. 必須先 fork homebrew-cask 到自己的 github 帳號下 )
homebrew-cask$ git push https://github.com/jazzwang/homebrew-cask microsoft-azure-storage-explorer
- STEP 9: 等 homebrew-cask 的 Travis CI 通過,若有錯誤,就還要反覆修改並重新提交內容。
更新自己的 Cask
- 參考: https://github.com/caskroom/homebrew-cask/blob/master/CONTRIBUTING.md#updating-a-cask
- STEP 1: 安裝 cask-repair
# install and setup script - only needed once
brew install vitorgalvao/tiny-scripts/cask-repair
cask-repair --help

# fork homebrew-cask to your account - only needed once
cd "$(brew --repository)/Library/Taps/caskroom/homebrew-cask/Casks"
hub fork
cask-repair --pull origin --push jazzwang microsoft-azure-storage-explorer
或
cask-repair microsoft-azure-storage-explorer
- STEP 2: 照著問題回答,例如修改版號、修改下載網址等
Type the new version (or leave blank to use the current one)
> 0.8.0
Paste the new URL (or leave blank to use the current one)
> http://go.microsoft.com/fwlink/?LinkId=708342
Homebrew Tap
- 舉凡官方不收或是有 license 疑慮的 formula 變可透過 Homebrew Tap 的方式來自已管理。
- [參考] https://blog.gasol.tw/make-your-own-homebrew/
Tableau
- 為了看 DSP 與 DMP 的 Daily Report,可以使用 Tableau 來觀察 CSV 檔的內容。
- Mac 安裝
brew install Caskroom/cask/tableau-public
Hadoop
- 在 Mac 上安裝單機版(local mode)的 Hadoop 還蠻簡單的,只需要透過 brew 就可以裝好。
- Mac 安裝
brew install hadoop
Hive
- 在 Mac 上安裝單機版(local mode)的 Hive 還蠻簡單的,只需要透過 brew 就可以裝好。
- Mac 安裝
brew install hive
Spark
- 在 Mac 上安裝單機版(local mode)的 Apache Spark 還蠻簡單的,只需要透過 brew 就可以裝好。
- Mac 安裝
brew install apache-spark
Gist
- http://defunkt.io/gist/
- https://github.com/defunkt/gist
- Ruby Gems 安裝:
gem install gist
- Mac 安裝
brew install gist
- Debian / Ubuntu 安裝
apt-get -y install gist
- 使用
登入 - gist --login 上傳單一檔案 - gist file1 上傳多個檔案 - gist file1 file2 上傳 STDIN 到指定檔名 - 指令 | gist -f "檔名" 複製 gist URL 到剪貼簿 - 指令 | gist -c
Bash
- 偶爾會用到一些 Bash 的色塊 COLOR
- 參考文件:
http://www.tldp.org/HOWTO/Bash-Prompt-HOWTO/x329.html https://wiki.archlinux.org/index.php/Bash/Prompt_customization
- TLDP 的測試腳本可以在 gist 取得
https://gist.github.com/jazzwang/55203a9f33386e0e567328fb86ebf7db
Spring Boot
- 假設 project 名稱是 tenmax-audience-library ,主程式的 package 是 io.tenmax
- 要切換 Spring Profile 可以在環境變數中,設定 SPRING_PROFILES_ACTIVE 為特定的 profile 名稱
[參考] http://stackoverflow.com/questions/23367507/how-to-pass-system-property-to-gradle-task
export SPRING_PROFILES_ACTIVE=dev
- 若要切換 log4j 的 level 一般要在 application.yml 先改好
[參考] http://stackoverflow.com/questions/20485059/spring-boot-how-can-i-set-the-logging-level-with-application-properties 因為有使用 gradle 的 application plugin,參考產生出來的 bin/tenmax-audience-library start script,發現可以在環境變數中,設定 TENMAX_AUDIENCE_LIBRARY_OPTS
export TENMAX_AUDIENCE_LIBRARY_OPTS="-Dlogging.level.io.tenmax=DEBUG"
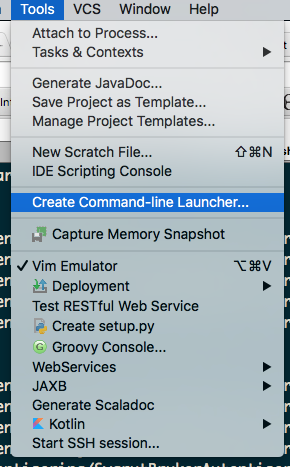
Intellij IDEA CE
- MAC OS X 安裝
brew cask install intellij-idea-ce
- 設定用 command line 指令 idea 就可以啟動 IDEA

gitbook
- MAC OS X 安裝
- 編輯器
brew cask install gitbook-editor
- 用戶端程式
npm -g install gitbook-cli
mailx
- CentOS 安裝
sudo yum -y install mailx postfix
- 複製 Mac OS 家目錄下 Library/Application\ Support/Firefox/Profiles/*.default 的 cert*.db 與 key*.db 放到 Linux 家目錄的 .cert 底下
- 設定帳號資訊於 .mailrc
[jazz@tenmax-sg-spark1 ~]$ cat .mailrc
set smtp-use-starttls
set nss-config-dir=/home/jazz/.cert
set ssl-verify=ignore
set smtp=smtp://outlook-apaccentral.office365.com:587
set smtp-auth=login
set smtp-auth-user=jazz@funp.com
set smtp-auth-password=$PASSWORD
set from="jazz@tenmax.io(Jazz Wang)"
- 使用 mail -s "信件標題" 收件者信箱 < 信件內容 即可用命令列寄信
- [參考] http://www.systutorials.com/1411/sending-email-from-mailx-command-in-linux-using-gmails-smtp/
- [參考] http://www.binarytides.com/linux-mailx-command/
jq
azurecat -b 4096 -z $URL
| jq -c '. | select( .bidRequest.domain=="setn.com")
| { underbid: .bidResponse.campUnderIds, winCampaign: .bidResponse.campaignId ,
space: .bidRequest.spaceId , time: .dateTime }'
Attachments (5)
- 800px-Hotkeys.png (232.8 KB) - added by jazz 8 years ago.
- 800px-Mac_Security_Setting.png (178.8 KB) - added by jazz 8 years ago.
- After_compression.png (15.8 KB) - added by jazz 8 years ago.
- Idea_command_line_launcher.png (95.3 KB) - added by jazz 8 years ago.
- Mac_terminal_xterm.png (58.4 KB) - added by jazz 8 years ago.
Download all attachments as: .zip