
How to deploy GPFS nodes massively using DRBL
rock, rock@…
1. Introduction
Follow the time, People's digital data need more and large spaces to store. Although, hard disk's volume is become large, but hard disk has phsical limit. GPFS(General Parallel File System) is a high-performance shard-disk file system. GPFS provide a virtual view to merge multi-disk into one large disk. DRBL is a Diskless Remote Boot mechanism, you just install OS and essential software in the DRBL server, don't install any software in client(client just enable PXE in BIOS, and anfter reboot, your DRBL environment is ok) .In this article we use DRBL to massively deploy GPFS nodes, it has three advantage (1)you can use DRBL command to manage your storage cluster, (2)you can use GPFS to effective utilize client disk(If your client has disk), (3)you can add and remove storages dynamicly with fault tolerance suppor.
2. Software
We use below software:
- Debian
| Linux Distribution. |
- GPFS
| The IBM General Parallel File System™ (GPFS™) is a high-performance shared-disk file management solution that provides fast, reliable access to a common set of file data from two computers to hundreds of systems. GPFS integrates into your environment by bringing together mixed server and storage components to provide a common view to enterprise file data. GPFS provides online storage management, scalable access and integrated information lifecycle tools capable of managing petabytes of data and billions of files. |
- DRBL
| Diskless Remote Boot in Linux (DRBL) provides a diskless or systemless environment for client machines. It works on Debian, Ubuntu, Mandriva, Red Hat, Fedora, CentOS and SuSE. DRBL uses distributed hardware resources and makes it possible for clients to fully access local hardware. It also includes Clonezilla, a partitioning and disk cloning utility similar to Symantec Ghost®. |
- Kernel version 2.6.20
| If your kernel is not 2.6.20. You can download form http://www.kernel.org/pub/linux/kernel/v2.6/linux-2.6.20.tar.bz2 or use our kernel image deb http://trac.nchc.org.tw/grid/browser/gpfs_kernel . |
Note: GPFS 3.1 just support kernel 2.6.18 below version. If you want use kernel 2.6.20, you maybe download our patched gpfs image http://trac.nchc.org.tw/grid/browser/gpfs_3.1_ker2.6.20 .
3. Install GPFS
3.1 Install requirement package
$ sudo aptitude install  ksh  xutils-dev alien
$ sudo aptitude install libstdc++5-3.3-dev
3.2 Config Linux Environment
Because GPFS just support SuSE and RedHat environment, Debian must adjust partial path.
$ sudo ln -s /usr/bin /usr/X11R6/bin
$ sudo ln -s /usr/bin/sort /bin/sort
$ sudo ln -s /usr/bin/awk /bin/awk
$ sudo ln -s /usr/bin/grep /bin/grep
$ sudo ln -s /usr/bin/rpm /bin/rpm
3.3 Download GPFS
- Method 1:(Download GPFS 3.1 from http://www14.software.ibm.com/webapp/set2/sas/f/gpfs/download/systemx.html this version support 2.6.18 kernel )
$ sudo alien *.rpm
$ dpkg -i *.deb
$ wget http://0rz.tw/e13Jo
$ sudo ./gpfs.shell
- Method 2:(usr our team patched GPFS 3.1, the version can support 2.6.20 kernel. Download from http://trac.nchc.org.tw/grid/browser/gpfs_3.1_ker2.6.20/gpfs_ker262015_v0625.tar.gz?format=raw)
$ sudo wget http://trac.nchc.org.tw/grid/browser/gpfs_3.1_ker2.6.20/gpfs_ker262015_v0625.tar.gz?format=raw -O /usr/gpfs_ker262015_v0625.tar.gz
$ cd /usr
$ sudo tar zxvf gpfs_ker262015_v0625.tar.gz
3.4 Config & Install GPFS
$ cd /usr/lpp/mmfs/src/config/
$ sudo cp site.mcr.proto site.mcr
$ sudo vim site.mcr
edit below content:
(
LINUX_DISTRIBUTION = KERNEL_ORG_LINUX
#define LINUX_KERNEL_VERSION 2062015
)

$ su
$ vim ./bashrc
add blew context then use root to relogin:
(
export PATH=$PATH:/usr/lpp/mmfs/bin
export SHARKCLONEROOT=/usr/lpp/mmfs/src
)

$ make World
$ make InstallImages
4. Install DRBL
4.1 Add apt source
$ sudo vim /etc/apt/sources.list
add below content:
(deb http://free.nchc.org.tw/drbl-core drbl stable)

$ wget http://drbl.nchc.org.tw/GPG-KEY-DRBL sudo apt-key add GPG-KEY-DRBL
$ sudo apt-get update
4.2 Install DRBL
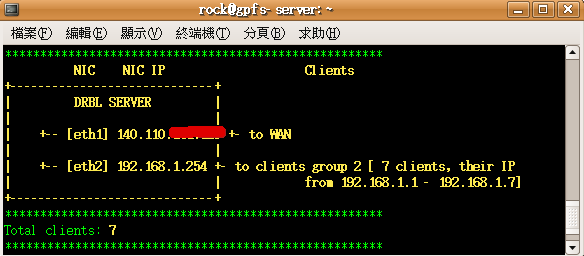
Before we install DRBL, we must clear plan our DRBL environment. The below layout is our environment, eth0 used to connect WAN, eth1 used for DRBL internal clients.

                                         NIC     NIC IP                          Clients
+-----------------------------+
|                     DRBL SERVER                        |
|                                                                    |
|                             +-- [eth0] 140.110.X.X  +- to WAN
|                                                                    |
|                             +-- [eth1] 192.168.1.254  +- to clients group 1 [ 7 clients, their IP from 192.168.1.1 - 192.168.1.7]
|                                                                    |
+-----------------------------+

$ sudo aptitude install drbl
(DRBL will be installed in directory /opt/drbl )

$ sudo /opt/drbl/sbin/drblsrv -i
$ sudo /opt/drbl/sbin/drblpush-offline -s `uname -r`
(The command used interactive mothod help user to install. It install related packages (nfs, dhcp, tftp......) and create /tftpboot directory. The /tftpboot include:
nbi_img: kenrel , initrd image and grub menu
node_root: server directories copy
nodes: each nodes' individual directories)

$ sudo /opt/drbl/sbin/drblpush -i
(the command will deploy client environment, like client name, DRBL mode, swap ...)

5. Test DRBL and GPFS
5.1 Setup auto login in DRBL environment
GPFS command must use root to execute.
$ su
$ ssh {client_node}
(sever must test ssh to all nodes for authenticity of host. ex. ssh gpfs01 . )

$ ssh-keygen -t rsa
(all node need this step)

$ cat ~/.ssh/id_rsa.pub >> ~/.ssh/authorized_keys
$ cat /tftpboot/nodes/{client ip}/root/.ssh/id_rsa.pub >> ~/.ssh/authorized_keys
(all node public key must add to this authorized . ex. cat /tftpboot/nodes/192.168.1.1/root/.ssh/id_rsa.pub >> ~/.ssh/authorized_keys)

$ cp ~/.ssh/authorized_keys  /tftpboot/nodes/{client ip}/root/.ssh/
$ cp ~/.ssh/known_hosts  /tftpboot/nodes/{client ip}/root/.ssh/
(this two step must cp to all node)
Note:If you meet problem (ex. don't auto login), (1)check your /etc/hosts or ssh config file (2) restart client's ssh service or reboot client.
5.2 Config GPFS Environment
First, check your /etc/hosts to know your machine information.
this's our /etc/hosts content:
(
192.168.1.254 gpfs00
192.168.1.1 gpfs01
192.168.1.2 gpfs02
192.168.1.3 gpfs03
192.168.1.4 gpfs04
192.168.1.5 gpfs05
192.168.1.6 gpfs06
192.168.1.7 gpfs07
)

$ mkdir /home/gpfs

$ vim gpfs.nodes
Edit your node information. you can refer to your /etc/hosts.
You can assign “quorum” to your GPFS Server.
(
gpfs00:quorum
gpfs01:quorum
gpfs02:
gpfs03:
gpfs04:
gpfs05:
gpfs06:
gpfs07:
)

$vim gpfs.disks
Before vim this file. you must know how many hard disks want to use. Because our environment is DRBL, so we can use client's all disk.
This is our disk information:
(
/dev/sda:gpfs01::dataAndMetadata::
/dev/sdb:gpfs01::dataAndMetadata::
/dev/sda:gpfs02::dataAndMetadata::
/dev/sdb:gpfs02::dataAndMetadata::
/dev/sda:gpfs03::dataAndMetadata::
/dev/sdb:gpfs03::dataAndMetadata::
/dev/sda:gpfs04::dataAndMetadata::
/dev/sdb:gpfs04::dataAndMetadata::
/dev/sda:gpfs05::dataAndMetadata::
/dev/sdb:gpfs05::dataAndMetadata::
/dev/sda:gpfs06::dataAndMetadata::
/dev/sdb:gpfs06::dataAndMetadata::
/dev/sda:gpfs07::dataAndMetadata::
/dev/sdb:gpfs07::dataAndMetadata::
)
5.3 Run GPFS
$ cd /home/gpfs
$ mmcrcluster -n gpfs.nodes -p  gpfs00 -s gpfs01 -r `which ssh` -R `which scp`
(
-n: Node file
-p: Primary Server
-s: Secondary Server
-r: Remote shell
-R: Remote cp
)

$ mmlscluster
$ mmlsnode
this two command can see your gpfs node information and check your mmcrcluster command.
Our display:
(
gpfs-server:/home/gpfs# mmlsnode
GPFS nodeset    Node list
-------------   -------------------------------------------------------
   gpfs00       gpfs00 gpfs01 gpfs02 gpfs03 gpfs04 gpfs05 gpfs06 gpfs07
)


$ mmcrnsd -F gpfs.disks
(
-F: disk file
)
Setup your disk.

$ mmlsnsd
check your disk information.
Our display:
(
gpfs-server:/home/gpfs# mmlsnsd
File system   Disk name    Primary node             Backup node
---------------------------------------------------------------------------
 gpfs0         gpfs1nsd     gpfs01
 gpfs0         gpfs2nsd     gpfs01
 gpfs0         gpfs3nsd     gpfs02
 gpfs0         gpfs4nsd     gpfs02
 gpfs0         gpfs5nsd     gpfs03
 gpfs0         gpfs6nsd     gpfs03
 gpfs0         gpfs7nsd     gpfs04
 gpfs0         gpfs8nsd     gpfs04
 gpfs0         gpfs9nsd     gpfs05
 gpfs0         gpfs10nsd    gpfs05
 gpfs0         gpfs11nsd    gpfs06
 gpfs0         gpfs12nsd    gpfs06
 gpfs0         gpfs13nsd    gpfs07
 gpfs0         gpfs14nsd    gpfs07
)

$ mmstartup -a
this command can load all GPFS module and start GPFS services.

$ mmgetstate
$ tsstatus
This two command to check your GPFS service.
5.4 Mount GPFS and Enjoy Large Spaces
$ mmcrfs /home/gpfs_mount gpfs0 -F gpfs.disks -B 1024K -m 1 -M 2 -r 1 -R 2
(
-F: Disk File
-B: Block size
-m: Default Metadata Replicas
-M: Max Metadata Replicas
-r:  Default Data Replicas
-R: Max Data Replicas
If you want to enable fail tolerance, you -m and -r value must setup 2.
)

$ mmmount /dev/gpfs0 /home/gpfs_mount -a

$ df
check your disk volume. Below is our display:
(
gpfs-server:/home/gpfs# df -h
Filesystem            Size  Used Avail Use% Mounted on
/dev/sda1              19G  7.2G   11G  41% /
tmpfs                 1.5G     0  1.5G   0% /lib/init/rw
udev                   10M   68K   10M   1% /dev
tmpfs                 1.5G  8.0K  1.5G   1% /dev/shm
/dev/sdb1             294G   13G  266G   5% /home/mount
/dev/gpfs0            3.1T  137G  3.0T   5% /home/gpfs_mount
)
6. Reference
Attachments (3)
-
.config
(71.5 KB) -
added by rock 18 years ago.
kernel 2.6.20 .config for GPFS
- How to Deploy GPFS Nodes Massively using DRBL.pdf (27.8 KB) - added by rock 18 years ago.
-
drbl_environment.png
(9.6 KB) -
added by rock 18 years ago.
our DRBL environment
Download all attachments as: .zip